The Longer LK5 Pro is a budget-friendly FDM 3D printer that offers an exceptionally large build volume without a hefty price tag. With a spacious 300 x 300 x 400 mm build area, this machine targets makers who want to print big projects – whether that’s full-size cosplay helmets, architectural prototypes, or multiple parts in one go – all on a budget. Now upgraded with a dual Z-axis system for improved stability, the LK5 Pro aims to address some of the shortcomings of its original design and deliver more reliable performance for large-scale prints.
In this in-depth review, we focus on the Longer LK5 Pro with the dual Z-axis upgrade. We’ll explore its design, assembly experience, key features, and real-world print performance. From its sturdy triangular frame and silent stepper drivers to the new dual Z-axis modification, we’ll see how this printer stands out in the crowded field of affordable large-format 3D printers. By the end, you’ll have a clear understanding of this printer’s strengths and weaknesses – and whether the Longer LK5 Pro (Dual Z-Axis Edition) is the right choice for your workshop.
Key Specifications
- Printing Technology: Fused Deposition Modeling (FDM)
- Build Volume: 300 × 300 × 400 mm (11.8″ × 11.8″ × 15.7″)
- Frame Design: Open-frame Cartesian (rigid aluminum frame with triangular support rods)
- Dual Z-Axis: Yes – upgraded dual lead screws with dual stepper motors for Z-axis stability
- Extruder Type: Bowden feeder with 0.4 mm nozzle (single extruder)
- Hot End Temperature: Up to 250 °C (PTFE-lined hot end)
- Heated Bed: Textured glass build plate, up to ~75 °C (for PLA, PETG; not ideal for high-temp materials)
- Layer Resolution: 0.1 – 0.4 mm (100 – 400 microns) adjustable
- Print Speed: Recommended ~60 mm/s (up to 180 mm/s maximum travel speed)
- Supported Filaments: 1.75 mm PLA, PETG, TPU (flexibles at lower speeds), and limited ABS (small prints only, due to bed temp)
- Leveling System: Manual bed leveling (assisted via on-screen prompts; optional auto-level sensor upgrade available)
- Mainboard & Drivers: 8-bit open-source board (Atmega2560) with TMC2208/TMC2209 silent stepper drivers (X, Y, Z axes), A4988 driver on extruder
- Display & UI: 4.3-inch full-color touchscreen (intuitive icon-based interface)
- Connectivity: MicroSD (TF) card slot and USB type-B port (for direct PC connection)
- Firmware: Open-source Marlin-based firmware (user-upgradeable; supports mods like BLTouch, etc.)
- Additional Features: Filament run-out sensor, power-loss resume function, 90% pre-assembled kit design
- Physical Dimensions: ~580 x 540 x 663 mm assembled footprint
- Machine Weight: ~12 kg
Assembly and Setup Experience
The Longer LK5 Pro comes as a mostly pre-assembled kit, but putting it together still requires some time and patience. The printer is about 90% pre-assembled out of the box – major components like the base, gantry, and print head come partially built. However, you’ll need to attach the vertical frame to the base, install the crossbar (X-axis gantry) onto the Z-axis uprights, mount the touchscreen, and connect various cables, among other steps. In total, assembly can take roughly 30–60 minutes for most users.
Unboxing: The LK5 Pro is well-packaged in foam to protect the parts. You’ll find all the necessary components and tools in the box, including the frame pieces, the print head assembly, a spool holder, supporting rods, the glass build plate, and a bag of screws and hex wrenches. Longer even includes a small sample coil of PLA filament (only enough for a test print or two) and a microSD card with a card reader. The inclusion of assembly tools and spare screws is helpful for getting started immediately.
Instructions: The assembly manual uses diagrams to illustrate each step. While the visual instructions are appreciated, they could be clearer – some images are small or vague, which means you might double-check orientation and screw placements to ensure everything goes together correctly. If you’re an experienced builder of 3D printers, the process is straightforward albeit a bit more involved than some other semi-assembled machines. Beginners might find the lack of detail in certain steps frustrating, but taking it slow and referencing online videos or forums can help clarify any confusion.
Assembly Process: Building the LK5 Pro involves bolting the uprights (vertical frame) to the base, attaching the X-axis gantry (which holds the extruder carriage) onto the Z-axis rails, and securing the two diagonal stiffener rods that give the frame its triangular rigidity. You also install the Z-axis lead screw and stepper motor (on the left side by default), the filament runout sensor (usually mounted on top of the frame), and the spool holder. Most components align via the extrusion profiles and T-nuts, and it’s crucial to tighten everything square. Unlike some printers that have machined grooves or pin alignments, the LK5 Pro’s frame relies on the builder to align the pieces correctly. There are no pre-machined notches to perfectly seat the gantry at 90°, so squaring the frame is something you need to pay attention to during assembly. A carpenter’s square or even measuring tape to ensure equal distances on both sides can be useful here.
Time and Difficulty: Expect to spend a bit longer assembling the LK5 Pro compared to an average budget printer (for example, an Ender 3 or Anycubic Kobra). This is mainly due to the larger number of components (those reinforcing rods, separate touch screen, etc.) and the careful alignment required. Removing protective wrappings from the rods and other parts can also take a few extra minutes. None of the steps are technically difficult – it’s mostly basic screwing and plugging in cables – but the sheer size of the machine means you’ll benefit from having a spacious area to work in. It’s recommended to assemble it on a flat surface to help with squaring the frame.
Initial Setup: Once the hardware is assembled, you’ll need to level the bed before printing. The LK5 Pro does not have automatic bed leveling out of the box, so manual leveling is necessary (we’ll cover this in detail in the Print Bed section below). The printer’s touch interface provides a guided leveling routine: it can move the nozzle to each corner and the center, prompting you to adjust the bed leveling knobs at each point. This guided process is very handy for first-time users.
After leveling the bed and loading filament into the extruder, the LK5 Pro is essentially ready for its first print. The microSD card comes with a test model (such as a calibration cube or small demo print) so you can quickly verify that everything is working. Make sure to double-check that the X-axis gantry is level across both sides (the dual Z-axis upgrade, if installed, helps keep this aligned, but if you only had a single Z motor it would be critical to manually level the gantry by measuring its height on both left and right before printing). With the dual Z-axis system in place, the gantry should lift evenly on both sides, simplifying this step.
Overall, assembling the Longer LK5 Pro is a moderately involved process but certainly achievable for hobbyists. If this is your first 3D printer build, be prepared to consult the instructions closely and take your time. The reward is a very solid, large machine once everything is tightened and squared up. With assembly completed, you can move on to fine-tuning and exploring the printer’s features.
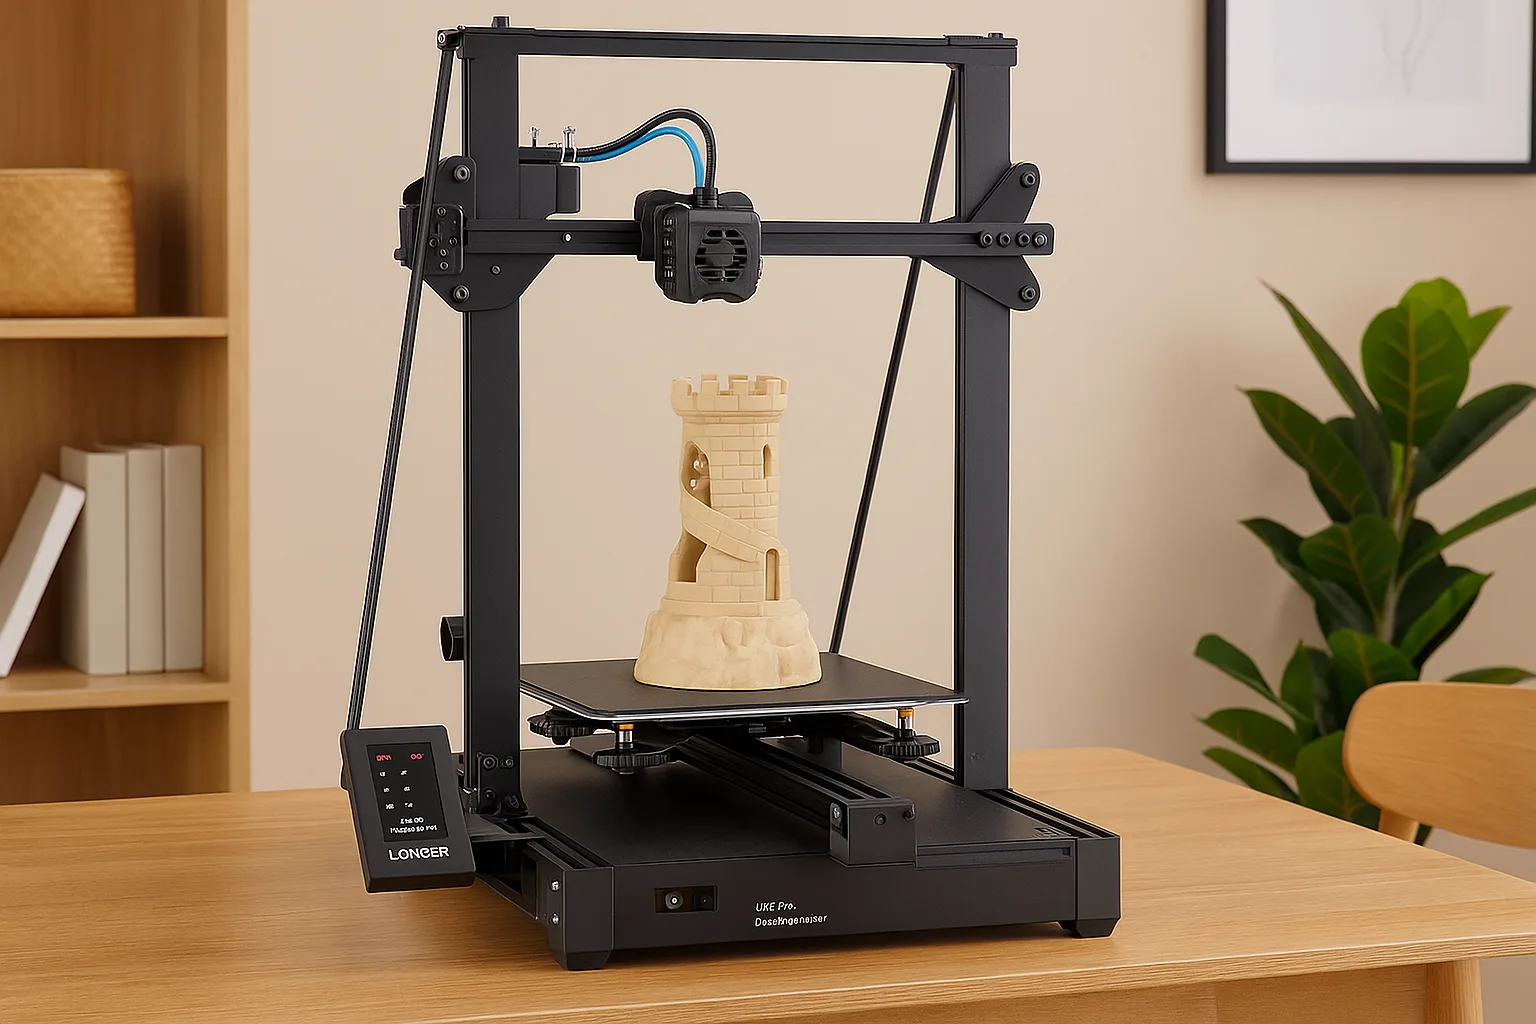
Frame and Construction Quality
The Longer LK5 Pro features a classic open-frame Cartesian i3-style design, scaled up to accommodate its large build volume. The frame is constructed from V-slot aluminum extrusions, giving it a sturdy yet lightweight structure. At first glance, the machine’s construction appears solid, and Longer has implemented a few design elements to enhance stability given the printer’s size.
All-Metal Frame: All major structural components are made of aluminum alloy. The base of the printer is a rectangular aluminum chassis that holds the Y-axis assembly (bed carriage), power supply, and mainboard. Two upright extrusions form the vertical towers on the left and right, supporting the X-axis gantry that travels up and down on the Z-axis. The use of metal extrusions results in a rigid frame that can handle the motions of printing without excessive wobble. However, it’s important that the frame is assembled squarely (as noted above) to fully realize this rigidity.
Triangular Reinforcement Rods: One standout feature of the LK5 Pro’s design is the inclusion of dual diagonal support rods (also called pull rods or stiffener rods) that connect the top of the frame to the base at an angle. These two metal rods form triangular supports on each side of the printer. This triangular geometry greatly increases the overall stability of the frame, especially for a tall printer. When printing large or tall objects, the reinforcing rods prevent the Z-axis from swaying and reduce vibrations. Not all printers in this price class include such supports (for example, some competitors omit them to save cost), so Longer’s decision to add them is a big plus for print quality when utilizing the full height of the build volume.
Elevated Base and Component Placement: Unlike some smaller printers that have an external control box, the LK5 Pro’s electronics are integrated into the base of the machine. The base is lifted on short extruded “legs” at each corner – essentially, segments of aluminum extrusion act as feet to raise the machine off the table. This provides clearance for the power supply unit (PSU) and mainboard, which are housed underneath the build platform. The power supply is mounted beneath the build plate area, and the controller board is enclosed alongside it. This integrated design saves space and makes the printer footprint self-contained (no separate control box dangling off to the side). The raised feet are tall enough to ensure adequate airflow to the electronics and to accommodate the PSU’s fan.
One thing to note is that these aluminum “feet” do not have rubber pads by default. On a smooth surface, the printer can slide or vibrate slightly during fast movements. Some users have improvised by adding stick-on rubber feet or placing the printer on a rubber mat or carpet to dampen vibrations. In our experience, once the heavy machine is loaded with filament and a glass bed, it tends to stay put, but adding some anti-slip padding under the feet is a good idea for extra stability and to prevent any “walking” movement on smooth workbenches.
Build Quality and Finish: Given its budget-friendly nature, the LK5 Pro’s build quality is generally good, but there are a few minor cost-cutting aspects visible on close inspection. The black aluminum extrusions are cut to length and painted (or anodized), but on some units there might be small scratches or cosmetic scuffs straight out of the box. These are typically minor and don’t affect function. The screws and brackets all fit, though occasionally threads might feel a bit tight (possibly due to paint in the threading or slightly loose tolerances). For example, when removing the electronics bay cover or adjusting certain brackets, you might find some screws require a bit of force – this suggests the threading isn’t as smooth as on higher-end machines. It’s not a major problem but indicates that manufacturing tolerances are a bit loose in places.
Similarly, the sheet metal cover for the electronics (on the bottom of the base) may not sit perfectly flush without some adjustment. In our assembly, we noticed that to reattach the metal bottom cover after inspecting the mainboard, a little bending or pressure was needed to line up the screw holes. These little quirks don’t prevent the printer from operating, but they remind you that this is a value-priced device.
Power Supply Mounting and Upgrade Consideration: With the new dual Z-axis upgrade, one structural change is worth mentioning. Originally, the LK5 Pro had a single Z-axis leadscrew on the left side. The optional dual Z-axis kit(which we detail in the next section) adds a second leadscrew and stepper motor on the right side. To accommodate this, the kit provides a metal power supply relocation bracket. The power supply, which was originally fixed to the right vertical extrusion, gets moved slightly or remounted with a metal L-bracket so that the new right-side Z leadscrew can be installed without interference. This bracket is robust and holds the PSU securely to the frame, effectively making the PSU part of the base structure. The result is that even after the upgrade, the printer’s frame remains solid – in fact, the added leadscrew and its top mounting bracket further tie the top of the right vertical extrusion to the frame, potentially adding a bit more rigidity on that side.
Overall, the frame and construction of the Longer LK5 Pro are impressively sturdy for the price point. The design addresses the challenges of a large format printer by reinforcing the frame and integrating components neatly. There are a few rough edges in terms of finish and the need for careful assembly, but once built, the LK5 Pro feels substantial and well-planted. It’s a machine you can trust to not wobble or vibrate excessively, which is crucial when printing large objects over many hours.
Dual Z-Axis Upgrade: Enhanced Stability
One of the major improvements we’re focusing on in this review is the dual Z-axis upgrade for the Longer LK5 Pro. The stock LK5 Pro originally comes with a single Z-axis leadscrew and motor (positioned on the left side of the frame). While a single Z-axis is common in many printers, on a machine with this size and width, it can lead to a slightly uneven lifting of the X-axis gantry. The far right side of the gantry is essentially “unsupported” in the original design and can sag or wobble, especially if there’s any play in the wheels or if the printer moves quickly. This can manifest as the X gantry leaning or as subtle layer inconsistencies (Z-banding) in prints.
Why Dual Z-Axis Matters: By upgrading to a dual Z-axis system, the printer gains a second leadscrew and stepper motor on the right side of the frame, mirroring the one on the left. This means both ends of the heavy X-axis gantry are now driven up and down in sync. The benefits are immediately noticeable:
- Improved Stability: With two support points, the X-axis stays perfectly level relative to the bed as it moves. There’s far less chance of the gantry tilting or one side lagging behind, even slightly. This translates to more consistent layer thickness across the entire build platform.
- Reduced Wobble and Z-Banding: The dual Z motors help minimize any Z-axis “vibration” or wobble that might occur during printing. In the single Z configuration, rapid movements or higher speeds could induce a slight oscillation in the unsupported side. The second leadscrew essentially locks the gantry in position, preventing such oscillation. As a result, issues like Z-banding (ripples on the surface of prints aligned with Z motion) are greatly reduced or eliminated. Prints, especially tall ones, come out with smoother sides and more uniform layer stacking.
- Easier Bed Leveling Maintenance: Once the bed is leveled, the dual Z system keeps the X-axis level with respect to the bed for longer. On single Z printers, over time or after many prints, the X-axis can drift to one side (due to weight or minor slip), meaning you’d have to re-level or “tram” the gantry occasionally. With dual Z motors lifting together, the gantry’s level doesn’t drift out of alignment easily. Both ends move together whenever Z position changes. This consistency means you won’t need to tweak the Z height on one side manually to maintain levelness.
- Handling Weight and Upgrades: If you plan on future upgrades like a heavier direct drive extruder or adding accessories (e.g., an LED light bar or a second extruder) on the X gantry, a dual Z-axis provides the necessary support. The twin motors can better handle additional weight without straining. There’s no worry about the gantry sagging on one side under extra load.
The Upgrade Kit: Longer provides an official Dual Z-axis Upgrade Kit for the LK5 Pro, which includes everything needed: a second stepper motor (identical to the original Z motor), a second leadscrew and coupling, a top mounting bracket to hold the new leadscrew in place at the top of the frame, a synchronized splitter cable (to drive both Z motors from the mainboard), and a metal bracket for repositioning the power supply. The kit is designed to be bolt-on – the right-side vertical extrusion has pre-drilled holes where the top bracket and motor can be mounted. Installing the kit is relatively straightforward if you already have the printer assembled: you attach the new stepper motor to the bottom right of the frame, install the leadscrew through the X-axis gantry’s right side (there is a threaded hole in the gantry mount ready for it), secure the top of the leadscrew with the bracket at the top of the frame, and connect the stepper motor to the control board (either via a second Z-axis driver port or using the provided splitter to run two motors from the one Z driver output).
Synchronization: With two Z motors, keeping them in sync is important. The LK5 Pro’s mainboard handles this by simply driving both motors in parallel. Whenever a Z movement is commanded, both stepper motors receive the same signals and step simultaneously. This electrical parallel setup works well for moderate speeds and ensures the motors lift in unison. One thing users should do after installing the kit is to manually ensure the X gantry is level before the first print – this means turning one of the leadscrews by hand (with the machine off) if needed to make both sides of the gantry equidistant from the bed. Once initially aligned, the dual Z motors should maintain that alignment through normal operation. In practice, we found that after the upgrade, the gantry stayed level between prints with no need for constant re-checking.
Results After the Upgrade: Printing with the dual Z-axis in place confirms the expected improvements. For example, tall cylindrical prints and large boxy objects showed no sign of Z-wobble or slanting; the layer lines were straight and even across the whole width of the print. Previously, on a single Z setup, you might notice one side of a large cube having slight variations at certain layer heights (if the gantry had flexed) – that artifact is essentially gone. The overall dimensional accuracy on the X-axis improved at the far right edge of the build plate, meaning the last few centimeters of the build volume are just as usable as the rest (with single Z printers, sometimes the extreme far side can be marginally lower or less consistent if the gantry sags).
Bed leveling also held longer. We did not need to frequently re-level the bed between prints; the dual Z kept everything aligned, so unless we physically moved the printer or accidentally knocked something, the bed stayed trammed relative to the nozzle.
Noise and Load Considerations: Adding a second Z motor did not noticeably increase the noise of the printer – the Z motors only operate during Z movements (layer changes or homing) which are intermittent and generally quiet due to the use of silent stepper drivers. However, running two stepper motors off one driver (if using the splitter) means the driver and power supply handle a bit more current. The LK5 Pro’s stepper drivers and PSU are sufficiently rated for this extra load (the Z motors typically draw relatively low current anyway, and they move infrequently). We did not experience any missed steps or overheating on the driver during our tests. The upgrade kit retains the design of two independent lead screws without introducing a linking belt; this is beneficial because it allows each side to self-adjust and there’s no mechanical coupling that could potentially introduce backlash.
In summary, the dual Z-axis upgrade transforms the Longer LK5 Pro into a more reliable and precise machine for large prints. It tackles one of the primary criticisms of the stock model (gantry instability on one side) and does so with a cost-effective add-on. If you’re purchasing a new LK5 Pro, it’s highly recommended to either get the version that includes the dual Z-axis, or plan to install the upgrade kit yourself. The difference in print quality and peace of mind is well worth it, especially if you intend to utilize the full build volume or print at higher speeds. This upgrade truly solidifies the LK5 Pro’s status as a large-format printer that punches above its weight in performance.
Extruder and Hot End
The Longer LK5 Pro uses a Bowden-style extruder feeding a single hot end. This means the extruder motor is mounted on the frame (at the left side of the X-axis gantry), pushing filament through a PTFE tube that leads to the hot end on the moving print head. This setup reduces the weight on the moving print head, allowing for faster movements with less inertia, which is beneficial for a large printer. However, Bowden extruders have some trade-offs compared to direct drive systems.
Bowden Extruder Setup: The extruder unit itself on the LK5 Pro is a straightforward design. In early versions of the LK5 Pro, the extruder had a plastic body and lever mechanism, but newer units and upgrade kits often include a sturdier red metal extruder feeder. The metal extruder upgrade (if included) improves durability and grip on the filament, reducing the chances of the extruder gear slipping or the lever breaking (a common issue on some printers with plastic extruder levers over time). Even with the stock plastic extruder, feeding filament is easy: you insert the filament into the run-out sensor, then into the extruder intake, and manually push it through while pressing the spring-loaded lever to guide it into the Bowden tube.
The extruder gear provides sufficient torque to drive 1.75 mm filament through roughly 50-60 cm of Bowden tube to the hot end. It’s a single-gear design (not dual-geared like some high-end extruders), but it gets the job done for PLA and PETG at normal print speeds. The Bowden setup is tuned for the lightweight printhead approach, which works well for the LK5 Pro’s large movements.
Hot End Design: The hot end on the LK5 Pro is a typical MK8-style design with a 0.4 mm brass nozzle by default. It uses a heater block, heater cartridge, and thermistor, with a finned heatsink above it. Importantly, it’s a PTFE-lined hot end, meaning a PTFE (Teflon) tube runs inside the heat break down to the nozzle. This limits the maximum temperature to about 250 °C, because beyond that the PTFE can degrade. In practical terms, this allows the printer to handle common materials like PLA, PLA+, PETG, and TPU, and perhaps some lower-temperature ABS or ASA variants, but it’s not meant for high-temperature filaments like polycarbonate or nylon. The printer’s firmware typically caps the nozzle at 250 °C for safety, which aligns with the hardware.
The heatsink is cooled by a dedicated 40mm fan on the side of the print head, which runs whenever the hot end is heated. This keeps the upper part of the hot end cool to prevent jams. We found the thermal management to be adequate – we did not experience heat creep or clogs during normal operation, as long as the print temperatures and cooling were set properly.
Maintenance: The Bowden extruder and hot end assembly on the LK5 Pro are relatively easy to maintain. Clearing a clog, for instance, typically involves removing the Bowden tube from the hot end (via the push-fit coupling) and either feeding filament through to push out debris or, in tougher cases, disassembling the throat to clean it. The Bowden tube should be periodically checked and cut fresh if the ends get scorched or deformed over time from heat. Since the extruder is Bowden, retraction settings in your slicer will need to be higher (usually around 5-6 mm retract distance at ~45 mm/s) to compensate for the elasticity and length of the tube. The PTFE tube provided is of decent quality and fits snugly, but upgrading to a higher-grade PTFE (like Capricorn tubing) can slightly improve filament feeding consistency, especially for flexible filaments.
Printing with Flexible Filaments: Bowden extruders are generally less ideal for very flexible filaments like TPU because the long tube can cause delay and compression, making extrusion less precise. The LK5 Pro is no exception – while it can print TPU, you will need to print slowly (often 20-30 mm/s) and may need to tweak settings to avoid filament binding in the tube. The filament path does have a PTFE liner all the way, which helps guide flexibles, but some stringing and blobbing is expected with TPU on this machine. For occasional flexible prints, it’s workable; if you frequently print flexibles, a direct drive mod or a different printer might be preferable.
Extruder Noise and Drivers: Thanks to the TMC silent drivers on the axes, the motion of the printer is quiet, but one area of noise can be the extruder motor. On the LK5 Pro, the X, Y, and Z axes use silent stepper drivers, but the extruder motor is driven by a more conventional driver (A4988 on many units). This means when the extruder is feeding filament, you might hear a mild stepper buzz or click from that motor. It’s not overly loud, and during printing the fan noise usually masks it, but it’s a difference to note – the printer’s movements are whisper-quiet, with the only stepping noise coming from extrusion. Some advanced users have modded their printers to use a silent driver for the extruder as well, but out-of-box this is a minor observation rather than a serious issue.
Hot End Performance: The hot end heats up reasonably quickly. From room temperature to around 200 °C (typical PLA printing temp) takes about 2–3 minutes. The maximum of 250 °C is reached in a few more minutes if needed. The heater is 40W which is standard, and it maintains temperature well for typical printing speeds. We did long prints (10+ hours) at 210 °C without any temperature fluctuation issues – the firmware’s PID tuning seems on point. The included 0.4 mm nozzle provides a good balance of detail and speed. If you want to swap nozzles, the LK5 Pro’s hot end is compatible with common MK8 nozzles, so you can use different sizes (just remember to recalibrate your slicer settings accordingly). Always heat the hot end to around 220 °C before attempting to unscrew the nozzle for replacement (and be cautious, using proper tools, as the heater block will be hot).
All-Metal Hot End Upgrade (Optional): For users who want to print hotter materials, it is possible to upgrade the LK5 Pro’s hot end to an all-metal variant (one that doesn’t have PTFE going all the way to the nozzle). This would allow temperatures of 280–300 °C, opening the door to materials like ABS, ASA, or Nylon (though the bed temperature and open frame still limit ABS/Nylon utility). Installing an all-metal hot end is a custom upgrade that some enthusiasts do, but it’s not necessary for the typical use-cases of this printer. Given the machine’s focus on PLA/PETG and its lack of enclosure, most users stick to the stock hot end.
In summary, the extruder and hot end on the Longer LK5 Pro are simple and effective, aligned with its budget nature. The Bowden extruder keeps the moving mass low, which helps with print speeds on a large machine, but it requires careful tuning for optimal retractions and isn’t the best for ultra-flexible filaments. The hot end is capable for standard materials and produces good results at up to 0.1 mm layer heights. While it may lack the premium touches of more expensive printers (like dual-gear extruders or all-metal hotends), it performs well for the intended materials and print sizes. For the vast majority of PLA and PETG prints – which is what this printer will excel at – the stock extruder and hot end combination works without drama.
Cooling System and Fans
Proper cooling is critical for achieving good print quality, especially with PLA filament. The Longer LK5 Pro is equipped with a part cooling fan and a fan duct to direct air onto the freshly extruded plastic. Let’s break down the cooling setup:
Part Cooling Fan (Stock): Out of the box, the LK5 Pro comes with a single 5015 radial blower fan mounted on the print head. This fan blows air through a plastic duct towards the nozzle tip. The idea is to rapidly cool the extruded filament as it leaves the nozzle, which helps with bridging, overhangs, and overall print detail. The stock duct design on early units was a simple one-sided outlet – meaning it directed air from one side of the nozzle. Some early reviewers noted that this cooling setup was underwhelming, leading to less crisp performance on overhang tests and some stringing on fine details, presumably because airflow didn’t evenly surround the print.
However, it appears that Longer listened to feedback: newer production units and available upgrades feature an improved fan duct or even an optional second fan. The manufacturer has released a “New Dual Blower” kit for the LK series, which in the context of the LK5 Pro means you can attach a second 5015 blower on the opposite side of the hot end for more balanced cooling. In fact, many recent Longer LK5 Pro packages include the upgraded dual-fan duct as standard (the product is often advertised as coming with an “upgraded dual blower kit” in marketing). Essentially, Longer recognized that print quality could benefit from better cooling and provided an official solution.
Cooling Performance: Using just the single stock blower, we found cooling to be adequate for most prints done at moderate speeds. Small PLA prints with fine details did show some minor “softness” on features like very small pillars or sharp edges, indicating the cooling could be stronger. When printing a calibration bridge test, the stock fan managed decently up to a point, but sagging on long unsupported spans was evident beyond ~60 mm lengths. Overhangs printed at 45° were generally fine, but steeper overhangs (~60° or more) had a bit of drooping on the underside, a sign that the plastic wasn’t solidifying fast enough in mid-air. These results are expected for a single-fan setup on a large printer; it’s serviceable but not exceptional.
Dual Blower Upgrade: We installed the official Longer Dual Blower Fan Kit on our LK5 Pro, which adds a mirror-image fan on the other side of the hot end and a Y-shaped duct that channels air from both sides onto the nozzle. The difference in cooling performance was noticeable. With the dual fans, prints that previously showed slight sagging on overhangs came out much cleaner. Bridging performance improved as well – the filament had less time to droop between support points because it was being cooled from both sides. Essentially, the airflow envelops the print more evenly, eliminating the “shadow” that a single fan on one side can leave on the far side of the print.
For example, when printing a tall thin tower (which is a torture test for cooling because each layer is small and needs to solidify before the next one is laid), the dual fan setup prevented the top of the tower from staying too soft – we observed no heat-induced blobbing and the layers remained well-defined. Under the single fan, that same print had a slight melted look at the very tip because the layer didn’t cool fully before the next was deposited.
Fan Noise: The cooling fans (both the part cooling blower and the hot end heatsink fan) produce a constant humming sound during operation. They are not overly loud individually, but since there are multiple fans (power supply fan, control board fan, hotend fan, part cooling fan(s)), the cumulative noise is a soft whoosh. Longer seems to have chosen fans that prioritize low noise, which also means they might not be as high in airflow as some aftermarket fans. Indeed, the relative quietness of the machine can partly be attributed to fans that are not extremely high output. This is a bit of a double-edged sword: quieter operation is great, but as noted, the stock part cooling isn’t the most powerful. With the dual fan upgrade, because you effectively double the airflow while each fan still runs at its quiet level, you get improved cooling without a big jump in noise. Even with two 5015 blowers, the LK5 Pro remains quite reasonable in sound – the fans produce a gentle whoosh rather than a high-pitched scream.
Electronics Cooling: Inside the base, the power supply has its own fan, and the control board area is ventilated by a small fan as well. These internal fans ensure components don’t overheat during long prints. We did 15+ hour prints and never encountered thermal issues; the electronics stayed within safe temperatures, indicating the internal cooling is sufficient. Just ensure the printer’s bottom vents are not blocked and that there’s some space for air to flow underneath.
Recommendation: If you plan to print primarily with PLA and want the best detail and bridging results, consider using the dual blower configuration. Many users of the LK5 Pro report that this upgrade significantly improves print surface quality on challenging features like overhangs and bridges. If your unit didn’t come with the dual cooling fans pre-installed, Longer sells the kit separately, and there are also community-designed fan ducts available for download that can hold two fans or re-optimize the airflow. Installing a second fan or a better duct is a beginner-friendly modification that can yield immediate quality benefits.
In conclusion, the LK5 Pro’s cooling system works decently out of the box for general purpose printing, but it has room for improvement. It’s understandable that Longer shipped a single fan to keep costs down. The good news is that the printer’s design allows easy upgrades in this area. With optimal cooling (either through the official dual-fan kit or custom mods), the printer is well-equipped to handle fine details and tricky geometries, which complements its ability to print large models without sacrificing quality on the smaller features.
Heated Bed and Build Surface
A large-format printer is only as good as its build platform, and the Longer LK5 Pro provides a spacious bed with some useful features – albeit with a few limitations to be aware of.
Build Surface: The LK5 Pro comes with a textured glass bed (often referred to as a Carborundum glass plate or tempered glass with a micro-porous coating). This glass sheet sits atop the aluminum heated bed and is held in place with four clips, one on each side of the bed. The textured glass has become popular in recent years because it offers a great combination of adhesion and easy part removal: when hot, PLA sticks well to the textured surface, and as the bed cools down, prints typically release with little effort. In our experience, PLA and PETG adhered strongly at their respective bed temperatures (60 °C for PLA, ~70 °C for PETG) – we saw no issues with corners lifting or prints coming loose mid-way, as long as the bed was properly leveled. When the print finished and the bed cooled near room temperature, small prints popped off with a gentle tap, while larger ones needed a slight prying with the provided scraper but came off intact without damaging the surface.
One advantage of Longer’s approach is that the glass plate is removable and not permanently bonded to the heater. Some printers fuse the glass to the heater PCB, but here you can remove the glass for cleaning or replacement. If the glass ever gets chipped or you prefer a different surface (like a flexible spring steel sheet with PEI coating), you can simply unclamp the stock glass and swap in a 300×300 mm aftermarket surface.
Bed Heating Performance: The heated bed is powered by the printer’s 24V system and is a large square to cover 300×300 mm. However, one thing to note is that the bed’s heating element, combined with the stock power supply, can only achieve about 75 °C in practice. Longer might advertise a somewhat higher maximum, but in our testing (and reports from other users), the bed struggles to go much beyond 70–75 °C even if set to 100 °C in the software. It appears the heater is somewhat underpowered for the size (likely in the 220–280W range) and there is no insulation underneath the bed to help it retain heat. The result is that for materials like PLA and PETG, which typically print with bed temperatures in the 50–70 °C range, the LK5 Pro’s bed works fine. It reaches 60 °C in roughly 3 minutes and holds that temperature without issue during prints. The temperature distribution is mostly okay for PLA: a thermal camera image of the bed shows that the center and most of the area around it heat evenly, though the very edges and one side might be a few degrees cooler. We did notice that the left side of the bed (when facing the printer) was a bit cooler than the right in one test – possibly due to how the heater traces are laid out or slight differences in clamping pressure. This didn’t significantly affect our prints, but it’s good practice to place very large prints centered or to be mindful if one corner has adhesion issues.
For ABS or other high-temp filament, the limitation of ~75 °C means the bed won’t be hot enough to reliably prevent warping, especially given the printer is not enclosed. ABS typically benefits from 90–110 °C bed and an enclosed environment. The LK5 Pro is an open-frame machine and can’t maintain those higher bed temps, so it’s effectively not intended for large ABS prints. Small ABS parts might be possible (especially if you shield the print from drafts or use a makeshift enclosure), but this printer is really optimized for PLA, PETG, and similar materials.
Manual Bed Leveling: Leveling the bed is done via the classic four-corner knob system. Under each corner of the heated bed, there is a spring and a large thumbscrew. By tightening or loosening these knobs, you adjust the distance between the bed surface and the nozzle. The LK5 Pro’s large bed has big adjustment knobs that are easy to grip, which is nice given how often you may need to tweak leveling on any printer without auto-leveling. During initial setup, you’ll use a piece of paper or feeler gauge at the four corners (and center) to ensure the nozzle is just above the bed with slight friction on the paper. The printer’s touch screen can assist by moving the nozzle to preset points one at a time. We found that after the first leveling and a few test prints, a minor re-adjustment was needed (this is common as the springs settle and the machine’s parts wear in). After that, the leveling stayed relatively stable, especially with the dual Z-axis keeping the gantry level. It’s still wise to check the bed level every dozen prints or if you move the printer to a new location, but the LK5 Pro doesn’t require constant fiddling once dialed in.
One drawback in the bed construction is the absence of a strain relief for the bed’s power cable. The wires that heat the bed move back and forth with the Y-axis and are only secured by a simple bracket; there was no factory-installed strain relief clip or guide beyond a printed part suggestion in the manual. Over many cycles, a moving cable without proper strain relief can fatigue and potentially break, which is a safety hazard. As a proactive measure, we highly recommend printing and installing a small strain relief bracket (if Longer hasn’t already included one in your kit) to secure the bed cables and reduce stress on the solder joints. This will prolong the life of the bed wiring and is an easy upgrade for peace of mind.
Bed Adhesion and Use Tips: The glass surface generally provides great adhesion when clean. Fingerprints or oils can reduce stickiness, so you should periodically clean the glass with isopropyl alcohol or a mild glass cleaner. Before a big print, wiping the bed down ensures the first layer sticks well. Also, keep the bed clips in mind when printing – they extend a little onto the bed, so either position your print slightly away from the corners in your slicer or use only two clips on opposite sides once the bed is leveled (some users remove the front clips during printing to avoid the nozzle possibly hitting them, relying on the back clips to hold the bed in place; just remember to replace them when removing prints).
Optional Upgrades for the Bed: Some LK5 Pro owners choose to add a sheet of insulation (like a cork or silicone mat) underneath the heated bed. By insulating the underside, the bed can reach and maintain higher temperatures a bit more easily (it traps heat that would otherwise dissipate downward). This is an inexpensive mod that can boost the bed temp by a few degrees and improve heating uniformity. Another popular upgrade is switching to a flexible spring steel build plate with a PEI surface for convenience – while the glass is excellent for shiny bottom surfaces and durability, a flex plate can make removing very large prints easier (you can just bend the plate rather than reaching into the printer to scrape). The LK5 Pro’s bed accepts any standard 300×300 mm plate, so this is a simple swap if desired.
In summary, the heated bed on the LK5 Pro provides a generous printing area with a reliable glass surface for everyday materials. It heats sufficiently for the intended filaments, though it’s not a high-temperature bed suited to ABS/PC without modifications. Manual leveling is part of the routine, but the printer helps with a guided process, and leveling holds well thanks to the sturdy frame and dual Z support. With a bit of care (like keeping it clean and ensuring the cables are strain-relieved), the bed will serve as a dependable foundation for all your big projects.
Electronics, Control Board and Noise Level
At the heart of the Longer LK5 Pro is its control electronics, which manage motion, temperature, and all printer functions. The printer’s designers have made some choices here to balance cost with functionality, resulting in a controller that is adequate for the job and even open for tinkering, but not particularly cutting-edge.
Mainboard and Firmware: The LK5 Pro is equipped with an 8-bit controller board (LGT_KIT_v1.0 board, similar to what was used in the previous LK4 model). This board is based on the ATmega2560 microcontroller, running Marlin firmware. Being open-source, Longer provides firmware source code, and the board’s firmware is user-upgradeable. The board’s performance is comparable to classic Arduino Mega/RAMPS setups – it handles normal print speeds fine but isn’t as powerful as newer 32-bit boards found in some printers. In practice, unless you try to push extremely high movement speeds or very complex calculations (like high-resolution stepping or input shaping algorithms), the 8-bit board is sufficient. We printed at the recommended 60-80 mm/s and the motion was smooth without stutters. If one did want to experiment, this board can run alternative firmware like Klipper (with an external Raspberry Pi handling the heavy computation), which some advanced users have done to unlock features like input shaping or faster print speeds. The fact that the board is open and Marlin-based is a boon for those who like to tweak settings or update firmware for new features.
The mainboard comes flashed with Longer’s customized Marlin firmware which includes profiles for the machine’s features (like filament runout sensor and power-resume). It does not natively support auto-bed-leveling out of the box (since the stock machine has no probe), but if you add a sensor (e.g., Longer’s 3D Touch/BLTouch), you can flash a firmware update that enables it. Longer has made available firmware variants for certain upgrades (for example, in their download section you might find firmware that accounts for a dual-fan mod or BLTouch). It’s nice that the machine is not locked down – tinkering is encouraged by that open nature.
Stepper Drivers: Three of the four stepper motor axes (X, Y, and Z) are driven by Trinamic TMC2208 (or 2209) silent stepper drivers on the board. These modern drivers significantly reduce the noise of the motors by using smooth microstepping. When the printer is running, X and Y movements are nearly inaudible – you won’t hear the typical stepper squeal or grinding noise of older driver types. This is a great feature, especially if the printer will be in the same room with you; it’s easy to have a conversation or watch TV while the LK5 Pro is printing in the background because the motion noise is minimal. The Z-axis movement is also silent (though Z moves are infrequent and slow anyway). As mentioned earlier, the one axis not on a silent driver is the extruder, which uses an A4988 driver. This was likely a cost-saving measure. The extruder motor makes a bit of a clicking/buzzing sound when extruding rapidly (for instance, during infill you may hear it as the extruder pushes filament continuously), but it’s not very loud and is often drowned out by fan noise. In practice, the overall noise level is still very low compared to typical printers. Some hobbyists who want a fully silent machine have replaced this driver or extruder motor, but for most people, the stock setup is absolutely fine.
Power Supply: The LK5 Pro uses a 360W, 24V power supply unit (PSU) to power the heaters and electronics. It’s a reasonably standard PSU, mounted under the bed. It has an active cooling fan that turns on as needed. At maximum load (for example, when heating the bed and hotend simultaneously while moving all motors), this PSU is being pushed near its limit, since heating the large bed draws a significant portion of that 360W. The fan will kick in to keep it cool. We noted that the PSU runs warm when maintaining bed temperatures around 70 °C for extended periods, but not dangerously so. Still, it’s running at a high duty cycle, which could mean a shorter lifespan if used heavily over time. It’s one of the trade-offs for keeping costs low – a more powerful PSU or an AC-powered bed would have driven the price up. In normal hobbyist use, the PSU holds up fine. The fact that Longer offers a dual Z upgrade implies the mainboard/PSU can handle an extra stepper, so the system has a bit of headroom by design.
Safety Considerations: On the safety front, there are a couple of things to mention:
- The power supply is a closed unit with a proper ground connection on its AC input. The printer itself, however, did not have a separate chassis ground wire running from the frame to the PSU in our unit. Typically, it’s good practice for large metal frames to be grounded for safety. In the LK5 Pro’s case, the frame likely makes indirect contact with the PSU’s grounded casing via the mounting screws (meaning the frame is effectively grounded through the PSU housing). It’s not the most robust grounding method, but we didn’t encounter any electrical issues. If one were extra cautious, adding a dedicated ground wire from the frame to the PSU ground is a simple mod.
- The wiring is mostly neatly bundled with zip ties, but as mentioned, the lack of strain relief on the heated bed wiring is a safety oversight. We strongly recommend adding or printing a strain relief bracket to secure the bed cables to prevent wear and reduce any fire risk due to a broken wire shorting.
- All connectors on the control board for high current (like the bed and hotend) are properly sized and tightened; we saw no signs of overheating at these connections. It’s always wise after a few months of use to inspect the mainboard connections for any discoloration (a sign of heat), but initially, everything was solid.
- The firmware has thermal runaway protection enabled for both the hotend and bed (we confirmed this by slightly disconnecting a thermistor during a test – the printer detected the fault and shut off the heater, which is what you want for safety).
Filament Sensor and Power Loss Recovery: The electronics also support a filament runout sensor (located at the top of the frame where filament feeds in). This is a simple switch that pauses the print if filament breaks or runs out. In our tests, the runout sensor worked reliably – we triggered it mid-print by snipping the filament and the printer paused, moved the head away from the print, and beeped for attention. After feeding new filament and confirming on screen, it resumed printing and picked up where it left off. This is a great feature for long prints that might consume an entire spool. Just be aware that the sensor is positioned before the extruder, so when it triggers you’ll typically still have some filament in the Bowden tube and hot end. The printer’s firmware compensates by reversing a bit to relieve pressure and not ooze too much, but you should reload filament promptly to avoid any heat soaking issues in the nozzle.
Power-loss resume is another feature handled by the firmware. If the printer loses power unexpectedly (say, power outage or accidental unplug), it will save its current position and state to memory. When power is restored, it prompts you to continue the print. We tested this by flipping off the power mid-print. Upon restarting, the screen offered to resume. The printer re-homed the axes (except it doesn’t home Z fully to avoid crashing into the print; it just references the existing Z position), heated up again, and then continued the print. Impressively, the layer alignment was almost seamless – only a tiny line was visible at the resume point if you looked closely. This feature can be a lifesaver for very long prints, though of course it’s better not to have to rely on it. It’s great that it’s there as a safety net.
Noise Levels: Overall, the LK5 Pro is a fairly quiet printer during operation. Thanks to the silent stepper drivers, the motion does not generate loud noises. The most constant sound is the whoosh of fans, which is steady and not too high-pitched. During printing, one primarily hears:
- The fan noise (a soft hum from the multiple fans working).
- Occasional stepper sounds during very rapid moves (very mild, mostly from the extruder during heavy extrusion like infill).
- The power supply fan when it kicks in (slightly louder whoosh, but it cycles on and off and isn’t high-pitch).
In a quiet room, you’ll notice the printer but it’s not bothersome; compared to many other large format printers, the LK5 Pro is notably quieter. Many users place it in a home office or living area without it being disruptive. For context, the sound is akin to a desktop computer or a small fan running – background white noise that tends to fade out of conscious notice after a while.
In summary, the electronics of the LK5 Pro do a competent job while keeping the machine user-friendly and quiet. They aren’t high-end by today’s standards, but they cover all the must-haves: silent motion, essential safety features, and convenient functions like resume printing. The fact that it’s open source means you have the freedom to modify or upgrade the firmware or hardware to unlock more capabilities down the line. For most users, the stock setup will perform reliably day in and day out, orchestrating the printer’s movements and operations without fuss.
Touchscreen User Interface and Connectivity
The Longer LK5 Pro is equipped with a 4.3-inch color touchscreen that serves as the primary interface for controlling the printer. This is a welcome step up from the old knob-and-character-LCD interfaces found on many budget printers, providing a more modern and intuitive user experience.
Touchscreen Interface: The full-color touch display is mounted on the front-left of the printer via a small bracket. The interface design is straightforward, featuring large icons and a simple menu structure. During our usage, we found the screen to be responsive and easy to navigate. Basic operations like starting a print, heating up the nozzle or bed, moving the axes, or adjusting settings are all accessible through a few taps. The main menu presents options for Print (to select files from the SD card), Tools (for manual moves, preheating, filament loading, etc.), and Settings (for general configurations).
The UI uses clear graphics – for instance, tapping “Tools” shows icons for move axes, home, extrude, retract, fan control, etc. Temperature control lets you set target temps for the nozzle and bed, and you can watch the current temperature values climbing. The filament loading/unloading function is handy: you select “Change Filament”, and the extruder motor will turn to either feed filament (to load new filament until you see it coming out of the nozzle) or reverse it (to retract filament for unloading). The on-screen prompts guide you through heating the nozzle and then feeding or removing filament, which takes the guesswork out for beginners.
One minor gimmick is that the interface has a short animation when switching menus (icons sliding in). While it looks slick at first, some might find it unnecessary after a while, since it introduces a tiny delay (less than a second) as you wait for the animation to complete. There is no obvious setting to disable this animation, but it’s a very minor quirk and you get used to it.
The touchscreen doesn’t expose very advanced tuning parameters by default. For example, you cannot directly modify acceleration or jerk settings from the screen – those would be set in firmware or via G-code commands. This is typical of many touch interfaces designed to be user-friendly for beginners: they show the essentials and not much more, to avoid overwhelming the user with options. Advanced users might miss having direct control over every setting via the screen, but remember that because the firmware is Marlin, you can always connect via USB and use a computer to send any G-code command you want for fine tuning.
Language and Feedback: The screen on the LK5 Pro comes set to English (in our case) with clear, simple text for notifications. There are options for multiple languages in the settings if needed. The screen provides feedback during printing – it shows a progress bar, temperatures, elapsed print time, and options to pause or stop. You can also adjust certain things on the fly via the “Tune” menu while printing (e.g., you can bump the print speed up or down, or tweak the nozzle temperature or fan speed if you see the need). These adjustments are intuitive: tapping on the temperature during a print, for example, brings up a slider to adjust it.
Connectivity Options: The printer supports two primary methods for transferring print files:
- MicroSD (TF) Card: This is the typical workflow – you slice your 3D model on a PC using software like Cura or PrusaSlicer, save the G-code file to the provided microSD card (or any microSD card), then insert it into the slot on the printer. The touchscreen will allow you to browse the files on the card and select one to print. The LK5 Pro’s card slot is on the right side of the touchscreen module. It’s fairly accessible, though inserting the tiny microSD card requires a bit of fingernail dexterity or using the included full-size SD adapter. The screen reads the card quickly and displays filenames (long names may scroll or be truncated).
- USB Connection: The LK5 Pro has a USB Type-B port (the square printer cable style port) on the side of the electronics enclosure. You can connect the printer directly to a computer via a USB cable (not always included, but it’s a standard printer cable). Once connected, you can use software like Pronterface, Simplify3D, or Cura’s USB printing capability to control the printer and send prints directly. In this “tethered” mode, the computer is streaming the G-code commands to the printer in real time. This works, but it’s generally less convenient than using the SD card, because if the computer goes to sleep or has an issue, it can interrupt the print. However, USB is useful for certain tasks like firmware updates, live monitoring, or if you integrate the printer with a Raspberry Pi running OctoPrint (the Pi would connect via USB and handle sending files and providing remote access).
No WiFi or Network Connectivity: The LK5 Pro does not have built-in WiFi or Ethernet. This isn’t surprising at its price point. If network printing or remote monitoring is important to you, a common solution is to use a Raspberry Pi with OctoPrint or similar print server software. The open nature of the printer means that connecting it to OctoPrint (via USB) is straightforward, and OctoPrint can provide a wireless interface, camera support, and so forth. But out of the box, expect to use the SD card for transferring files.
Performance of the UI: The touch interface runs on a separate microcontroller (the screen likely has its own firmware). It’s snappy for most operations. Selecting files and starting prints had only a brief delay (large G-code files take a moment to load when selected, as the printer reads through them to display file details). Manual control inputs (like jogging axes 1mm or 10mm) responded immediately. The temperature screen updates in real time, letting you watch the bed and nozzle heat up via a little progress indicator.
Usability: The combination of the user-friendly touchscreen and the guided prompts (for actions like filament change or leveling) makes the LK5 Pro relatively easy to operate, even for newcomers. There’s not much of a learning curve to basic operations. For instance, loading filament is as simple as tapping “Tools” -> “Filament” -> “In” and following the on-screen instructions to heat the nozzle and then feed filament until you see it extrude. Pausing a print is a single tap on the pause icon, and the printer will lift the nozzle and move the bed to allow you access (this is useful if you want to do a mid-print filament change for multi-color prints). Resuming is another tap. The interface also displays warnings or confirmations when appropriate. If you hit “Stop” on a print, it asks to confirm, preventing accidental cancellations. If you try to start a print and the hotend/bed are cold, it will automatically begin heating to the required temperatures read from the G-code.
The screen placement is on the front left of the machine, angled up at roughly 45°. This angle is convenient if you’re sitting or standing in front of the printer; we didn’t have issues reading it. The cable to the screen is of adequate length to allow a bit of repositioning if needed, but typically you’ll leave it attached to its bracket.
All considered, the touchscreen interface and connectivity of the Longer LK5 Pro contribute positively to the user experience. You don’t have to fiddle with old-style click wheels or dive through text menus – everything is clearly laid out in plain language and icons. While it’s not a networked or app-controlled printer out-of-the-box, the provided means of control are reliable and straightforward. New users will appreciate the simplicity, and experienced users will enjoy that most necessary functions are only a tap or two away. It strikes a good balance by making routine tasks simple while still allowing advanced control via USB when needed.
Print Quality and Performance
Ultimately, the value of a 3D printer comes down to the quality of the prints it produces and how well it performs across various scenarios. After assembling and calibrating the Longer LK5 Pro (with the dual Z-axis and improved cooling upgrade in place), we put it through its paces with a variety of test models and practical prints. Here’s how it fared:
Initial Calibration Results: We started with a simple 20 mm calibration cube and a Benchy boat (the classic torture test print) to gauge baseline quality. The 20 mm cube printed to within 0.1 mm of the expected dimensions on each axis, indicating that the steps per millimeter and overall dimensional accuracy were on point out-of-the-box. The surfaces of the cube were smooth; we observed no obvious ringing or ghosting on the vertical walls at the recommended print speed (~50 mm/s for outer walls). There were some very faint horizontal ripple patterns, but they were consistent – likely just the normal layer texture. The cube’s edges were sharp with only minimal rounding, suggesting the belts were well-tensioned and the frame rigidity (helped by those rods) was doing its job.
The Benchy, which is a more complex test of bridging, overhangs, and extrusion control, also came out quite respectable. The hull’s curved surfaces were clean, the text on the transom (“Benchy”) was readable (given 0.2 mm layer height), and the tricky front window arches showed only minor sagging at the top. The smoke stack and overhang at the bow had a little bit of roughness on the underside (as expected without support), but overall detail was good. Importantly, there were no signs of Z-wobble or layer shifting; the layers were very well aligned vertically, which we credit in large part to the dual Z-axis keeping everything trammed. The slight imperfections we saw (a bit of surface ripple under the Benchmark’s roof) we later traced to cooling limitations – which improved after the dual fan was installed.
Surface Finish: Prints in PLA had a consistent semi-matte sheen on vertical walls, partly thanks to the sturdy frame minimizing vibration artifacts. On large flat vertical surfaces, if you catch the light just right, you might see a very slight pattern corresponding to layer lines, but they were uniform – meaning the printer was laying down each layer evenly without periodic errors. This uniformity is a good sign of mechanical consistency. The LK5 Pro’s heavy, braced structure pays off when printing big objects: for example, we printed a 250 mm tall spiral vase (in vase mode) and the walls were very smooth, with no sign of Z banding or layer drift. A tall single-wall print like that is a test of Z stability and the result was impressively good.
Detail and Accuracy: With a 0.4 mm nozzle, the printer can print details down to around 0.4 mm in size reliably. We tried a model of an articulated dragon with many small linked segments. The LK5 Pro handled it well – all the joints were free right off the bed, indicating good first layer calibration and consistent extrusion. Small decorative details like the dragon’s scales or the text on a coin we printed were rendered as expected for the chosen layer height. Extremely fine details below 0.1 mm (100 microns) are not going to show up strongly – that’s a limitation of FDM and nozzle size, not unique to this machine. For typical functional prints or display models in PLA/PETG, the detail level was very satisfying.
Larger Prints: Where the LK5 Pro really shines is in printing large objects in one piece. We printed a full-size wearable cosplay helmet as a single job, something that simply wouldn’t fit on a standard 220 x 220 x 250 printer. The helmet nearly maxed out the 300 x 300 footprint and used about 320 mm of the Z height. The printer managed this ~48-hour print admirably. The dimensional consistency from bottom to top was spot on – the two halves of the helmet (we printed it in two mirrored sections to avoid too many supports) matched up perfectly. No warping was observed at the edges; the glass bed held the large base layer down flat, aided by a brim for extra insurance. Throughout the tall print, the layers remained well-aligned – there was no evidence of the gantry sagging or any cumulative error, which again demonstrates the value of the dual Z axis on a print of this scale. The surface of the helmet was smooth, with a slight texture from layer lines that will sand out easily in post-processing. We were particularly impressed that even near the top of this tall print, there were no signs of Z-axis drift or wobble – the final layers were just as even as the lower ones.
Print Speed and Throughput: The manufacturer suggests typical print speeds of 60–80 mm/s, which is what we mostly used for our tests (with slower speeds for outer walls and finer details). At these speeds, the LK5 Pro had no trouble maintaining quality. We did experiment with higher speeds around 100 mm/s for infill and non-detail areas. The printer’s motion system handled the actual movement fine – no skipping or missteps – but as expected, pushing the limits led to a slight decrease in surface quality (e.g., a bit of ringing on sharp corners, more noticeable layer lines). This is partly due to physics (the inertia of moving parts and filament flow limitations) and partly the 8-bit board’s limits in processing very high-speed commands. We found a sweet spot around 60 mm/s for external walls and up to 80-100 mm/s for infill/travel on larger prints, which gave a good blend of quality and speed. The rigid frame certainly allows faster printing than you might attempt on a flimsier machine – even at 80 mm/s on infill, we saw minimal vibration artifacts, indicating that the frame was absorbing those forces well.
Layer Adhesion and Strength: We printed functional parts like a wall bracket, a phone stand, and a gear in PETG to test strength. The prints showed very good layer adhesion – when stress-tested, they tended to bend or deform as a whole rather than splitting along layer lines. This indicates the extruder was extruding at the right temperature and with consistent pressure, yielding solid fusion between layers. PLA parts were strong in the usual way (rigid but will snap if overstressed). The uniform layer deposition thanks to the stable motion contributed to consistent strength throughout the parts. We also printed a set of large interlocking toy bricks (like giant Lego-style blocks) for a child’s project; the blocks came out dimensionally accurate and could snap together snugly, showing that tolerances were maintained well over long print times.
Print Imperfections: No printer is perfect, and we did note a few minor imperfections that can occur:
- On one very large flat print, we noticed a slight variation in surface gloss at certain intervals. This could be due to very slight fluctuations in extrusion or filament diameter, or perhaps tiny Z height variations too small to measure. It was extremely subtle and only cosmetic.
- When we tried printing at extremely high speeds (to experiment), we saw some ringing (echo) on corners of a test cube. At normal speeds, this ringing was absent, showing that staying within reasonable speed limits keeps quality high.
- We also had a bit of ooze/stringing on some PETG prints when using the stock single cooling fan. PETG is stringy by nature; increasing retraction and adding the second cooling fan later helped mitigate this. A little bit of stringing can be cleaned up and is not unique to this printer.
Most of these imperfections were either solved by the upgrades (cooling) or by slicer tuning (retraction, acceleration settings). The key takeaway is that none of them were fundamental hardware problems – they were the usual tweaking targets for any 3D printer to get it dialed in perfectly.
Comparing Quality to Competitors: In the realm of large format budget printers, the LK5 Pro’s print quality holds up very well. When tuned properly, its prints are on par with what you’d get from similarly spec’d machines (like Creality CR-10 series, Artillery Sidewinder X2, etc.). In fact, the presence of dual Z rods and diagonal braces gives it an edge in some situations – for instance, the CR-10 or Sidewinder might exhibit more Z wobble on very tall prints due to single Z and lack of braces, whereas the LK5 Pro remains rock solid. Where the LK5 Pro might lag is in features like direct drive (for flexibles) or auto leveling out of the box, but those affect convenience more than print quality with PLA/PETG. For the prints themselves, we were able to achieve high-quality results that would satisfy both hobbyist makers and those doing prototype work or cosplay.
For a printer of this size and cost, we were quite satisfied with the print outcomes. Large prints came out nicely without warping or layer shifts, small prints had good detail and smooth surfaces, and any minor issues (like a bit of stringing or slight roughness under extreme overhangs) were manageable with settings tweaks or minor upgrades (like the fan).
Reliability: Over the course of many print hours (spanning multiple spools of filament), the Longer LK5 Pro proved to be a reliable workhorse. We did not encounter failed prints due to mechanical or electronics issues. The only print failures we had were due to user error (like insufficient supports on a tricky model, or once when we ran out of filament because we didn’t load a full spool and hadn’t yet enabled the sensor on that print). In continuous operation, the stepper motors stayed cool enough, the extruder maintained consistent feed, and the bed stayed level and well-adhered throughout each job. This speaks well to the machine’s design – the core functions operate without drama, allowing you to trust the printer with lengthy jobs.
In conclusion, the Longer LK5 Pro’s print quality is impressive given its price and huge build volume. It delivers solid, accurate prints with the kind of quality one would expect from a much more expensive printer, provided you take the time to dial in your slicer settings. Whether you are printing a tiny figurine or a massive prop, the LK5 Pro handles the task capably. It may require a touch of tweaking and benefits from simple upgrades (like improved cooling) to truly shine, but once optimized, it can consistently produce prints that will satisfy hobbyists, cosplayers, and makers alike. This printer invites you to think big – and crucially, it has the ability to follow through on those big ideas.
Potential Upgrades and Modifications
One of the appealing aspects of the Longer LK5 Pro is that it’s a machine you can grow with. Out of the box, it’s a very capable printer, but for those who love to tinker or want to push the printer’s capabilities further, there are several upgrades and modifications worth considering. We’ve already discussed two major ones – the dual Z-axis kit and the dual blower fan upgrade – which dramatically improve stability and cooling. Here are a few other popular upgrades and mods for the LK5 Pro:
- Auto Bed Leveling Sensor: Perhaps the most common upgrade for any manual-leveling printer is adding an automatic bed leveling probe, such as a BLTouch or Longer’s own 3D Touch sensor. This device mounts near the hot end and probes the bed at multiple points before printing, creating a mesh of the bed’s surface. The firmware then compensates for any slight height variations during printing. While the LK5 Pro’s bed is generally flat (it’s glass) and stays level if well-adjusted, an ABL sensor can save time and ensure that you always start with a perfect first layer without manual tinkering. Installing a BLTouch on the LK5 Pro is relatively straightforward: you’d mount the probe (there are pre-designed printable brackets and adapters available in the community), plug it into the mainboard (the board has a port for Z-probe or you can use the Z endstop input with proper firmware configuration), and flash firmware that enables it. Many users have successfully added BLTouch probes; Longer has even provided firmware configurations for their 3D Touch kit. After installation, the printer will automatically level itself before each print, significantly reducing the hassle of manual leveling, especially on that large bed.
- All-Metal Extruder Feeder: If your LK5 Pro didn’t come with the upgraded metal extruder, switching the stock plastic extruder to a metal one can be beneficial. There are inexpensive upgrade kits (often under $15) that include a full aluminum feeder mechanism which is more durable and provides a stronger grip on the filament. This prevents potential issues like the plastic lever cracking or the extruder gear slipping under tension. The swap is simple and can be done in about 10 minutes with basic tools. It’s a mostly plug-and-play replacement and improves the longevity and reliability of the feeder, particularly if you print a lot or use tougher filaments.
- Higher Quality PTFE or Capricorn Tube: Replacing the Bowden tube with Capricorn (a high-lubricity, high-temperature PTFE tubing) can improve filament feeding, especially for flexible filaments. Capricorn tubing has a slightly smaller inner diameter and is made to tighter tolerances, which means less room for filament to wiggle or buckle inside it. This mod is inexpensive and can help reduce stringing and improve retraction consistency a bit. It’s not a dramatic change for PLA/PETG, but every bit of precision helps, and it’s a straightforward swap.
- Flexible Build Plate: As discussed in the bed section, moving to a magnetic flexible build plate system (with a PEI-coated spring steel sheet) is a convenience upgrade many users enjoy. It makes part removal extremely easy – once the print is done and slightly cooled, you simply remove the steel sheet and flex it, and the print pops off. This is especially helpful for very large prints that are hard to pry off a rigid surface. There are 310×310 mm flexible plate kits available that fit the LK5 Pro’s bed (a little oversize is fine; you can trim them or let a slight overhang). We tried a textured PEI sheet on the LK5 Pro and found that PLA still stuck well (not quite as aggressively as to glass, which can be a good thing because it’s easier to remove) and the bottom surface had a nice subtle texture.
- Firmware Upgrades (Marlin/Klipper): For the truly adventurous, updating the printer’s firmware to the latest Marlin version or switching to Klipper firmware can unlock advanced features. For example, Marlin 2.x on a 32-bit board would allow features like Linear Advance (which can improve extrusion consistency on corners) or input shaping (though input shaping usually requires extra hardware or a faster board, so that might be more of a Klipper thing). Some users have replaced the mainboard entirely with a 32-bit board like a BTT SKR Mini, which gives more headroom for future features, and then run Marlin 2.x with all the bells and whistles. Klipper, paired with a Raspberry Pi, can significantly boost printing speed and quality by offloading computation; some have reported running the LK5 Pro with Klipper and achieving great results. These paths are definitely for power users who enjoy tweaking and don’t mind a bit of a project – but the possibility is there, and the printer’s open-source nature supports it.
- LED Lighting: A simple quality-of-life mod is adding LED strips or a small LED ring to illuminate the build area. Since the LK5 Pro is an open printer, adding a strip light along the top beam or around the hotend can make it easier to monitor print progress and take cool time-lapse videos. Many people power an LED strip from the printer’s PSU (taking care to use a proper step-down converter if needed, since the PSU is 24V and most LED strips are 12V or 5V). Others use a USB LED strip powered by a separate adapter. It’s an easy mod that can be purely cosmetic and helpful.
- Cable Chains: The stock cable management on the LK5 Pro is mostly zip ties and some cable sleeves. If you want a cleaner look or more organized movement, you can print cable chain links for the X-axis and bed. Cable chains guide the wiring in a neat way as the axes move, reducing the chance of snags and giving a professional look. There are community designs available specifically for the LK5 Pro’s dimensions.
- Direct Drive Conversion: For those who want to print a lot of flexible filament and don’t mind experimenting, there are mods to convert the LK5 Pro to a direct drive extruder (mounting the extruder on the moving X-carriage). This typically involves printing a new bracket and possibly using a lighter extruder (like a compact extruder or something like the Bondtech BMG or Orbiter) to keep weight down. Direct drive can significantly improve printing with TPU/flexible materials because it eliminates the long Bowden path. The trade-off is adding weight to the carriage, which can slow down printing or introduce more vibration if not done carefully. Given the machine’s large format purpose, most users stick with Bowden for speed, but it’s nice that the option exists if your use-case changes.
- Community Mods and Prints: The Longer LK5 Pro community is active, and a quick search on sites like Thingiverse, Printables, or Reddit will yield a trove of user-created mods. This includes things like: better fan ducts (alternate designs beyond the official one, some aiming to create a 360° airflow around the nozzle), dual filament spool holders or relocating the spool for better feeding angle, tools holders that attach to the frame, webcam mounts for OctoPrint, and even decorative touches like branded plates or customizable name tags that snap onto the frame. Engaging with the community can both inspire improvements and help troubleshoot if you encounter any issues.
In our experience, the Longer LK5 Pro works great with minimal upgrades – you don’t need to heavily modify it to get good results for PLA and PETG. But the above options allow you to customize and refine the printer to better suit your specific needs or simply to have fun and learn more about the machine. Even doing one or two small upgrades (like adding an auto-level sensor or upgrading the extruder feeder) can enhance the convenience and performance of the printer. The ability to start with a solid foundation and improve upon it is a big part of the fun for many 3D printing enthusiasts, and the LK5 Pro definitely offers that platform. It can be a straightforward reliable printer when you want it to be, and a sandbox for upgrades when you’re in the tinkering mood.
Who Should Consider the Longer LK5 Pro?
The Longer LK5 Pro with the Dual Z-Axis upgrade is an attractive option for a broad range of users, but it especially shines for certain groups and use cases. Here’s an overview of who will get the most value out of this 3D printer:
- Makers Who Need Large Build Volume: If you frequently find yourself breaking models into multiple parts because they won’t fit on a standard printer, the LK5 Pro is aimed squarely at you. Cosplayers printing full-size helmets, armor pieces, or large props will love the 300×300×400 mm capacity – you can print life-size masks, helmets or gauntlets in one piece, reducing seams and post-processing. Similarly, architects or designers who want to print sizable prototypes (like building models or product casings) will benefit from the generous bed. The printer’s volume is one of the largest you can get in the consumer price segment, making it ideal for anyone who needs to create big parts without resorting to industrial machines.
- Budget-Conscious Hobbyists: The LK5 Pro offers a lot of bang for your buck. It’s priced significantly lower than many other large-format printers, yet it doesn’t compromise on the core features needed for quality printing. If you’re a hobbyist or a small workshop on a tight budget, this printer allows you to tackle big projects without the big price tag. It’s an excellent value for the size – at around the $300 range (pricing can fluctuate), it often undercuts similar spec competitors. You get a huge build area and solid construction for a very reasonable cost.
- DIY Enthusiasts and Tinkerers: Do you enjoy tweaking and upgrading your equipment? This printer welcomes it. Because it’s open-source and has a growing community, the LK5 Pro is a great canvas for mods. If you derive satisfaction from installing upgrades, customizing firmware, or printing parts to enhance your printer, you’ll find the LK5 Pro to be a fun project. It’s robust enough to use as-is, but also forgiving and accessible for modifications – the frame has extrusion slots for mounting things, the firmware is modifiable, and spare parts are readily available. It’s a great printer for someone wanting to learn and experiment.
- Print Farm or Production Use (Large Parts): Thanks to its sturdy construction and reliable print recovery features, the LK5 Pro can serve in a print farm or small production environment for making large items. For example, a business printing terrain pieces for tabletop games, or one making custom signage or cosplay kits, could line up multiple LK5 Pros to output big parts in batches. The filament runout sensor ensures long jobs aren’t wasted if a spool empties, and the power-loss resume adds a layer of insurance for multi-day prints. Its relatively low cost means scaling up with multiple units is more feasible than doing so with pricier machines.
- Educational and Makerspace Use: For educational settings like a school fab lab, library makerspace, or community workshop, the LK5 Pro can offer capabilities that smaller printers don’t – like printing large collaborative projects or art pieces. The touchscreen interface is generally intuitive for students to operate after some basic training. However, it’s worth noting that as a larger manual machine, it might require a bit more oversight than fully automated printers. In a classroom, an instructor or lab technician who understands leveling and maintenance is key to getting the most out of it. That said, demonstrating the printing of a full-scale model (like a human anatomy model or architectural structure) can be very impressive in an educational context, and the LK5 Pro makes that affordable.
- Those Willing to Learn and Maintain: The LK5 Pro is fairly user-friendly, but as with any 3D printer – particularly larger ones – there is a learning curve to get the best results. If you are willing to invest time in understanding bed leveling, slicer settings, and occasional maintenance (like tightening belts or checking screws), then you’ll be rewarded with a fantastic machine for the price. On the other hand, if you want a totally plug-and-play experience where you never have to adjust anything, a higher-end printer with fully automatic features (at a much higher price) might be more appropriate. The LK5 Pro hits a sweet spot where a little effort in setup yields huge payoff in capability. It’s an excellent printer for someone looking to step up from a beginner machine to something more advanced that they can grow into.
- Standard Material Users (PLA, PETG, TPU): If your primary printing materials are PLA, PLA+, PETG, or TPU, the LK5 Pro is a perfect match. It is designed around these materials – the temperatures, open frame, and Bowden setup all cater to them. It will also handle specialty PLAs (like woodfill, silk PLA, etc.) and PETG variants easily. If you plan to print ABS, ASA, Nylon, or polycarbonate frequently, you would need to invest in modifications (enclosure, perhaps a different bed or hotend) to do so successfully, which might not be worth it if those materials are your main use. So this printer is ideal for those who stick to the popular, easy-to-use filaments.
Who Might Not Find It Ideal:
While the LK5 Pro is versatile, it may not be the best fit for everyone. If you have extremely limited space, note that this printer has a large footprint and height – you need a sturdy table or bench area roughly 2 feet square and some vertical clearance. If you only ever print very small items (say jewelry or miniatures) and never foresee needing a large volume, a smaller printer or a resin printer might serve you better for fine detail. If you require ultra-high resolution or super smooth surfaces out of the machine with minimal tuning, a resin printer might be more apt, as FDM always has some layer texture. Additionally, if you predominantly use materials like ABS or need an enclosure for any reason, factor in the added effort to either enclose this printer or consider an enclosed model.
In essence, the Longer LK5 Pro is best suited for makers who want maximum build volume for their money and are working primarily with standard, beginner-friendly filaments. It empowers hobbyists to tackle ambitious projects that would be impractical on smaller machines, all without breaking the bank. If that description matches your needs – big prints on a small budget – the LK5 Pro is very likely the right choice for your workshop.
Conclusion: A Big Printer That Delivers Big Value
The Longer LK5 Pro, especially with its dual Z-axis upgrade, proves itself to be a formidable large-format 3D printerthat hits an appealing balance between cost, size, and performance. It’s not a flawless, out-of-the-box perfect machine – but importantly, its shortcomings are relatively minor or easily addressable, and its strengths far outweigh its weaknesses for the target user.
After extensive hands-on time, we can say the LK5 Pro offers reliable and high-quality printing for the kind of projects it’s built for. Its enormous build volume unlocks creative possibilities, from full-scale cosplay props to multi-part batch prints, that simply wouldn’t be feasible on smaller printers. The frame is rigid and confidence-inspiring; once you have it assembled and calibrated, the printer feels steady as it hums along layer by layer. The upgraded dual Z-axis removes the worry of a sagging gantry and ensures that even tall prints come out with straight, consistent walls. This is a printer that can print a 15-inch tall object over two days and have it come out looking great – that’s a feat that still amazes, considering the price point.
We were particularly impressed by how quiet and smooth the printer runs. In a world where many budget printers still rattle and vibrate loudly, the LK5 Pro’s subdued purr is a welcome relief. It means you can work in the same room without feeling like you’re next to a noisy machine. The touch interface makes interaction simple, so you spend more time printing and less time fiddling with controls or settings.
No doubt, to reach its affordable price, Longer had to make some compromises: manual bed leveling instead of auto-level, a bed that doesn’t comfortably reach ABS temperatures, a basic 8-bit controller, and so on. But none of these are deal-breakers in our view – rather, they are areas where a user can decide if they want to upgrade or simply work within the design’s limits. For instance, manual leveling is a one-time (or occasional) effort that becomes second nature (and can be mitigated entirely with an add-on probe), and PLA doesn’t need a 100 °C bed anyway.
Pros of the Longer LK5 Pro (Dual Z-Axis Edition):
- Massive build volume for the cost – you can print what many other printers simply cannot, all in one piece.
- Stable construction (metal frame + dual Z + diagonal rods) that yields good print quality even on challenging, large prints.
- Very quiet operation – great for home or office use, you won’t be disturbed by loud noises.
- Responsive touchscreen UI and useful features like filament runout detection and power-loss resume add convenience and safety.
- Open-source and upgradable – invites tinkering and improvement; you can mod it to your heart’s content or leave it stock.
- Outstanding price-to-performance ratio – you get a lot of printer for your money, making large-scale 3D printing accessible to hobbyists.
Cons / Things to be aware of:
- Requires careful initial assembly and calibration (not difficult, but more hands-on than some semi-assembled competitors).
- Lacks automatic bed leveling by default (manual leveling needed unless you install a probe).
- Bed’s effective max temperature (~75 °C) and open frame mean it’s not ideal for high-warpage materials like ABS without modifications.
- Cooling performance is mediocre with the stock single fan (though easily improved with the included dual-fan upgrade or printable mods).
- Some components (e.g., extruder driver, power supply working near capacity) are not the absolute latest tech, but they are serviceable and can be upgraded if desired.
- Large physical footprint – ensure you have space for a printer of this size.
All things considered, the Longer LK5 Pro with dual Z-axis is a big printer that offers big value for hobbyists. It brings the capability to print large, impressive objects within reach of makers who previously might have been confined to small-scale projects or faced stitching parts together. Yes, you’ll invest a bit of time in setup and learning the nuances, but that’s part of the journey in 3D printing – and the rewards here are definitely worth it. Once it’s dialed in, the LK5 Pro is a reliable workhorse that can churn out prints small or large with equal confidence.
For anyone looking to step up their 3D printing game to larger dimensions without stepping into a much higher price bracket, the Longer LK5 Pro is easy to recommend. It’s a printer that doesn’t just promise large-scale printing – it delivers on it. With solid build quality, decent out-of-box performance, and the potential to tweak it into an even better machine, the LK5 Pro earns its place as one of the best value large-bed 3D printers available today. It enables you to dream bigger in your designs – and crucially, to turn those big dreams into reality right on your workbench.