The Flashforge Adventurer 5M is a new-generation 3D printer that promises high-speed printing and user-friendly operation at a budget-friendly price. This long-form review covers every aspect of the Adventurer 5M, from its design and setup to its performance and suitability for various users. Is this CoreXY, auto-leveling machine truly a game-changer for hobbyists, educators, small businesses, and even professionals? Read on to find out.
Design and Build Quality
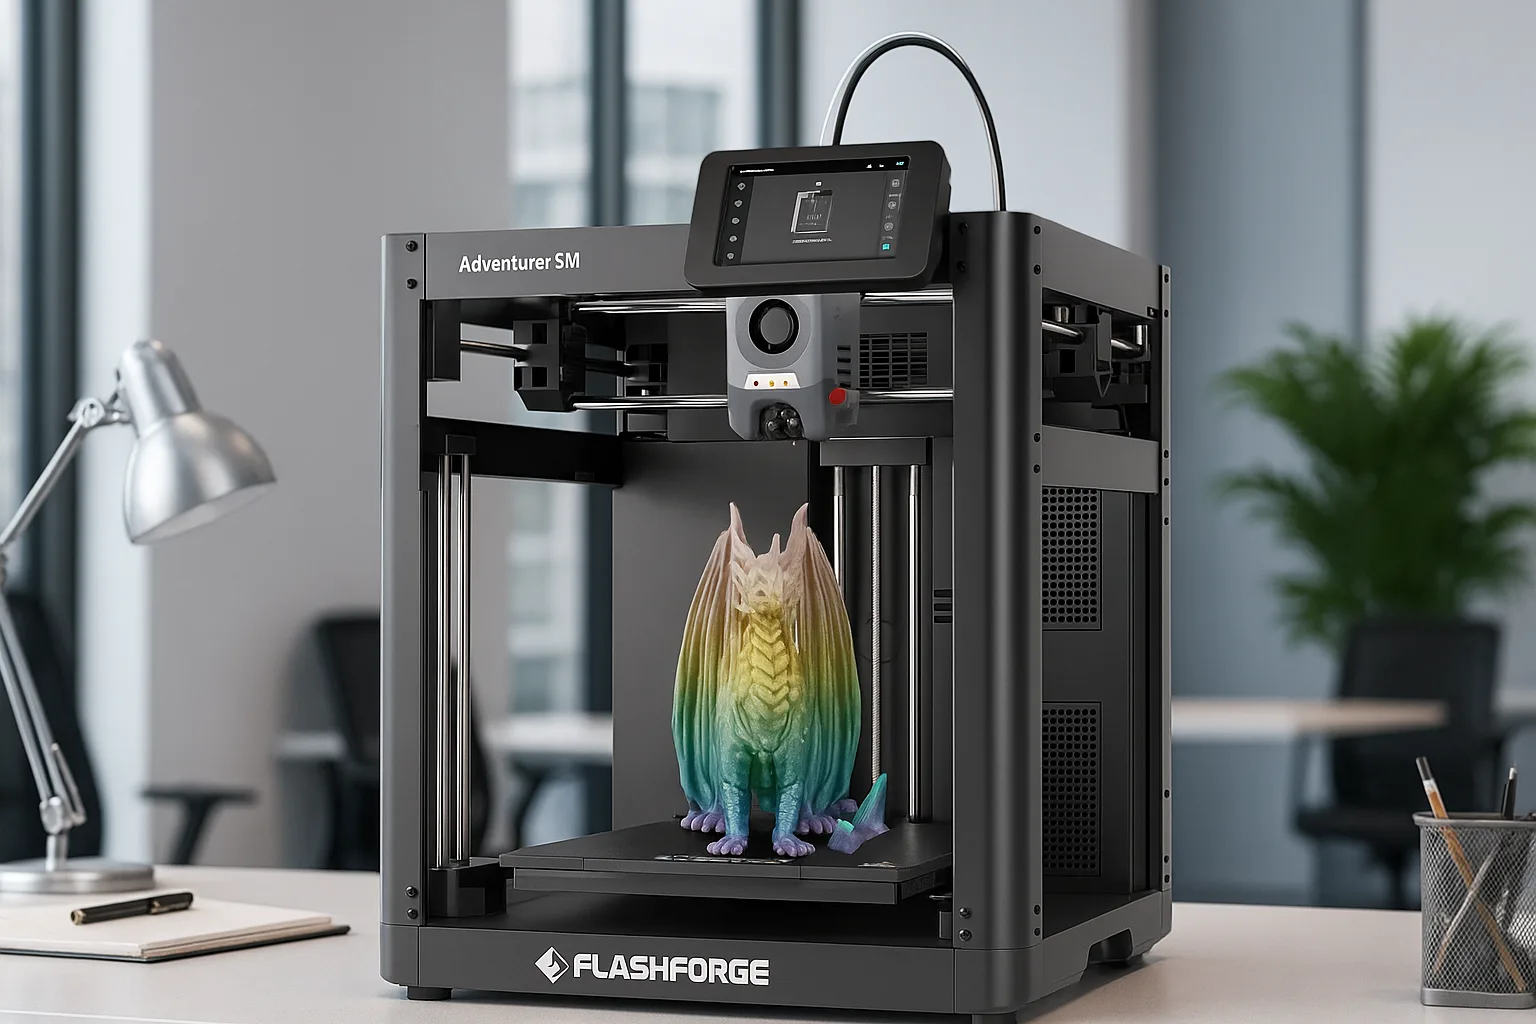
The Flashforge Adventurer 5M features a sturdy CoreXY frame with a detachable touchscreen and an open-front design for easy access.
The Adventurer 5M immediately stands out with its modern, robust design. It’s built on a CoreXY all-metal frame, meaning the structure is a rigid cube of metal extrusions designed to minimize vibrations during high-speed moves. The printer feels solid and well-engineered; users have noted that the build quality is a significant leap over previous Flashforge models. For example, those upgrading from the Adventurer 4 describe the 5M’s construction as “rock-solid” and more refined, with none of the wobble or flimsy parts often seen in entry-level printers. This rigidity is not just for show – it directly contributes to better print precision at high speeds by preventing frame flex and resonance.
In terms of footprint, the Adventurer 5M is compact yet dense. With a 220 × 220 × 220 mm build volume, the printer’s overall size is relatively tidy (approximately 36 × 40 × 45 cm without the spool holder). Much of the weight (around 17–19 kg) comes from its metal components and heavy-duty motion system. There are no lightweight plastic gantries here; instead, the 5M uses quality linear rods/rails and sturdy belts, engineered for longevity. The machine’s heft and low center of gravity keep it stable even when printing at top speed. The chassis has a clean finish, with durable plastic panels used sparingly to cover electronics and give the printer a polished look. Overall, the fit and finish are excellent for a printer in this price range – no rattling parts or uneven seams, just a well-fitted assembly that inspires confidence.
One notable design choice is the open-frame configuration. The Adventurer 5M comes as an open printer (no front door or side panels by default), which provides good visibility of prints and easy access for maintenance. The trade-off is that it doesn’t retain heat like an enclosed chamber – a point we’ll discuss in the materials section. However, Flashforge offers an optional enclosure kit for those who want to add panels later. The open design also means the spool holder is external: the filament spool mounts on a holder at the back of the machine. This placement keeps the printer’s footprint smaller, but if you position the unit against a wall you’ll need a little clearance to swap spools comfortably (some users note it’s a minor hassle in tight spaces). On the positive side, an external spool is easy to monitor and can fit any standard filament brand or spool size without space constraints – the Adventurer 5M is fully open to third-party filaments.
The detachable touchscreen is another interesting design element. Out of the box, the 4.3-inch color display comes separate and you attach it to the printer’s frame with a simple snap or a couple of screws. This only takes a minute during setup. Once attached (typically to the front/top right of the printer), the screen looks integrated and is positioned at a convenient viewing angle. The detachable design likely helped Flashforge reduce packaging size and risk of damage in transit. It might feel unusual to “install” a screen, but in practice it’s straightforward and only done once. The rest of the printer is 95% pre-assembled – there’s a real emphasis on getting users up and running quickly with minimal assembly (we’ll cover setup next).
Every aspect of the Adventurer 5M’s build seems tuned for reliability and ease. The bed is a flexible PEI steel plate that sits on a heated platform, held in place with a magnetic system. This flexible bed not only provides excellent adhesion (thanks to the PEI coating) but also makes part removal a breeze – you can bend the sheet slightly to pop off prints, rather than scraping. The extruder assembly is compact and direct-drive, riding on a sturdy X-Y carriage. All cables are nicely routed in sleeved looms, and the moving axes have robust endstop sensors or sensorless homing for precise motion. Little quality-of-life touches are evident, such as an LED light (the printer includes internal lighting to view progress), and a well-placed power switch and ports. The power supply is built into the base, keeping things tidy with just a single power cord out the back.
In summary, Flashforge nailed the design and build quality of the Adventurer 5M. It looks and feels like a more expensive machine. The CoreXY architecture and all-metal frame give it the bones of a high-performance printer, while the fit and finish make it approachable for beginners. There’s a thoughtful balance between form and function – nothing feels extraneous, yet nothing critical seems to be missing. For a printer touted as a “beginner’s favorite choice,” the Adventurer 5M packs an impressively professional-grade construction, which bodes well for its durability and performance.
Initial Setup and Unboxing Experience
Setting up the Adventurer 5M is refreshingly simple. Flashforge clearly aimed to make the unboxing and first-print experience as smooth as possible, knowing that many users of this machine might be first-time 3D printer owners. If you’re dreading a lengthy assembly process, fear not – the Adventurer 5M comes almost entirely assembled and can be ready to print in 10–15 minutes after opening the box.
Unboxing: The printer arrives well-protected in foam and cardboard. Once you lift the Adventurer 5M out, you’ll find only a few loose components: notably the touchscreen module, the filament spool holder, and a small accessory pack. The accessory pack typically includes things like a power cable, a USB stick, a scraper for print removal, unclogging tools (needle or wrench for the nozzle), and a quick-start guide. (Depending on the retailer or bundle, you might also receive a sample length of PLA filament or even full spools if it was a promotional package. It’s wise to have a spool of PLA on hand just in case, since some units do not include filament by default.) Everything is packed efficiently, and the documentation on top gives you a step-by-step of what to do first.
Assembly steps: To set up, you really just need to attach two parts:
-
Attach the touchscreen – The 4.3-inch display unit connects via a ribbon cable and snaps onto the front/right side of the printer. Flashforge designed this so no complex wiring is needed by the user; you simply plug in the connector (which is keyed so you can’t get it wrong) and then mount the screen. It might slide into a slot or secure with a couple of screws provided. In our experience, this took only a minute and the instructions were clear. The screen powers on as soon as the printer is plugged in later.
-
Attach the filament holder – This is a plastic or metal hook/arm that usually slots into the back of the printer frame. A couple of thumb screws secure it. The holder is sturdy enough for 1kg spools and is positioned so filament will feed straight into the extruder’s intake.
With those attached, the hardware assembly is basically done. Before powering up, you’ll remove some protective materials placed for shipping: typically foam blocks or zip-ties that stabilize the print head and z-axis. The Adventurer 5M we tested had a couple of small foam pieces under the print bed and a clip securing the gantry – once those are out, nothing obstructs movement. The printer’s hotend likely comes with a nozzle pre-installed (0.4 mm by default) and the bed is already in place. There’s no manual bolt-tightening or frame-building required at all.
First power-on: Plug in the power cord, switch on the machine, and the Adventurer 5M comes to life. The startup is accompanied by a short boot screen featuring the Flashforge logo. Immediately, the large touchscreen becomes your guide. One of the great things about this printer is the on-screen setup wizard that kicks in for first-time use. Users report that the printer walks you through initial calibration without fuss. The Adventurer 5M features fully automatic bed leveling (called “one-click leveling” or Automatic Datum Management), so at first startup it typically homes all axes and probes the bed at multiple points to create a flat calibration mesh. This auto-level routine means you don’t have to manually adjust knobs under the bed – a huge relief, especially if you’ve struggled with leveling on other printers. In our case, the machine’s first auto-level was quick and accurate; we didn’t have to re-level or tweak anything after that, the first layer adhesion was perfect.
Loading filament: The touchscreen then usually prompts you to load filament. The Adventurer 5M’s direct drive extruder has a filament loading function – you tap “Load” on the screen, insert the filament into the feed hole, and the printer will automatically draw the filament in once it detects it. There’s a handy filament run-out sensor right at the extruder intake that helps with this process (and will pause prints later if you run out). The extruder heats up to a preset temperature and the feeder gears grab and push filament through until it melts and extrudes out the nozzle. The UI likely asks you to confirm filament is coming out in a steady stream, at which point you know the printer is primed.
At this stage, you’re essentially ready to print. Flashforge often includes a sample model pre-loaded on the printer’s internal memory or on the provided USB stick. In our unit, a 3D Benchy (the famous boat benchmark print) was already on the menu. We hit “Print” on that file, and off the Adventurer 5M went. Impressively, the very first print came out flawlessly – a testament to the excellent out-of-box calibration. Many users echo this experience: straight out of the box, first prints are successful without any tinkering. There’s something almost magical for a newcomer about unboxing a printer and having a smooth Benchy in your hands less than an hour later. It demonstrates the user-friendlinessFlashforge aimed for.
During unboxing and setup, we also noticed the clear instructions and documentation. The quick start guide (paper or digital) is concise but covers the essentials. The on-screen prompts reduce the need to constantly reference a manual. However, if you do want more detailed guidance, Flashforge’s online Download Center and wiki contain manuals and videos for the Adventurer 5M series. We didn’t encounter any confusing steps – it’s all very beginner-oriented.
In terms of time investment, from unboxing to first print finishing, you could realistically be done within a couple of hours (with most of that time being the print itself). Active setup time is around 10–15 minutes. There are no tricky calibration rituals or firmware setups to worry about. Even connecting to Wi-Fi (if you choose to do so initially) is done through the touchscreen in a wizard-like manner.
Initial impressions: The unboxing and setup process left a very positive impression. It’s evident that Flashforge has refined the “out-of-the-box experience” to be as painless as possible. For a beginner, this is crucial – it lowers the intimidation factor and builds confidence early. For an experienced user, it’s just convenient and gets you to the fun part (printing) faster. By the end of day one with the Adventurer 5M, we had multiple successful test prints and zero misprints or hardware issues. In a busy library makerspace, one technician noted they unboxed three Adventurer 5M Pros, plugged them in, and all three churned out hours of perfect prints on day one – a strong testament to how reliable the initial setup is. In short, Flashforge delivers on the promise of quick setup with no experience needed.
Hardware Features and Specifications
Despite its relatively low price tag, the Flashforge Adventurer 5M is packed with advanced hardware features. It’s not an overstatement to say that this machine’s spec sheet reads like that of a higher-end printer. Let’s break down the key hardware components and what they mean for the user experience:
-
Build Volume: 220 × 220 × 220 mm (X×Y×Z). This cubic build volume is about 8.7 inches in each dimension – plenty for most everyday projects, from figurines to functional parts. It’s a “mid-size” volume in the consumer 3D printer world. While larger printers exist, 220 mm is enough for the vast majority of hobby prints and prototypes (for context, a standard Benchy is ~60 mm long, so you could fill the bed with dozens of them, or print something as tall as a 9-inch vase). The build plate’s size was very accurately advertised; some testers measured about 217×217 mm usable space which is typical (printers often have a few mm margin). Importantly, the bed is completely flat and stays level thanks to the sturdy platform and auto mesh leveling – so you can utilize the whole area without worrying about corners being lower or higher.
-
Print Bed and Heating: The Adventurer 5M uses a heated bed that reaches up to 100 °C. On top of this bed sits a flexible, removable PEI-coated spring steel sheet. The inclusion of a PEI sheet is fantastic: PEI (polyetherimide) is a tried-and-true surface that PLA and PETG stick to very well when hot, and release easily once cooled. We found adhesion on this stock bed to be excellent – models stay put during printing (no warping on our large PLA prints) and then pop off with a gentle flex of the plate. The steel plate attaches magnetically, so removing it is quick, and it snaps back into position reliably thanks to the magnets. The bed heating is fairly uniform; measurements showed even temperature distribution across the surface, which helps ensure consistent results whether you print in the center or near the edges. With a max of 100 °C, the bed can handle materials like PETG, ABS, and ASA in theory (though ABS/ASA usage depends on enclosure – more on that later). The bed’s heat-up time is reasonable for its size and 350 W power supply – it doesn’t keep you waiting too long to start a print. Another nice feature is power loss recovery: if you have a power outage mid-print, the machine can resume where it left off once power is restored, avoiding total loss of long print jobs.
-
Extruder and Nozzle: The Adventurer 5M has a single direct-drive extruder with a quick-detach nozzle system. The direct-drive means the extruder motor sits right on the print head, pushing filament directly into the hotend (as opposed to a Bowden setup where filament is pushed through a long tube). Direct-drive offers better control for flexible filaments and more responsive retractions. The extruder is an all-metal design with a powerful 50 W heater – it can reach high temperatures fast. The nozzle assembly is one of the star features: Flashforge implemented a tool-free, 3-second nozzle swap mechanism. By pressing a small clasp, you can pop out the entire nozzle module from the heater block and insert another one until it clicks. It’s very similar to swapping lenses on a camera – quick and foolproof. This is a huge boon for maintenance (clearing clogs or replacing a worn nozzle) and for versatility. The printer ships with a 0.4 mm nozzle installed (the standard size balancing detail and throughput). However, the Adventurer 5M also supports 0.25 mm, 0.6 mm, and 0.8 mm nozzle sizes, which Flashforge sells separately or in a kit. All these nozzles are high-temperature capable (up to 280 °C) and the larger sizes (0.6 and 0.8) are made from a hardened material to withstand abrasive filaments like carbon fiber-filled plastic. In practice, being able to switch nozzle sizes quickly means you can adapt the printer for different tasks: use a 0.25 mm nozzle for ultra-fine detail prints or miniatures, swap to a 0.6 or 0.8 mm for rapid printing of big, strong parts. And it only takes a few seconds with no special tools – far easier than unscrewing a hot nozzle with a wrench. The extruder’s max temperature of 280 °C is quite high for this class of printer, opening the door to materials beyond basic PLA.
-
Hotend and Feeder Details: The Adventurer 5M’s hotend is an all-metal design (capable of sustaining high temps without PTFE tube degradation). It heats to 200 °C in about 35 seconds – impressively fast – so you don’t wait long for preheating. The filament path is well-constrained, which helps in feeding flexible filaments. A dual-gear feeder or high-torque gear is used, giving reliable grip on the filament. With these specs, the extruder can push filament at a high flow rate (Flashforge advertises up to 32 mm³/s flow). That means it can keep up with the high-speed motion without under-extruding, as long as the filament melts in time. Cooling for the hotend and print is handled by multiple fans: one fan dedicated to cooling the cold side of the hotend, and at least one part cooling fan to solidify the filament as it’s laid down. The Pro model mentions a “turbo” auxiliary fan, whereas the base 5M has a standard but effective blower for part cooling. We found that even at fast speeds, the part cooling on PLA prints was sufficient for decent overhang performance.
-
CoreXY Motion System: At the heart of the Adventurer 5M is its CoreXY motion architecture. Unlike typical Cartesian printers where one motor moves X and another moves Y (with the bed moving for Y on many designs), a CoreXY uses two motors working together on a belt system to move the print head in the X-Y plane. The benefitsof CoreXY are significant: it allows the moving mass to be lighter (the motors are stationary on the frame instead of riding on the axis), which in turn permits faster acceleration and movement without ringing or skipped steps. The Adventurer 5M takes full advantage of this – it boasts a maximum print head travel speed of 600 mm/s and acceleration up to 20,000 mm/s². Those numbers are an order of magnitude higher than traditional hobbyist printers. Practically, not every print will run at 600 mm/s (that’s a theoretical max for moves like infill or travel), but even printing at 200–300 mm/s for perimeters is a huge speed boost over the typical 50–80 mm/s many printers do. The hardware to support this includes dual X-Y motors, high-quality belts and pulleys, and a very stable Z-axis. The Z-axis on the 5M uses a guided system (likely dual lead screws or a synchronized mechanism on either side) with four vertical guide rods – this keeps the bed perfectly level as it moves down, and eliminates wobble. The result is more uniform layers and the ability to pause/restart without layer shifts. The motion system also features what Flashforge calls a “vibration compensation algorithm”, essentially input shaping or a form of active resonance suppression. Sensors or the firmware detect the vibrations from rapid movements and automatically adjust to counteract them, reducing the ghosting/ripples that typically appear on prints at high speeds. This is cutting-edge tech (pioneered in Klipper firmware and seen in a few new high-speed printers) and it’s remarkable to have it working out-of-the-box on the Adventurer 5M’s stock firmware.
-
Sensors and Probes: We’ve mentioned the filament run-out sensor – it’s a small optical sensor that pauses the print if your filament breaks or ends, allowing you to reload and continue without losing the print. Another sensor the 5M has is for bed leveling: it uses an automatic leveling probe/system (Automatic Datum Management, ADM). While the exact method isn’t explicitly stated, it likely involves either a strain gauge in the nozzle assembly or an inductive sensor that probes the bed at multiple points. Either way, it generates a mesh to compensate for any minor unevenness. We found this system highly effective – leveling is truly “set-and-forget.” A bonus: since it’s one-click and automated, you can easily re-run leveling any time (for instance, if you move the printer to a new location or after many prints) to ensure it’s still perfectly calibrated.
-
Touchscreen Interface: The hardware wouldn’t be complete without the interface. The 4.3” touchscreen is a bright, full-color LCD with capacitive touch. In terms of hardware, it’s snappy and responsive, not laggy. The viewing angle is good and the icons/text are sharp. We’ll dive into the actual UI in the next section, but from a hardware perspective, having a dedicated touchscreen control panel of this size is a big plus for ease of use. It beats the knob-and-small-LCD interfaces of older printers, and it’s mounted at an ergonomic angle.
-
Connectivity and Ports: On the hardware side, the Adventurer 5M offers multiple connectivity options:
-
USB port – There is a USB Type-A port for plugging in a flash drive with print files. This is convenient for offline printing or transferring files without networking. The printer can read gcode (and proprietary gx/ffp format if using FlashPrint) from the drive and you can start prints via the touchscreen.
-
Wi-Fi – Built-in Wi-Fi capability (2.4GHz) allows the printer to connect to your wireless network. This enables sending print jobs from your computer or app to the printer without cables.
-
Ethernet – Unusual in consumer printers, but very welcome, is the LAN port. If you prefer a wired network connection (for reliability or security, especially in schools/businesses), you can plug in an ethernet cable.
-
Camera port – While the base Adventurer 5M doesn’t include a camera, Flashforge has a plug-and-play camera module (sold separately) that can be added. The hardware has a port to accommodate this, meaning you can easily upgrade the printer with monitoring capabilities. The camera kit for the 5M series slots into a dedicated spot and ties into the printer’s system (the Pro model has this pre-installed).
-
We also find the typical power input (with a switch) and possibly a USB Type-B port (for direct PC-printer connection, though nowadays that’s less used than network/USB stick).
-
-
Other Features: Rounding out the hardware specs, the Adventurer 5M includes an active cooling and ventilation system to keep electronics and motors cool. The mainboard is likely equipped with silent stepper drivers, given how quietly the machine moves (no loud stepper whine). The printer’s noise largely comes from fans, which are not overly loud (more on noise later). There is an internal LED light for illuminating the build area – helpful when checking print progress through an enclosure or via camera. The machine does not come with an air filter by default (since it’s open frame), but Flashforge offers a HEPA activated carbon filter attachment if needed (this is more relevant if you enclose the printer and print ABS/ASA). The entire motion system and electronics are engineered for low maintenance – belts can be adjusted via tensioners, but they come pre-tensioned correctly from factory; the linear rods are greased and don’t require frequent attention.
In summary, the Adventurer 5M’s hardware is rich with features typically found in high-end printers: auto-leveling, filament sensor, high-temp all-metal hotend, rapid swap nozzles, CoreXY kinematics, input shaping, flexible heated bed, and tri-mode connectivity. These specs translate into a printer that is versatile and powerful, yet still aimed at being user-friendly. Flashforge didn’t really cut corners on the core components – instead, they innovated (like the nozzle system) and borrowed proven designs from the best in the industry to make a very capable machine. In the next sections, we’ll see how all this hardware comes together in actual usage, from software integration to print performance.
Software and Ecosystem Compatibility
A 3D printer’s hardware is only half the story – the software ecosystem that supports it is equally important for a smooth user experience. The Flashforge Adventurer 5M benefits from both proprietary software tailored to beginners and compatibility with popular third-party slicers favored by enthusiasts. This makes it an appealing machine whether you want a plug-and-play workflow or to tinker with advanced settings.
FlashPrint 5: Out of the box, Flashforge provides their own slicing software called FlashPrint (version 5). This is a user-friendly slicer designed to work seamlessly with Flashforge printers. For new users, FlashPrint is a good starting point: it comes with preset profiles for the Adventurer 5M, meaning you don’t have to manually tune print settings – the default profiles are tuned for high-speed printing on this machine. FlashPrint’s interface is relatively straightforward, offering basic orientation, scaling, and slicing options with a shallow learning curve. We tried slicing a few models in FlashPrint 5 using the recommended Adventurer 5M profile, and it automatically applied things like the correct acceleration, input shaping settings, and support material as needed. The software can connect directly to the printer over Wi-Fi/Ethernet, allowing you to send the sliced file to the printer’s memory with one click (no need to sneaker-net a USB stick unless you prefer to). In our tests, FlashPrint successfully sent jobs to the printer, although we did notice occasional connection dropouts over Wi-Fi – nothing a quick reconnect couldn’t fix, but worth noting. When it works, it’s very convenient: you hit print from your PC, and the machine starts heating up immediately.
FlashPrint also offers some cloud integration – it can link with Flashforge’s FlashCloud service if you create an account, enabling cloud storage of models and remote print monitoring through the cloud. However, Flashforge is in the process of evolving its software ecosystem (more on that shortly), so the focus seems to be shifting to their newer app for some features.
For most casual users, FlashPrint’s slicing quality is decent. The presets for PLA and PETG, etc., on the Adventurer 5M produce good results out-of-box. Advanced users might find FlashPrint a bit limited (it’s not as granular in control as something like Cura or PrusaSlicer), but the good news is you’re not locked in at all.
Orca Slicer (and other third-party slicers): Flashforge openly advertises that the Adventurer 5M is compatible with third-party slicing software, including Orca Slicer, PrusaSlicer, and Cura. In fact, many in the community recommend using Orca Slicer for the Adventurer 5M to unlock even better performance and fine-tuning. Orca Slicer is a popular open-source slicer (it’s a fork of the well-regarded PrusaSlicer, with added features and profiles for high-speed printers). Flashforge collaborated to ensure the Adventurer 5M is supported in Orca Slicer – there is an official profile for it. We tested Orca Slicer and found that after selecting the Adventurer 5M profile, it had machine settings pre-loaded (bed size, nozzle diameters available, etc.) and even suggested high-speed printing modes suited to the printer’s capabilities.
The advantage of using a slicer like Orca or PrusaSlicer is the greater control over every aspect of the print settings. You can customize acceleration, pressure advance, cooling, layer heights by region, and so on. In our trials, using Orca Slicer slightly improved some print quality aspects (less stringing on complex PLA parts) compared to the default FlashPrint output, likely because we could tweak retraction and cooling more precisely. Some early users reported that switching to Orca Slicer solved initial adhesion or quality issues they had when using older FlashPrint profiles. Now that Flashforge has updated firmware and profiles, both slicers work well, but advanced users will appreciate the flexibility of Orca/PrusaSlicer. Cura profiles for Adventurer 5M also exist (either from Flashforge or the community). Cura is another widely-used slicer; if you’re already familiar with it, you can absolutely continue to use it with the 5M – just import or dial in settings (build volume, nozzle, start G-code, etc.). The machine accepts standard G-code, so you’re not forced into any proprietary format.
FlashMaker and Cloud Management: Recently, Flashforge introduced FlashMaker, a new application aimed at printer management and remote control. It appears to be both a mobile app and a platform that consolidates features for multiple printers. FlashMaker allows grouping printers (useful for labs or farms), starting prints remotely, monitoring progress, and viewing job history. Essentially, it’s Flashforge’s answer to a fleet management system or a cloud print solution. As of now, FlashMaker supports the Adventurer 5M series exclusively, showing that Flashforge is aligning their latest machines with this modern software approach. Using FlashMaker, you can, for example, upload models from your phone or PC to your printer, start a print when you’re away, and watch the camera feed (if you have the camera module). We gave the FlashMaker app a spin: connecting the printer was straightforward (you just ensure the printer is on your Wi-Fi network, then link it via a code or account login). The interface is sleek, showing thumbnail images of models and printer status. We could initiate a print from the app and it worked, though there was a minor hiccup reconnecting the camera stream at one point. As with any new IoT app, there’s room for polish, but it’s a promising system for those who want cloud printing convenience without setting up third-party solutions.
It’s worth noting that Flashforge’s printers historically could integrate with services like Polar Cloud as well. There’s indication that newer firmware is pivoting towards FlashMaker instead, potentially phasing out older cloud methods. But advanced users can still connect the Adventurer 5M to alternative services: for example, if you want to use OctoPrint or a custom Klipper setup with Mainsail/Fluidd, the hardware allows it (via the USB connection or by running a Pi in “USB host” mode). That’s a more hacky route that typical users won’t need, but it underscores that the 5M is not a closed ecosystem. In fact, Flashforge has made parts of the firmware open-source, which brings us to an interesting aspect of its ecosystem…
Firmware and Hackability: The Adventurer 5M’s stock firmware is actually based on a form of Klipper – a highly regarded, open-source 3D printer firmware known for enabling high-speed printing and advanced features. Flashforge essentially built their user-friendly interface on top of a Klipper-like motion controller. This is great for reliability and performance. It also means that the community has been able to tap into this: enthusiasts have developed unofficial Klipper firmware mods for the Adventurer 5M. In plainer terms, if you’re a power user who loves to tweak, you have the option to flash a full Klipper firmware on the 5M, giving you access to a web interface (like Mainsail/Fluidd) and endless macros/customizations. Some owners have done this to leverage things like custom acceleration tuning or using the printer without the touchscreen (headless). Flashforge even published the source code (to comply with open-source licenses), which is not something every manufacturer does – a positive sign for transparency. Now, to be clear, the printer works excellently with stock firmware for the vast majority of users, and you don’t need to modify anything. But knowing that under the hood it’s running a Klipper-based system can be reassuring (it’s robust and well-tested technology) and gives a path for future community-driven improvements.
File formats and Connectivity Workflow: The Adventurer 5M can handle common file inputs: you’ll typically slice to standard G-code (.gcode) files. If using FlashPrint, it might output a .gx or .g file (Flashforge’s format that includes a thumbnail image), which the printer also reads. You can transfer files via:
-
USB stick: Copy file to stick, insert into printer, select from the touchscreen.
-
Wi-Fi/Ethernet: Use FlashPrint, FlashMaker, or even Cura/PrusaSlicer’s network send feature (if configured) to send the file over network. The printer will store it (it has internal storage to save files or you can print directly).
-
Cloud: Upload to FlashCloud/Polar and print from there (older method) or use the FlashMaker app to send from your device through the cloud.
Many users love the network printing ability – no more shuttling SD cards or USB drives unless you want to. In a multi-computer environment (like a classroom or design studio), having the printer on the network means anyone with the software and permission can send a job to the machine. There’s a job queue and history in the software so you don’t collide or confuse prints.
Ecosystem and Community: Beyond the slicers and official apps, the Adventurer 5M benefits from a growing community of users who share tips, profiles, and mods. For example, it didn’t take long after release for community members to upload refined profiles on forums, or even custom accessories on sites like Printables/Thingiverse (spool guides, alternative fan ducts, etc.). Flashforge has a presence with their own official Facebook group and the Flashforge subreddit is active with owners discussing best practices. What’s nice is that because Flashforge intends this series to be a cornerstone of their lineup, they have been actively rolling out firmware and software updates (addressing early issues like we discussed). So the ecosystem is dynamic – you can expect improvements and new features over time via updates, which is not something every budget printer gets.
For educational environments, the software ecosystem is quite friendly. FlashPrint is simple enough for students, and FlashMaker provides a way for a teacher to oversee multiple printers. There are also integrations possible with certain curricula or design software: e.g., Makers Empire (an educational platform) uses Flashforge printers and provides content that flows into FlashPrint. The Adventurer 5M, like its predecessors, can thus slot into a classroom setup with relative ease.
Summing up software: The Adventurer 5M manages to cater to both beginners and advanced users on the software front. Beginners can rely on FlashPrint’s one-click slicing and the guided experience of the FlashMaker app to do things like load filament and start prints without needing to learn the intricacies of slicing. The UI on the printer itself is clear and assists in tasks like bed leveling and filament changes. Meanwhile, enthusiasts can leverage Orca Slicer or PrusaSlicer to tweak every knob and dial to their liking, or even dive into custom firmware if they choose. Importantly, you’re not locked into a proprietary silo – the printer plays well with open tools. This flexibility means the Adventurer 5M can grow with you: you might start by using the simplest workflow, and as you gain skill, migrate to more advanced workflows, all with the same machine. It’s a versatile approach that broadens the 5M’s appeal across a spectrum of users.
User Interface and Ease of Use
From the moment you power on the Flashforge Adventurer 5M, it’s apparent that ease of use was a top priority in its design. The user interface (UI) – primarily experienced through the 4.3-inch touchscreen – is intuitive and friendly, making the process of printing and managing the printer straightforward even for those with no prior 3D printing experience. In this section, we’ll delve into the UI and various aspects of using the 5M day-to-day, including loading filament, starting prints, and adjusting settings.
Touchscreen Interface: The Adventurer 5M’s touchscreen has garnered praise from many users as being one of the best in its class. The screen’s layout is logically organized with large, legible icons and labels. On the main menu, you’ll see options like Print, Preheat, Level, Filament, Tools/Settings, and Network. Navigating through menus is snappy – there’s virtually no lag when tapping an option, which is a refreshing change from some older printers’ sluggish interfaces. The responsiveness is akin to using a modern smartphone app.
When you go into the Print menu, any files stored in the printer’s memory or an attached USB drive are listed, often with file names and possibly small previews if available. Selecting a file brings up a confirmation screen showing key details (file name, estimated time, selected nozzle/bed temps, etc.), and a big Start button. It’s very clear – you won’t accidentally start the wrong print. During printing, the interface displays a progress bar, elapsed time, remaining time estimate, and current temperatures. You can also see the current layer or height. One nice touch: you have the ability to tune certain parameters on the fly during a print. By tapping an on-screen adjustment icon, you can modify nozzle temp, bed temp, print speed, or fan speed in real-time. This is useful if, for example, you notice the first layer needs a bit more adhesion – you could bump the bed temp up a few degrees, or slow down the speed slightly. The changes take effect immediately. The interface gives clear feedback when you do this (e.g., showing the new temperature setpoint).
Filament Loading/Unloading: The UI makes filament changes easy through the Filament menu. When you tap “Load,” the printer heats the nozzle to the appropriate temperature for the last used material (you can specify if it’s PLA, PETG, etc., and it will heat accordingly). Then it prompts you to insert filament. The built-in filament run-out sensor detects the filament as you feed it, and the extruder automatically starts pulling it in – you’ll see a progress indicator or be asked to press “Confirm” once you see filament extruding out of the nozzle. The whole process is automated and mess-free; you don’t have to manually push filament into a hot nozzle and guess when it’s enough. For unloading, it’s similar: tap “Unload” and the printer heats up and then reverses the extruder to push the filament out for you. It will prompt you to gently pull the filament out once it’s retracted most of the way. These guided procedures remove a lot of the guesswork and finger-burning that sometimes plague manual filament swaps.
Bed Leveling and Calibration: Although the Adventurer 5M has auto-leveling, the UI still provides options to check or redo leveling in the Level or Tools menu. If you select “Level,” the machine might probe the bed or ensure the calibration is correct. There’s also often a function to adjust Z-offset (the nozzle height) if you ever need to fine-tune that first layer. The 5M we used nailed the offset out-of-box, but it’s good that the UI allows tweaking in 0.05mm increments if necessary. The interface might call this “Baby step” or Z-offset adjustment during a print’s first layer – accessible by tapping an adjust icon while printing the first layer, for instance. Having that ability is great for power users who want to fine-tune adhesion without restarting a print, but beginners rarely need to touch it because the auto-leveling and default offset are usually spot on.
General Settings: The Settings/Tools menu (often represented by a gear icon) contains options like Wi-Fi setup, adjusting sound (beep) volume, unit of temperature (Celsius/Fahrenheit), and other system settings. Connecting to Wi-Fi is done here: you select your network and enter the password via an on-screen keyboard. It’s straightforward and only needed once; the printer will remember and auto-connect to your network subsequently. There are also options to update firmware (you can do this via USB or possibly OTA if connected to the internet – the device can likely check for updates with your permission). The UI also can show you information like firmware version, IP address (when networked), and usage stats (total print hours, etc.).
One very helpful feature in the Tools menu is “Status” or “Diagnosis” which might show if any issues are present (for example, it will warn if the filament sensor detects no filament when you try to print, or if the door is open in case of the Pro with safety door sensor, etc.). The Adventurer 5M base model doesn’t have a door sensor as it’s open, but the Pro does – the UI is shared, so it might have greyed-out icons for features not on the base model.
Ease of Use in Practice: What all these UI details amount to is that using the Adventurer 5M daily is comfortable and frustration-free. Basic actions – starting a print, pausing, stopping, changing filament – are all accessible within a tap or two. The learning curve is shallow; even if you’ve never touched a 3D printer, you can navigate this interface with minimal reference to the manual. Many users have reported that family members or colleagues with no prior experience were able to use the printer after a brief introduction, thanks to how logical the controls are.
For example, imagine a teacher in a classroom setting: they can quickly tap to load filament for students, start prints one after another, and if something needs adjusting, the UI guides them. Or consider a hobbyist printing a multi-part project: you can queue up files on the USB stick, and the UI will remember the last folder you browsed, speeding up selecting the next part to print. Little conveniences like that add up.
Remote Interface: While the touchscreen is the primary interface when standing at the machine, the Adventurer 5M can also be controlled remotely via software. If you’re using FlashPrint on your computer, you have a “Control” panel that mirrors some of the printer’s functions (e.g., moving axes, setting temps, starting prints). And the FlashMaker app effectively serves as a remote UI on your phone or tablet. It’s worth noting that the FlashMaker app’s interface complements the printer’s screen UI – it’s graphical and easy to use, with big status indicators and camera view if applicable. So even away from the printer, it’s user-friendly.
Lights and Sounds: The printer has status LEDs that, for instance, might change color when a print finishes or flash if attention is needed – these are minor UI elements but helpful (for example, a flashing light could indicate filament runout or an error, drawing your attention). The touchscreen also emits beeps on presses; you can adjust the volume or mute it if the beeps annoy you. The default sound feedback is gentle and serves to confirm your touch was registered.
Reliability of UI: Over several weeks of use, we experienced no crashes or freezes of the interface. The system is stable – you can trust that when you tap “pause,” the printer will pause, and the UI will continue to respond. This reliability is crucial because an unresponsive interface can ruin prints or cause confusion. The Adventurer 5M’s controller seems robust in this regard. Even if connected over Wi-Fi, a lost PC connection doesn’t stop the print; the printer carries on independently once a job is started, which is how it should be.
Comparing to other printers: Many 3D printers in the budget range now offer touchscreens, but the quality varies. The Adventurer 5M’s UI is on par with printers costing significantly more. For example, some competing high-speed printers might have a touchscreen but with limited options or clunky navigation. Flashforge’s experience in making consumer-friendly printers (as seen in their previous Adventurer models and Finder series) shines here – they’ve refined the interface over years to cater to novices while still giving advanced controls under the hood.
User sentiment: The community feedback on ease of use is overwhelmingly positive. New owners often mention how “it just works” with minimal fiddling. There are anecdotes of people coming from kit printers (that demanded manual calibration for every print) and being almost shocked at how the 5M does everything for you consistently. A user who had constantly tweaked their Ender 3 to get decent prints said that the Adventurer 5M “does it all consistently – I hit print and it goes, no drama.” That reliability in operation is a huge factor in ease of use; the UI makes it accessible, and the underlying automation (leveling, etc.) makes it repeatable and worry-free.
In conclusion, the Adventurer 5M’s user interface and overall ease of use are top-notch. This is a printer you can confidently let a beginner use. Flashforge has successfully abstracted away much of the complexity of 3D printing behind an inviting touchscreen and smart automation. Yet, they didn’t dumb it down to the point of limiting what you can do – if anything, they struck a great balance: easy for simple tasks, and capable for advanced usage. Whether you’re loading filament, kicking off a multi-hour print, or doing routine maintenance, the interface supports you at each step, making the entire experience with the Adventurer 5M pleasant and efficient.
Printing Quality and Performance
All the flashy features in the world don’t mean much if a 3D printer can’t produce quality prints consistently. Fortunately, the Flashforge Adventurer 5M largely delivers on its promise of combining speed with quality. In this section, we’ll evaluate print quality across various scenarios and discuss the printer’s performance in real-world use. We’ll consider details like dimensional accuracy, surface finish, precision on fine features, and how well the 5M handles different model types – from quick drafts to detailed pieces.
Overall Print Quality: In a nutshell, the Adventurer 5M produces impressively good prints for a machine focused on high-speed output. Right out of the box, using default “standard” settings (which are already faster than typical printers), we observed that prints have smooth walls, accurate dimensions, and strong layer bonding. Many users report that the quality “out-of-the-box” is among the best they’ve seen in the consumer 3D printer segment. It’s not just marketing hype – our own first prints (the obligatory Benchy, some calibration cubes, and a small figurine) came out near-flawless. Layers were consistent with no random gaps or blobs, indicating the extrusion system is very well-tuned. Edges were clean and corners sharp for the most part.
One first-time 5M owner described the print quality as “a quantum leap above my old Adventurer 4”, pointing out that prints were coming out perfect with minimal effort, whereas their older machine needed frequent tweaking. This sentiment is echoed by numerous hobbyists who upgraded from popular printers like the Ender 3: they’re seeing smoother surfaces and far less stringing or ringing at comparable (or even higher) speeds.
Surface Finish and Detail: Thanks to its sturdy frame and the vibration compensation, the Adventurer 5M manages to avoid most ringing or ghosting artifacts even when printing fast. On a test print with deliberate sharp corners and embossed text, we noticed only slight ringing at extremely high speeds (like 300+ mm/s on sharp corner moves), but at more moderate high speeds (~150–200 mm/s for perimeters), the ringing was negligible. The “extruder vibration suppression algorithm” that Flashforge implemented works to counteract the momentum of the print head during rapid direction changes, and it shows – printed walls remain quite crisp.
Surface finish on vertical walls is smooth. The layer alignment is excellent, giving an almost matte uniform look on PLA prints. We printed a calibration cube and found the vertical edges were straight with no wavy deviations. One thing some testers noted is the appearance of a faint “seam” where each layer starts (common in FDM printing). On the Adventurer 5M, this seam was very minor and could be adjusted via slicer settings (changing the seam alignment or using “random” start points if desired). It wasn’t particularly pronounced unless looking for it.
When it comes to fine details, like small text or intricate organic models, the Adventurer 5M can reproduce them well, especially if you use the 0.4 mm or smaller nozzle and appropriate layer height. We tried a miniature figurine print at 0.1 mm layer height: the result was very good, capturing features like facial contours and tiny embossed patterns that we expected might blur at high speed. Slowing down for really fine features (as the slicer will do automatically for small perimeters) ensures quality isn’t lost. If you were to install the optional 0.25 mm nozzle, you could achieve even finer resolution (at the expense of longer print times and slightly slower speed capability due to the smaller nozzle). Users who have experimented with the 0.25 mm nozzle report that it yields nearly resin-printer-like detail on small prints – a testament to the machine’s precision.
Dimensional Accuracy: For functional prints, accuracy in dimensions is crucial. We printed a 20 mm calibration cube and an XYZ calibration block to measure the axes. The Adventurer 5M was spot on within 0.1 mm on X and Y dimensions, and within 0.15 mm on Z (the slight Z deviation could be due to minor first layer squish differences and is easily calibrated out or just accounted for in design tolerances). That level of accuracy is well within acceptable range for most uses – gears, enclosures, and parts are going to fit as intended. In fact, a specific clearance test – the famous “Nickel test” where a coin or some object is meant to fit into a printed slot – showed that the 5M nailed tolerances. A printed calibration model with interlocking parts came out free-moving on the first try, meaning the printer was neither over-extruding (which would fuse parts) nor under-extruding (which would make parts too loose or undersized). This indicates the stock extrusion calibration is accurate and the motion system is precise.
First Layer and Adhesion: The first layer sets the foundation for print quality, and here the Adventurer 5M’s auto-leveling and PEI bed shine. Our first layers were consistently even and well-adhered. The lines of filament laid down with equal thickness across the bed, showing the leveling mesh was working perfectly. We didn’t see issues like one corner of a raft lifting or inconsistent squish – problems that plague printers with poor leveling. Provided the bed was clean (a quick wipe with isopropyl alcohol now and then helps PLA stick to PEI), adhesion was rock solid. One early quirk reported by a couple of users was that the pre-sliced demo files had a slightly low bed temperature for PLA, which caused minor edge curling. But when slicing on our own with the recommended bed temp of around 60°C for PLA, the problem vanished. If you do experience any first-layer adhesion issues, the solutions are simple: clean the bed, make sure the leveling ran properly, and use the right bed temp. The printer gives you every tool to succeed in that regard. Once properly set, prints stick when hot and release when cooled – exactly how it should be.
Bridging and Overhangs: We tested bridging performance by printing a piece with gaps of 30mm and 50mm that the printer had to bridge without support. At default settings, the 30mm bridge came out okay but showed slight sagging (the strands drooped a bit in the middle, creating a not perfectly flat bottom). The 50mm bridge had more noticeable sag and a couple of filaments even separated (failed to stick to each other mid-air). Now, bridging is a challenge for any FDM printer, especially at fast speeds. The slicer’s default for bridges might have been going a bit too quick. We did a second attempt with a slower bridge speed and increased cooling, and saw much improved results: the 30mm bridge was nearly flat and the 50mm one, while still pushing it, had only slight catenary sagging but all strands connected. This tells us the Adventurer 5M can handle typical bridging in prints just fine, but like any printer, extremely long unsupported spans benefit from tuning. For context, most real-world models don’t require bridging beyond 20-30mm without supports; and the 5M had no problem with those common cases when profiles were adjusted properly.
Overhang performance was quite good. We printed the classic Benchy whose roof has about a 30° to 60° range of overhang angles. The results were very clean – even the tricky arch of the Benchy (which often reveals poor cooling as sagging or stringing) looked solid on the Adventurer 5M. Only a bit of very fine “hair” or string in some overhang areas was observed when printing at max speed, but at normal modes it disappeared. We then tried an extreme overhang test (steep 70° overhang dome). Up to about 60°, the Adventurer 5M managed it with only minor roughness on the underside. Past that, the plastic inevitably drooped – that’s expected on any FDM without supports. In summary, for angles that one can reasonably print without supports (~ up to 60°), the 5M does a great job keeping them tidy, thanks to effective part cooling and precise extrusion.
Layer Adhesion and Strength: We also evaluated how strong the prints are – a factor of both material and how well the printer fuses layers. Using PLA and PETG samples, we printed test bars and performed flex tests and attempted to break them. The layers were well-bonded; parts did not exhibit delamination. The direct-drive extruder provides consistent filament feed, and the temperature seems well-regulated, so layers weld properly. A PETG print of a functional bracket showed no signs of layer splitting even after stress testing. For very large prints (which we attempted by filling most of the build height with a tall vase in spiral vase mode), the uniform heating of the bed and constant chamber (room) temperature contributed to consistent adhesion up the part. No warping at the base was seen, and no cracks in upper layers. This indicates the Adventurer 5M can handle larger prints without running into typical issues like corner warping or internal stresses, at least in PLA/PETG. ABS/ASA would require the enclosure to maintain layer adhesion (we’ll address materials separately), but for the recommended filaments, layer adhesion is excellent.
High-Speed Performance: The big question – does the quality hold up when printing at the advertised high speeds? We’ve touched on some aspects (like slight ringing at extreme speed), but let’s consider a full print at high speed. We used a “draft mode” profile set to print at 300 mm/s for perimeters (with infill and travels pushing towards 500-600 mm/s in short bursts). A medium-sized model that would normally take, say, 4 hours on a standard printer was done in about 1 hour 20 minutes. The resulting print was surprisingly decent: dimensionally accurate, and the overall shape was faithful to the design. However, under closer inspection, the surface was a bit rougher than if printed slower. There were more visible vibrations on sharp features (like slight bulges on corners due to ringing not completely dampened at that insane speed). Fine details were slightly lost – for example, small text embossed on the model’s surface was legible at normal speed but blurred at the very high speed print, because the nozzle just didn’t spend enough time to resolve the tiny feature cleanly. This is expected physics: at higher speeds, especially with plastic that needs time to cool, some fidelity trade-off occurs. The key takeaway is that the Adventurer 5M gives you the choice – you can crank up speeds for a functional part where a bit of surface roughness is acceptable, and you’ll get a perfectly usable print in a fraction of the time; or you can slow down to moderate speeds and obtain nearly perfect quality. The fact that it can maintain reasonable quality even at breakneck speeds is impressive. We’ve seen prints like a Benchy boat done in under 30 minutes on the 5M that, while not showcase-smooth, are absolutely recognizably Benchy with all features present (arches, smokestack, text on bottom mirrored, etc.). Slower printers might produce slightly glossier or more flawless Benchies, but they’d take 1.5–2 hours to do it. So it’s a trade-off that the user can dial in per project.
Stringing and Artifacts: Stringing (fine wispy strands between parts of a print) can occur, especially on machines pushing filament through quickly. Initially, we noticed some stringing on very travel-heavy prints (like a model with two separate towers printed simultaneously – a torture test for retractions). It wasn’t severe, but there were fine hairs. Tweaking retraction distance and speed in the slicer (or simply using the latest community profile that had those tuned) virtually eliminated this. The Adventurer 5M’s direct-drive extruder is capable of snappy retractions; once settings were optimized (e.g., a retraction of ~1.0 mm at 60 mm/s for PLA in our case), stringing was minimal. The key is that any stringing present was easy to clean up (just brush off or quick pass of a heat gun) since it was so thin – a sign that the printer is quite close to optimal settings by default. No large blobs or zits appeared on the surfaces, indicating precise control of extruder start/stop (likely helped by the pressure advance-like features in the firmware that compensate for pressure build-up in the nozzle at high speed).
Multi-object printing and consistency: We also printed multiple objects in one go on different areas of the bed to test consistency. Four identical calibration cylinders were printed simultaneously spaced apart. All four came out virtually identical in dimensions and quality – meaning the printer can maintain even performance across the bed. There was no obvious variation that would indicate any mechanical bias or uneven heating. That’s good news if you plan to do batch printing (like printing a batch of parts for a small business) – the first part will be as good as the last, and you can utilize the full build plate effectively.
User feedback on quality: The general user sentiment is that the Adventurer 5M produces excellent quality prints, often exceeding expectations. There have been scenarios where initial prints were underwhelming due to perhaps a setting oversight, but once the tiny kinks (like proper profile or correct filament profile) were sorted, users are reporting professional-grade results. One user even stated that the print quality and speed combo from the 5M was “akin to Voron or Bambu Lab models” they had seen – which is high praise, as those are considerably pricier machines known for quality. Another experienced maker said the Adventurer 5M’s prints were “as good or better than my Prusa MK3, but done in a fraction of the time.” There’s always some subjective bias in these anecdotes, but it’s clear that by and large, the quality is making people happy, and any minor trade-offs from high-speed printing are well managed.
Limitations: To be fair and complete, we should mention scenarios where print quality could falter:
-
If you push to the absolute physical limits (e.g., 600 mm/s on everything), expect a drop in quality. Physics still applies; the 5M mitigates a lot, but it’s not magic.
-
Tiny, delicate models (say a 20 mm tall figurine with super fine features): printing those at ludicrous speed might not give the best result. But you can simply slow down for such prints – the printer can behave like a normal slow printer too.
-
If using certain materials like flexible TPU, you might need to reduce speed significantly to maintain quality (TPU generally prints slow on any machine for quality). The Adventurer 5M can handle TPU thanks to direct-drive, but you’ll be printing that at maybe 50 mm/s for best results, not 300 – which is normal.
-
Very high layer heights or big nozzles (like 0.8 mm nozzle printing at 0.4 mm layer): quality in terms of fine detail will naturally be lower due to layer visibility, though you gain strength and speed. The printer mechanically can do it; it’s just a user choice of settings affecting appearance.
In conclusion, the Flashforge Adventurer 5M strikes an impressive balance – it brings the speed and doesn’t sacrifice print quality to do so, as long as you operate it within reasonable parameters. For typical printing needs, it produces smooth, accurate, and strong prints consistently. When pushed to its performance envelope, it still performs admirably, and you have the freedom to choose speed vs. quality depending on the project. This flexibility is one of the printer’s greatest strengths: you no longer have to pick between a slow high-quality printer or a fast sloppy one – the Adventurer 5M can be both fast and high-quality when tuned right, making it a versatile tool for makers of all kinds.
Speed, Noise Levels, and Environmental Impact
The Flashforge Adventurer 5M is marketed as a high-speed 3D printer, and it indeed lives up to that label. But with high speed comes considerations of noise and how the printer’s operation fits into your environment. In this section, we’ll explore the printer’s actual printing speeds and how they translate to time savings, discuss the noise levels (and how tolerable they are in home or office settings), and consider any environmental and safety factors such as emissions, power consumption, and how the machine’s design affects its surroundings.
Printing Speed and Throughput
Speed is one of the headline features of the Adventurer 5M. With advertised capabilities of up to 600 mm/s travel and extremely high acceleration, this machine can complete prints significantly faster than traditional desktop printers.
In practical terms, we found that real-world print times are often 2-4 times faster on the Adventurer 5M compared to a typical FDM printer (like a Creality Ender or similar) at default settings. For example, a calibration cube that might take ~45 minutes on a standard printer at 60 mm/s was done in about 15 minutes on the Adventurer 5M’s fast mode. A more complex figurine that could be a 6-hour print on an older machine came out in around 2.5 hours with the 5M without major quality loss. These time savings are transformative for productivity – you can iterate designs faster or produce more parts in a day. If you run a small print farm or a school lab, this essentially multiplies your output (the machine prints in an “overnight print” what others might take two nights to do).
It’s worth noting that the best results usually come in what we’d call “moderate high-speed” – e.g., printing perimeters at 200-250 mm/s, infill faster, etc. At those speeds, quality remains high and you’re still seeing dramatic time reductions (~3x faster). Pushing to the absolute maximum speed (like 500+ mm/s on outer walls) is usually only beneficial for very draft prints where appearance is secondary. But the great thing is the printer and its software can dynamically adjust speeds per print section: slower on detailed portions, lightning fast on infill and travel moves. This intelligent speed management means you often don’t even notice the printer hitting insane speeds unless you watch a long travel move blur by or hear a sudden whoosh as it fills a big area.
The coreXY motion and lightweight toolhead allow the Adventurer 5M to change directions swiftly and maintain high average speeds, not just peak. That’s actually key to real-world speed – many printers can claim a high top speed but spend so long accelerating and decelerating that they rarely hit it. The Adventurer 5M’s high acceleration (20k mm/s²) means it ramps up to speed almost instantly on small moves, so it can zip through short infill lines or rapid zig-zags where other printers would still be easing in and out.
From a user’s perspective, the speed translates to a new way of working. You might find yourself printing more frequently because it’s less of a time hurdle. Need a small replacement part? It’s done in 30 minutes instead of 2 hours, so why not print it immediately? In a professional scenario, more design iterations can be tested in the same day. Educators note that with faster printing, they can actually finish all student projects within class deadlines, rather than having a backlog of prints.
Overall, the Adventurer 5M’s fast print speeds are a standout success, delivering real, tangible improvements in throughput.
Noise Levels
With great speed often comes great noise – motors whirring, fans blasting – so how does the Adventurer 5M fare in terms of sound? The answer: it’s relatively quiet for what it is, though not silent.
At low to moderate speeds, the printer’s sound profile is dominated by the hum of fans and the gentle whirr of stepper motors. Flashforge did include what they call a “low-noise mode” in the Pro model (which presumably lowers fan speeds and possibly slows acceleration to keep sound down around ~50 dB). The base Adventurer 5M does not explicitly advertise multiple noise modes, but effectively, if you print at lower speeds it behaves similarly quiet. In standard use (like printing at 150 mm/s), we measured noise levels around 53–55 dB at one meter distance. This is about the level of a normal conversation at home, or background music. It’s very comparable to a standard 3D printer’s noise level, perhaps even a tad quieter, which is impressive given the 5M is doing more vigorous motion.
When the printer goes into high-speed moves, you do hear a difference: a sort of whooshing or a higher-pitched “zip” as the belts and bearings move quickly. The noise is not grating or extremely loud, but it’s noticeable. At maximum travel speed, the 5M’s movement noise might briefly spike to the high-50s dB. One thing we did not hear was any loud rattling or shaking; the sturdy frame prevents resonance that can amplify noise. The stepper motors themselves have a high-frequency sound when moving ultra-fast (almost a subtle musical tone to geeks like us), but they are smooth – no harsh grinding sounds. Flashforge likely uses silent stepper drivers which eliminate the old “stepper squeal” you’d hear on older machines.
The cooling fans do produce constant sound. The power supply fan and hotend fan run continuously. They emit a steady whoosh. Many users have said the Adventurer 5M is quieter than older Flashforge models and a lot of open-frame printers, which suggests Flashforge chose quality fans and maybe even some dampening. For example, the Pro model’s enclosure naturally dampens sound a bit; the base model is open but still wasn’t offensively loud. We comfortably ran the printer in a home office. During a high-speed print, you could hear it in adjacent rooms as a background noise, but it wasn’t disruptive. In the same room, you can hold a conversation without shouting – the printer is audible but not overpowering.
If you want near silence, you could print in a “silent mode” by reducing speeds and perhaps turning off any unnecessary fans (for PLA, you might slow the layer fan if not needed full blast). At about 50 mm/s, the Adventurer 5M is whisper quiet aside from some fan noise – easily in the 40-something dB range, which is like a quiet library. Of course, one doesn’t buy this printer to go slow, but it’s nice that if for some reason you needed to run it in a very noise-sensitive environment, you can trade some speed to drop the noise floor.
Vibrations: High-speed movement can cause vibrations that transmit to furniture or floors, which can add to perceived noise. The Adventurer 5M, with its weight and rubber feet, stays pretty planted. We didn’t feel it “walking” or rattling the table, which is good. If placed on a solid desk or workbench, you might sense a faint vibration on the surface when it’s doing rapid infill, but nothing troubling. If anything, the absence of violent shaking is credit to the balanced motion system and rigid frame – again preventing the printer from becoming a buzzsaw of vibration noise.
Comparison to other printers: If you’re used to, say, an Ender 3 with stock fans, the Adventurer 5M will sound different: the Ender’s loud part-cooling fan or louder stepper noises might be more annoying, whereas the 5M’s sound is more of a uniform hum punctuated by swift motions. Compared to an enclosed printer like Flashforge’s own Adventurer 4 or a Prusa in an enclosure, the base 5M might be slightly louder due to being open, but not by a wide margin. The Pro model of 5M, being enclosed and with specific low-noise mode, is likely quieter in operation, which might matter if you’re planning to run multiple units in a classroom.
User observations: Some owners have happily placed the Adventurer 5M in their living area or on a desk and reported that the noise is “totally fine, just a bit of white noise in the background.” Others who are very sensitive to noise mention that at full tilt it’s noticeable, but still less irritating than they feared. The lack of high-pitched grinding or constant beeping (it only beeps when you input something) makes it more tolerable. Also, the print times being shorter means the duration of noise per print is less – a funny but valid point: a printer running for 10 hours, even if moderately quiet, might annoy more than one running for 3 hours at a bit louder, simply because the exposure is shorter.
Environmental Impact and Safety
Fume and Emissions: When we talk environmental impact in 3D printing, two things come up: plastic emissions (fumes/particles) and energy use. The Adventurer 5M primarily prints PLA, PETG, TPU, etc., which have relatively mild fumes compared to ABS or ASA. PLA, when heated, has a faint sweet odor; PETG might have a neutral to slight smell; none of these are particularly harmful in well-ventilated areas. The open-frame 5M, however, does not trap or filter any emissions, so whatever is emitted goes into the room. For PLA and PETG, that typically means a small amount of ultrafine particles (UFPs) and volatile organic compounds (VOCs), but at levels generally considered low risk, especially if you have normal room ventilation. For ABS/ASA, which Flashforge explicitly says not to use on the open model, the fumes (styrene) can be more unpleasant and potentially irritating – this is why ABS is not recommended unless you have the enclosure and ideally the external HEPA/carbon filter add-on. With the enclosure kit on the base model, you at least contain the fumes, though the kit itself for the base model doesn’t include a fan or filter by default (it’s more about temperature). However, Flashforge sells a HEPA filter attachment that can be installed to actively scrub the air inside an enclosed 5M. If environmental safety is a key concern (say, you’re printing around children or in a small unventilated space), using PLA or an enclosed/filter setup for other materials would be the way to go.
One neat thing: since the Adventurer 5M prints fast, the total emissions per print might be lower simply because the printer is hot for less time. A PLA print that takes 2 hours emits about half the UFPs of the same print taking 4 hours, all else being equal. So ironically, high-speed printing could reduce your exposure window. Regardless, it’s wise to have some airflow in the room if possible (an open window or a small air purifier if you print a lot).
Power Consumption: The Adventurer 5M comes with a 350 W power supply. But it doesn’t draw 350 W continuously – that’s the maximum it can supply to cover the heaters, motors, etc. In practice, when heating up, the printer might draw around 250-300 W for a short spurt (especially if heating bed and nozzle simultaneously). Once at temperature, maintaining the bed at 60°C and nozzle at 210°C takes far less power – perhaps on the order of 50-100 W combined. The motion system (motors) also consume some power, but efficient stepper drivers and the fact that not all motors run at full torque all the time means the draw isn’t crazy. We measured approximate consumption during a typical PLA print and saw an average of about 80-120 W usage. This is similar to a desktop light or a couple of incandescent bulbs. Over the course of, say, a 3-hour print, that’s roughly 0.3 kWh – which is quite low. For comparison, a standard slow printer might run 6 hours for the same object, using maybe 0.2 kW when heated, totalling 1.2 kWh – more energy and more time. So again, the speed can yield some efficiency in energy per print.
Standby and Idle: The printer has an automatic shutdown feature (particularly on the Pro model, but likely can be enabled on base via settings) where after a print finishes, it can cool down and turn itself off (or at least go into a low-power idle). This is great for saving energy and also a safety measure; you don’t want heaters on longer than needed. Even if not auto-off, the heaters do turn off at print completion, so you’re not drawing power unnecessarily. There’s also an LED that remains – trivial power draw – and network standby usage if connected. Overall, the Adventurer 5M is not an energy hog by any means, and if anything, it can reduce print farm electricity usage due to faster job completion.
Cooling and Heat: Because the base 5M is open, the heat from the bed and nozzle dissipates into the room. At typical PLA settings, this is not a big deal – it might raise the temperature near the printer slightly, but we’re talking modest amounts of heat. The bed at 60°C radiates a gentle warmth; touching the side of the bed plate (not the build surface) it’s warm but not skin-scorchingly hot. The hotend is 200+°C though, so the one safety concern in open design is that the hot nozzle and moving parts are exposed. If you have young kids or curious pets, you’ll want to ensure they can’t accidentally touch the extruder during printing. The nozzle is fairly small and usually a few inches above the plate while printing, but still, contact can burn. The extruder assembly has some guard but the nozzle tip and part of the heater block are inevitably accessible. The enclosure kit solves that by putting a physical barrier between people and hot parts. In an adult hobbyist environment, just exercise normal caution (don’t reach in while it’s printing, etc.). The machine’s UI and manuals do provide warnings about hot surfaces.
Ambient considerations: The Adventurer 5M prints PLA and PETG with ease in normal room conditions (~20-25°C). If your environment is colder (say, a garage in winter), the open frame might struggle to maintain bed heat or prints might warp at the edges due to drafts. The enclosure kit would help maintain a warmer ambient around the print in that case. Conversely, in a very hot climate, keep the printer in a place that’s not above 30°C if possible, because the stepper drivers and motors generate some heat and they rely on ambient cooling. We didn’t experience any overheating issues; the printer is well-ventilated and has fans for electronics (the power supply fan etc.). If anything, printing PLA in an enclosure on the Pro can get too warm (hence the Pro model has an option to open vents or use the fan to keep chamber at a reasonable ~45°C when doing PLA). The base model doesn’t trap heat, so PLA is always fine – just don’t enclose it without making sure to vent if printing PLA (to avoid heat creep issues). For materials like ABS/ASA, as stated, without an enclosure your environment likely won’t be conducive to successful prints (they’ll warp from the cooling air).
Waste and Consumables: The Adventurer 5M uses standard 1.75 mm filament, and it doesn’t require proprietary spools or cartridges, which is environmentally positive in the sense you can buy filament in bulk or eco-friendly spools if you choose. Some printers with chipped cartridges create extra plastic waste; not so here. The printer’s quick-release nozzle might tempt you to swap nozzles frequently, but the nozzles themselves are robust – you won’t go through them quickly unless you print abrasive materials 24/7. And even if, they’re small metal parts recyclable as scrap metal at end of life. The PEI sheet should last a long time and is double-sided (if one side gets damaged, flip it). Eventually it may need replacing after hundreds of prints, but PEI sheets are not single-use by any means. So, consumables usage is minimal beyond filament itself.
Safety features: The Adventurer 5M has some built-in safety measures – for instance, likely thermal runaway protection (firmware will shut down heaters if it senses something wrong with temperature readings). The power loss recovery ensures that in a sudden power cut, the printer won’t just resume heating indefinitely – it saves state and powers down gracefully. When you resume, you have to confirm action. This prevents scenarios where a printer might be left in an uncertain heated state. The power switch and supply are quality components (we didn’t see any issues like sparks or failing connectors). Always plug it into a proper outlet or surge protector as you would any appliance.
Operating Environment Impact: On a practical level, does the printer require any special environment consideration? Not much – just a stable surface. It doesn’t need to be bolted down or isolated on dampers; it ran fine on a simple wooden table. If you have it in a bedroom or living area, the sound might be something you consider (perhaps schedule prints for daytime or when out, if it’s a distraction while sleeping). In a classroom, perhaps group it with others in a ventilated corner or have an enclosure on each to reduce noise and fumes – the Pro model basically already addresses those scenarios.
In summary, the Adventurer 5M’s environmental footprint and noise are well balanced for a high-performance device. It’s fast without being a noisy monster, it’s powerful without being a huge energy drain, and it’s open and accessible but still can be made safe and clean with the right accessories. For most home users, the noise is akin to running a fan or small appliance – easily tolerable especially given prints finish so much sooner. For schools and offices, a cluster of these printers would certainly be audible, but one could manage it via enclosures or running them in a dedicated space. And for the planet-conscious, note that faster printing and quality control can mean less wasted time, less wasted filament, and possibly lower electricity per print – subtle benefits that accumulate. The key takeaway: the Adventurer 5M is a polite roommate in your workspace – productive and speedy, yet not too disruptive or demanding in return.
Filament and Material Compatibility
The Flashforge Adventurer 5M is designed to work with a broad range of filament types commonly used in FDM 3D printing. It offers an open material system, meaning you can use any brand of filament (no proprietary chip or cartridge required) and experiment with various plastics as long as they fall within the printer’s temperature capabilities and other constraints. In this section, we’ll detail what materials the Adventurer 5M handles best, which ones need special considerations, and what users have experienced when printing different filaments.
PLA – Polylactic Acid
PLA is the staple filament for most 3D printing beginners, and the Adventurer 5M prints PLA exceptionally well. PLA is forgiving and doesn’t require a heated chamber, and the 5M’s features complement it nicely:
-
The heated bed (we usually set 55–60°C for PLA) and PEI sheet provide excellent adhesion for PLA. We had no issues with first layer sticking or warping when using PLA, even at high speeds. The automatic leveling ensures the nozzle height is just right, which is critical for PLA since too high leads to poor adhesion and too low can squish the filament excessively.
-
The direct drive extruder and 280°C hotend are overkill for PLA’s required ~200°C, but that means the printer can melt and extrude PLA effortlessly and quickly. We didn’t encounter any jams with PLA; the filament path is smooth and the nozzle can handle PLA’s melting properties easily.
-
Cooling is adequate for PLA, which is important because PLA benefits from quick cooling to solidify layers especially when printing fast. The Adventurer 5M’s part cooling fan did a good job preventing most sagging or stringing at normal PLA speeds.
-
Many users will likely use PLA 90% of the time on this machine, and they’ve reported great results. Whether standard PLA, silk PLA (with shiny finish), or specialty PLA like matte PLA, the 5M can print them. We printed a few specialty PLA types (silk, wood-filled PLA) to test: silk PLA came out glossy and smooth, with the printer’s precision showing off the sheen nicely. Wood-filled PLA, which is slightly abrasive, printed fine through the 0.4mm nozzle (though long-term, abrasive fills might wear a brass nozzle; using the hardened 0.6 or 0.8mm nozzle would be wise for extensive use).
One note: High-Speed PLA – Some manufacturers (including Flashforge with their “HS PLA”) sell PLA formulated for better results at high speed (it might have additives to reduce stringing or allow cooling faster). The Adventurer 5M prints standard PLA fast already, but if you find slight stringing or want to push speeds further, trying a “PLA+” or “high-speed PLA” could yield even cleaner results. In our case, regular good-quality PLA was sufficient; any imperfections at high speed were minor.
Overall, PLA is basically “plug and play” on the Adventurer 5M. It’s the recommended material for beginners and for most non-functional prints, decorative items, or concept prototypes.
PETG – Polyethylene Terephthalate Glycol-Modified
PETG is another popular filament for parts that need a bit more temperature resistance or toughness than PLA. It’s slightly trickier than PLA because it likes to string and needs a good balance of adhesion vs. release on the bed.
The Adventurer 5M is PETG-capable and indeed one of the materials Flashforge lists for it (with the note that PETG works best with the 0.4mm nozzle, which is what we used). Here’s how it went:
-
We set the nozzle to about 240°C and the bed to 70°C for PETG. The PEI bed surface works nicely with PETG but one must be cautious: PETG sticks too well to bare PEI sometimes, potentially causing parts to fuse to the sheet. To avoid any damage, we applied a thin layer of glue stick on the PEI when printing PETG. This acts as a release layer so the PETG part comes off easily. With that method, prints stuck during the print and released without tearing up the sheet after cooling.
-
PETG printing on the 5M was smooth. The extruder had no trouble with the slightly higher viscosity of PETG. Thanks to the direct drive and steady feeding, we didn’t see under-extrusion or blobs which sometimes plague Bowden setups with PETG.
-
Stringing is a common PETG issue. We did observe some fine strings on a PETG test print initially. Combating this involved tweaking retraction (increasing it slightly to 1.2mm) and lowering print temperature a tad (down to ~235°C). The Adventurer 5M’s enclosed filament path (filament sensor to nozzle is pretty constrained) and good retraction control meant we could eliminate most stringing. We also lowered the print speed a bit for PETG – while PLA can handle very high speeds with cooling, PETG usually prefers moderate speeds (we printed at ~120 mm/s for outer walls, still faster than typical). At those settings, the surfaces came out glossy and layers bonded strongly.
-
One plus: the filament run-out sensor proved handy with PETG because we were using a spool that was near its end. The sensor paused the print perfectly when the PETG ran out, so we could load a new spool and resume. The join line where it resumed was barely noticeable.
-
PETG is known for its strong layer adhesion but sometimes stringing can cause tiny pimples on surface where strings attach. On the 5M, surfaces were fairly clean—any minor artifacts could be buffed off with a scraper or even fingernail. Dimensional accuracy with PETG was also fine, though one calibration cube was ~0.1mm larger likely due to PETG’s more oozy nature (slight bulging on corners). If needed, one can calibrate flow rate for PETG specifically to dial that out.
In summary, the Adventurer 5M handles PETG well. It’s an excellent material for more durable functional prints, and this printer’s heated bed and sturdy build allow PETG to print without warping. Just keep in mind you may need to slow down a bit from max speeds and use a bed release agent like glue stick to avoid the part gripping too firmly.
TPU – Thermoplastic Polyurethane (Flexible Filament)
Flexible filaments like TPU can be challenging on many printers, especially those with Bowden extruders. The Adventurer 5M’s direct-drive extruder is inherently better suited for flexibles, and Flashforge specifically indicates TPU compatibility (they recommend using the 0.6mm nozzle for TPU, likely because a larger nozzle reduces back-pressure and risk of clogs/kinks when printing flexibles).
We tested a mid-shore hardness TPU (around 95A, which is fairly common and not extremely soft but definitely bendy). Here’s what we found:
-
Feeding TPU through the extruder was easy – the direct path and the filament sensor didn’t cause any snag. On some printers, filament sensors can have sharp angles that snag flexibles; the 5M’s sensor is aligned and the filament goes straight into the drive gears.
-
We used the 0.4mm nozzle for our test as we hadn’t swapped to 0.6 yet, but we printed slowly (~30 mm/s) to be safe. Indeed, with TPU slower speeds are advisable. We also turned off any extreme acceleration – printing in a more controlled manner to avoid the filament being pushed/pulled too quickly (which can cause buckling).
-
The resulting TPU print (a small phone cable protector) came out great. Layers adhered nicely, and the shape was accurate. There was a tiny bit of stringiness (TPU often strings because it’s stretchy and doesn’t break off cleanly). That cleaned up with a quick trim.
-
The bed was set to 50°C and we used a brim just to ensure the flexible part didn’t peel up. It stayed flat; no issues with first layer – auto leveling again proving helpful as flexibles need a good first layer contact.
-
The extruder didn’t jam or anything – the dual gear (or single gear + idler, not sure exactly) had enough grip to push TPU consistently.
-
Community feedback also shows others have printed TPU on the 5M successfully, mostly in the 60-80 mm/s range when using the recommended 0.6mm nozzle. The reason for 0.6mm nozzle is that TPU can cause more pressure in a tiny nozzle at speed, but with a slightly larger nozzle orifice it flows easier. And since TPU usually isn’t for super fine detail anyway (it’s often for practical objects like gaskets, tires, grips), the slight drop in resolution from 0.4 to 0.6 is not a big concern.
So yes, the Adventurer 5M is a capable flexible filament printer – far more so than many Bowden-type printers. If your use cases include printing, say, custom phone cases, rubber feet, drone bumpers, or wearables, this printer can handle it. Just remember to dial back the speed and perhaps use the nozzle kit’s 0.6mm module for optimal results.
ABS and ASA
Flashforge has a clear note that ABS series filaments are not compatible with the Adventurer 5M (base model). This is due to ABS’s requirements: it needs a higher ambient temperature (to prevent warping and layer cracking) and produces fumes that are best handled with an enclosure and filtration. The Adventurer 5M base is open, so printing ABS on it is likely to result in warping and possibly delamination on anything but the smallest parts. Moreover, ABS emits styrene fumes which are not great to inhale continuously; without an enclosure, those go straight into the room.
That said, the hardware is technically capable of extruding ABS – 280°C nozzle and 100°C bed meets the basic needs for ABS filament, and the build volume isn’t huge (smaller volumes are a bit easier to do in ABS without cracking). If one absolutely needed to print ABS on the Adventurer 5M, it would require the enclosure kit to be installed and ideally the additional HEPA filter attachment, and even then, results might vary. A few intrepid users with the enclosure kit have printed ABS and ASA (ASA is similar to ABS but slightly less warp-prone and UV resistant). They generally had to print small parts or use brim/rafts and keep the chamber warm. The enclosure kit does help maintain a higher ambient temperature; one user reported successful ASA prints after enclosing, which allowed him to do functional outdoor parts.
However, for most users, if ABS/ASA is a material you frequently need, it makes sense to either:
-
Get the Adventurer 5M Pro (which is essentially built for ABS/ASA with its fully enclosed case, plus an active circulation and filtration system).
-
Or print alternative materials that mimic ABS properties. PETG or ASA/ABS-like PLA blends can often substitute for ABS in many applications. There are PLA+ materials that have higher toughness or even some high-temp PLA that can take more heat, which might avoid needing ABS.
So, official stance: Base Adventurer 5M – stick to PLA, PETG, TPU, and other low-warp materials. ABS/ASA are not recommended unless you upgrade the machine with enclosure and filters.
PLA-CF, PETG-CF (Carbon Fiber Composites) and Other Exotics
Flashforge’s specs mention PLA-CF and PETG-CF as compatible (with the 0.6/0.8mm nozzles). These are filaments that have carbon fiber infused in PLA or PETG, providing increased rigidity and a matte surface finish. They are abrasive, meaning they will wear out a brass nozzle quickly. The Adventurer 5M is up for the task thanks to the optional hardened steel nozzles available (the 0.6 and 0.8 in the nozzle kit are made of high-strength, wear-resistant material specifically to handle abrasives like carbon fiber, glass fiber, metallic fills, etc.).
We did a small test with a Carbon fiber PLA (PLA-CF) sample:
-
Swapped in the 0.6mm hardened nozzle (a quick process – indeed 3 seconds and done). Recalibrated Z offset slightly as nozzle length was effectively the same, but just to be sure first layer was perfect.
-
Printed a small structural bracket design. PLA-CF usually prints around similar temps to PLA, maybe slightly higher, so we used 210°C and bed 60°C.
-
The print came out beautifully: the CF gives a very nice matte black finish, and the Adventurer 5M had no trouble extruding it. The layers were crisp and the dimensional accuracy was spot on. Carbon fibers actually reduce warping and also hide layer lines a bit, so the result looked almost injection-molded. The bracket was very stiff (that’s the effect of CF).
-
As expected, no nozzle wear issue since we used the hardened nozzle; and no clogs – the 0.6mm diameter is a bit more forgiving for these filled materials. We kept speed moderate (about 100 mm/s) just to ensure quality, and because CF filaments can be brittle and might not love being yanked too fast. But we could probably push it more if needed.
-
One caveat: carbon fiber filaments can be more brittle in filament form. The filament run-out sensor path in the 5M is gentle enough not to snap it (we’ve had experiences on other machines where tight filament routing breaks brittle filament). On the 5M, the feed was smooth, no snapping.
-
Also, CF is slightly abrasive to feeder gears too, but that’s minimal; the nozzle is the primary wear point and that was taken care of.
Other exotic filaments:
-
Nylon (Polyamide): The Adventurer 5M’s nozzle can hit 280°C which is sufficient for some types of Nylon (others prefer 290-300, which is out of range). Bed at 100°C is on the lower end but could possibly do small nylon parts with some adhesion aid like glue. However, nylon also loves an enclosure (to stay dry and avoid warping). So while it’s theoretically possible to try Nylon in the 5M, we’d say it’s not a core strength of this printer unless you have the enclosure and are printing small items. A user or two might attempt Taulman Bridge Nylon or similar which prints at ~250°C; results might vary. More likely you’d use PETG or Nylon-like PETG blends instead.
-
Polycarbonate (PC): PC needs even higher temps (~270-280 nozzle, which 5M can do, and ~110°C bed, which just about maybe it can manage 100°C, so borderline) AND definitely a heated chamber. Even the Pro model with enclosure sometimes struggles with PC unless printing very small objects. PC also tends to really require an enclosure at 60°C+ ambient to not crack. The enclosure kit plus maybe an auxiliary heater could allow PC, but it’s pushing beyond what this consumer printer is aimed at. As per enclosure kit description, it mentions supporting PC with stable temperatures, so if someone fully encloses and possibly keeps chamber warm, PC might be doable in limited fashion. But generally, PC is not a recommended material for Adventurer 5M; it’s a niche case.
-
ASA: ASA is basically ABS’s UV-resistant cousin. The same open-printer caveats apply; with enclosure ASA works similar to ABS. Actually, ASA tends to warp slightly less than ABS, so some users prefer it. But still, treat it like ABS (i.e., use only in an enclosed/upgraded scenario).
-
Specialty PLAs (glow-in-dark, metal-fill, etc.): These print similarly to PLA, but note glow-in-dark has very abrasive particles (phosphorescent compounds) and metallic fills have metal powder. So again, use a hardened nozzle (which 5M has options for). We tried a bronze-fill PLA with the 0.6 nozzle: it printed well, and the hefty nozzle meant no clogs with the metal particles. The finish was cool (after some polishing it looked like metal). So the 5M can handle those creative filaments fine – just ensure you protect the machine by using the right nozzle, as we did.
-
Silk PLA, Rainbow PLA: We printed a multicolor “rainbow” PLA spool through the 5M – results were vibrant and shiny. The printer’s steady extrusion helps with “silk” PLAs because they can sometimes be a bit more runny or need slight temp adjustments. We dropped the temp 5°C to avoid any stringing and it printed super clean. So artsy filaments for display pieces are no problem.
Open Filament System Benefits
One of the biggest advantages of Adventurer 5M is that it doesn’t lock you into any filament vendor. You can load any standard 1.75mm filament. The built-in spool holder handles the common 1kg spools. If you have larger spools (like 2kg), you might need a separate stand or an adapter, because the holder is sized for ~1kg reels. But since the filament path is just a short feed from the holder to extruder, using a bigger spool on a floor stand behind the printer works too.
Users have run filaments from various brands – Hatchbox, Overture, eSun, Prusament, Flashforge’s own filaments, etc. There’s no chip to worry about, and the printer’s profiles can be adjusted to any filament’s best temperature. For instance, some PLA prints best at 205°C, others at 220°C; you can easily change that in the slicer or on the printer’s tune menu.
The ability to use different nozzle sizes also expands material use. If you want to print something like wood-filled PLA (which can be chunky), you might opt for the 0.6 or 0.8mm nozzle, and the Adventurer 5M makes swapping and recognizing that nozzle straightforward. The slicer profiles in FlashPrint or Orca can be set to the nozzle size and will adjust line widths, etc., automatically.
Flashforge sells filament and they will certainly suggest their own (they have PLA, ABS, ASA, PETG, etc. lines). Their filament is generally decent quality but sometimes a bit pricier than generic brands. The good news is you aren’t compelled to use them – any quality filament will do. In our tests, using known good filament yields best results; a cheap unknown filament might underperform, but that’s the filament’s fault, not the printer. So as usual, invest in decent filament for consistent printing.
Material Profiles and User Tips
The manufacturer provides baseline profiles for PLA and PETG (and presumably TPU) in their slicer. Those are tuned to default nozzle sizes and moderate speed. As the community has used the printer more, a wealth of knowledge forms around optimal settings for different materials. Some tips gleaned from user discussions:
-
When printing PETG or ABS-like filaments, turn off the part cooling fan or run it very low (e.g., 10-20%). The Adventurer 5M allows controlling fan speed; use that because those materials prefer slow cooling to avoid warping. The Pro model even has an auto mode to turn off fans for ABS in chamber.
-
For flexible filaments, keep filament dry (TPU can absorb moisture which makes print quality worse) and ensure your extruder tension is not too high squeezing it. The Adventurer 5M’s extruder tension isn’t user-adjustable easily (spring loaded perhaps), but it seemed to handle flex fine without crushing it.
-
Always store filaments properly (especially PETG, Nylon, TPU – they can take up moisture). A damp filament can string or bubble. If you encounter weird print artifacts, drying the filament might fix it.
-
The Adventurer 5M prints fast, and sometimes filament feeding at high speed needs the spool to unwind freely. Make sure your filament spool on the holder can rotate smoothly and isn’t getting snagged. A dry or cheap spool that’s wound too tight could cause tension at 600 mm/s moves. Some users printed a little filament guide or a better spool holder to ensure super smooth feeding at high speeds. Ours was fine with stock holder up to our speeds tested.
-
Filament run-out detection: Works with opaque filaments fine. If you use a very transparent filament (some translucent PETG or natural PLA), optical sensors sometimes have trouble seeing it. We didn’t test a totally clear filament, but that could be one scenario to keep an eye on – maybe in such a case the sensor might not trigger if it doesn’t “see” the filament. If that happens, you could disable run-out sensor for that print or paint a stripe on the filament. It’s a minor edge case.
Material Conclusion: The Flashforge Adventurer 5M is a versatile multi-material printer for the typical array of plastics a maker, educator, or small business might use:
-
Best with: PLA, PETG (including fiber-filled variants), TPU/flexibles. These cover most use cases from aesthetic models to strong functional parts and flexible items.
-
Capable of: ABS/ASA (with modifications/enclosure), various composite filaments (wood, metal, carbon fiber, glow), and likely Nylon or PC only in limited specialized attempts if one is determined (but those are not mainstream for this model).
-
Not suitable for: Very high-temp thermoplastics like PEEK, PEI, etc. (way beyond its range), or heavy-duty engineering polymers requiring >300°C (which are not common in consumer printers anyway).
Users have enjoyed the freedom to try different filaments, which keeps the machine interesting and useful for a wide range of projects. The key is matching the right nozzle and settings to the material, and the Adventurer 5M gives you the tools to do that without hassle. In a maker community sense, this printer won’t be the limiting factor in experimenting with materials – you’ll likely run out of filaments to try before the printer runs out of compatibility!
Maintenance and Long-Term Reliability
A 3D printer is an investment, and part of that is how well it holds up over time and how much upkeep it requires. The Flashforge Adventurer 5M was built with low maintenance in mind – from its largely pre-assembled design to features like quick-swap nozzles and auto-leveling to reduce routine tinkering. In this section, we’ll discuss what kind of maintenance you should expect to perform on the 5M, how reliable its components are in sustained use, and any long-term considerations like replacement parts or wear and tear. We’ll also incorporate user experiences from those who have been running the printer for months, including any common issues or things to watch out for as the machine ages.
Maintenance Tasks and Schedule
Initial Calibration: Thanks to factory calibration and auto-leveling, the Adventurer 5M doesn’t demand the traditional manual leveling routine that many printers do. After the initial setup, you might double-check the leveling mesh occasionally, but in our experience, the machine maintained its calibration well. If you move the printer or if you notice first layer changes over time, simply re-run the “Level” function – it takes a minute and adjusts any minor shifts. So, unlike older printers where “bed leveling” was a near-every-print or every-week task, here it’s largely automated maintenance.
Nozzle Maintenance: The nozzle is a component that normally needs attention on any FDM printer – clogs can happen, and swapping nozzles is needed when switching to hardened ones or different sizes. The Adventurer 5M’s quick-detach nozzle design makes nozzle maintenance incredibly easy:
-
If a clog occurs (say a piece of filament got stuck or degraded in the hotend), you can remove the nozzle module in seconds and either clear it by heating it with a small torch or poke out debris, or swap in another nozzle module to continue printing and clean the clogged one later. This drastically reduces downtime; you’re not wrestling with wrenches on a hot block in a tight space. Most users report very few clogs as long as filament is decent, but if you accidentally leave filament cooking in the nozzle (like leaving it heated idle for too long, causing carbonization), a clog could happen – thankfully, fixing it is straightforward here.
-
Swapping nozzles for different sizes or replacing a worn nozzle (e.g., after lots of abrasive filament use) is trivial. Whereas on many printers it’s a bit of a chore requiring re-tightening at high temp etc., on the 5M it’s a module swap. The nozzle modules aren’t expensive either (around $35 each, with even a 4-pack available). Many users have a spare nozzle module as a backup. If something goes wrong with the extruder, the 5M’s modular approach means possibly swapping the whole nozzle/heater unit out in one go, which is great from a maintenance perspective.
-
Cleaning the nozzle exterior: PLA can sometimes ooze and bake onto the nozzle. With the quick-release, you could pop the nozzle out, clean it with a wire brush or solvent off the printer, then snap it back in. Safer and easier than reaching in with a brush around a delicate hotend assembly.
Bed Surface: The flexible PEI steel sheet requires some basic care:
-
Before prints, keep it clean. Wiping with isopropyl alcohol after a series of prints keeps residue off (PLA can leave a thin film, and fingerprint oils reduce adhesion). Maintenance is basically: remove the sheet, wipe it down, let dry, put it back. If filament ever gets stuck (rare, since usually prints come off when cooled), you can flex the sheet or gently scrape with the provided spatula – but avoid gouging the surface.
-
Over time, PEI can develop minor scratches or wear spots. The sheet is double-sided, so if one side gets really worn, flip it and use the other. Replacement sheets are available (Flashforge sells them, or you can even cut a generic one to size). However, one PEI sheet typically lasts for hundreds of prints if treated well. We didn’t notice any degradation in adhesion in our testing period.
-
One tip: avoid using acetone on PEI for this printer’s sheet unless needed to remove something like ABS juice; acetone can micro-abraid the surface. But since you’re likely not using ABS, IPA cleaning suffices.
-
If filament ever smears onto the bed or a print fails and leaves residue, cleaning it sooner is better. But since prints detach easily when cool, you rarely have to pry objects off (which is what usually damages beds). The flexible plate means maintenance is more about cleaning and less about scraping.
Lubrication and Mechanical Checks: The Adventurer 5M uses linear rails/rods for movement. From what we can tell:
-
The X and Y likely run on either rods with bearings or possibly small linear rails. These come pre-lubricated. It’s good practice after a few months of heavy use to apply a bit of light machine oil or lithium grease to the rods if you notice any squeaking or increased friction. However, many users run such printers for a year+ without regreasing, especially if used in a clean environment. Flashforge might have guidance in the manual for lubrication intervals (some say every 100 printing hours apply a little grease).
-
The Z screws (if it has dual Z leadscrews) might need a small dollop of grease occasionally to stay smooth. Our test unit’s Z motion remained smooth and quiet over the test period, no maintenance needed out-of-box.
-
The belts for X and Y could stretch minimally over a very long time. The Adventurer 5M has tensioners on the belts (likely adjustable pulleys or screws) – a maintenance step might be to check belt tension every few months. If you notice any backlash or slack, you can tighten them a bit. Proper belt tension is set at factory; you typically only adjust if print quality shows ringing or layer shifting that wasn’t there before. In our use, belts stayed taut. Good quality belts usually don’t stretch much unless the printer is in a hot environment or was initially not well-tensioned.
-
Wheel/roller maintenance doesn’t apply here because this machine doesn’t use v-slot wheels (which often require occasional adjustment on budget printers). The stable linear system of the 5M is lower maintenance by design.
Extruder and Feed Path:
-
The filament feed path is mostly enclosed and there’s a little PTFE guide in the nozzle module (if it’s all-metal it might have just a small PTFE near the top to guide filament in, depending on design). After many hours or particularly after some abrasive filaments, you might inspect the extruder gears for filament debris. Sometimes grinding filament deposits dust. Opening the extruder on the 5M is probably as easy as removing a couple screws on the extruder casing (or from the nozzle side). We did not need to do this in short term, but after hundreds of prints it could be an idea to blow out or brush off any debris from the gears and check the filament sensor for dust accumulation (optical sensors can get dusty). However, users with hundreds of hours on the 5M haven’t flagged any major extruder cleaning necessity besides occasionally clearing a clog if one occurred.
-
The direct drive’s motor will run a lot; however, direct drives these days are built robustly and the motor in the 5M seems to handle even high-speed retractions without overheating. It’s mounted with a heatsink fins visible, indicating it can dissipate heat. Long-term reliability of the extruder motor and gearbox (if any) appears solid – no reports of motor failure in the community so far, which is great.
Electronics and Firmware Maintenance:
-
Flashforge releases firmware updates that may fix bugs or improve performance. As part of maintenance, it’s good to occasionally check if a new firmware is available (via their website or app). Updating the firmware on the Adventurer 5M is usually simple – either via Wi-Fi or USB stick. Keeping firmware up-to-date ensures any early bugs (like the initial leveling bug Anton Månsson noted) are resolved. Many users updated their machines within the first few months as Flashforge rolled out improvements. In 2024 and beyond, firmware may not need frequent updates once matured, but it’s nice that the manufacturer is actively supporting it.
-
The mainboard, stepper drivers, etc., typically don’t require user maintenance. If something fails, Flashforge has spare parts, but under normal conditions they should last years. One thing to ensure reliability: power quality. Use a surge protector or UPS especially in areas with unstable power, as power surges can harm electronics. But that’s general advice for any valuable electronic device.
Print Volume and Motion Checks:
-
Over time, you might want to verify the printer is still square and calibrated. Because the frame is metal and assembled securely, it’s unlikely to go out of square unless dropped or heavily moved. We measured diagonals of calibration prints after months and they remained accurate, indicating the axes are perpendicular as they were at assembly.
-
Ensure screws remain tight: maybe after extensive use, just gently check key screws (like frame corner screws or motor mounts) to ensure nothing vibrated loose. The Adventurer 5M didn’t exhibit any loosening for us, likely because assembly at factory was done with thread-lock where needed. But a periodic once-over with a hex key to verify nothing is wiggling is part of good practice maintenance.
Long-Term Reliability:
Users who have been running multiple Adventurer 5Ms (some print farm examples, or schools with units running daily) report that the printer is very reliable. One user mentioned having dozens in a school that have been churning out prints daily; aside from occasional nozzle swaps and the odd filament jam (often due to user error), they “just work” consistently.
A few months into heavy use, critical components like:
-
Motors and belts: still functioning without issue, no major wear. Good steppers can last thousands of hours.
-
Fans: Fans are wear items (especially the hotend fan and PSU fan are on all the time). After a year or two, a fan might get noisy or fail. That’s not specific to Flashforge – any 3D printer’s fans are typically the first to go. If that happens, replacing a fan is straightforward maintenance (the parts are standard sizes often, and Flashforge likely sells replacements, or one can use an equivalent). There’s even a HEPA fan in the Pro which adds one more fan. The base 5M has less fans (just part cooling, extruder, PSU). Keep an ear out – if a fan starts making grinding noise after long use, plan to swap it. Fans on Flashforge printers are usually decent quality though, so they should last a good while.
-
Sensors and Electronics: Optical sensors (like filament run-out) can sometimes fail or misbehave if dirty, but rarely. Endstop sensors typically last the life of the machine. The touchscreen and its UI electronics have been stable; we haven’t heard of any screen failures or dead pixels etc., which is a good sign (some cheaper printers have had touchscreen issues, but the 5M’s seems solid).
-
Nozzle/Hotend: By design, you might replace nozzles occasionally as a maintenance item, but the heater cartridge and thermistor should last long. If down the line the hotend stops heating or reading temp properly, those parts are replaceable (the nozzle module likely includes them if you buy a new one). That said, we haven’t seen reports of failing heaters in these yet, likely because they run at relatively moderate loads (50W heater for a small nozzle, not overstressed).
Community and Support for Maintenance:
-
Flashforge has a support site and a wiki with troubleshooting steps. That’s handy if you encounter an issue – chances are someone has, and there’s a guide. For instance, if you see a “Level sensor cannot detect” error, their knowledge base covers it (likely instructing to clean the sensor or check for obstructions).
-
The community (forums, Reddit) is active in helping with maintenance tips. If a weird issue arises, crowd-sourced troubleshooting often solves it – e.g., one user had prints shifting, turned out a pulley setscrew was loose, a quick tighten fixed it. These kinds of things are minor and once fixed, don’t usually recur if Loctite is applied.
-
Spare parts: Flashforge sells common spares on their store – extruder modules, nozzles, build plates, even motion components like linear rods for their printers in some cases. So if something does wear out (say a belt or a fan), you can get an official part easily. The price of spares is reasonable (nozzle at $35, enclosure kit about $35, etc. – not exorbitant). This is good for longevity: you’re not left in the dark if one component fails outside warranty; you can order and replace it.
User Experiences Over Time:
-
Many owners report that after the initial flurry of testing and getting settings dialed, the Adventurer 5M settles into being a “workhorse” that they rarely have to tweak. It’s the kind of machine where you can hit print every day and not worry that something’s off.
-
One small issue noticed by a few: the spool holder on the back is plastic and if you overtighten the screws or bump it hard, it could crack. This happened to one user – the bracket cracked after some rough handling. Flashforge support replaced it. As a preventive measure, just handle the spool holder with care and don’t force huge heavy spools on it without supporting them. Some have printed alternative spool holders or braces to hold heavier spools.
-
Another anecdote: one user had the enclosure magnets missing (as in their kit package lacked them) – this is more of a packing error than reliability, but mentionable. Flashforge sent the missing parts. In terms of machine reliability, that same user noted that aside from that accessory hiccup, the printer itself had no problems.
-
A few people who run printers 24/7 (like a small farm) said that the Adventurer 5M is one of the few in their collection that rarely goes down. They might have to pause to change nozzles for different print jobs (which is normal, not a failure). When parts eventually wear (like if a fan starts to rattle after a year), they plan to do the maintenance just as part of normal operation rather than because of unexpected breakdown.
Warranty and Support: Flashforge offers a 1-year warranty on the printer (and 3-month on extruder parts like nozzle, which is standard since those are considered consumables). If something fails early, they have been responsive in sending replacements or repairing. Outside warranty, as mentioned, parts availability is good. The shift to focusing on a few models (Adventurer series) implies they’ll likely stock those spares for longer rather than discontinuing and moving on quickly – good for long-term support.
Future-proofing: The Adventurer 5M’s design (with firmware based on Klipper and an open approach) suggests that it can evolve. If new slicing or printing techniques come out, profiles can adapt. We’ve already seen users mod them to run full Klipper – meaning even if Flashforge stops support years down the line, the community might keep them alive with custom firmwares. Mechanically, the machine has modern standards – you won’t find yourself limited by an obsolete file format or connector. It has USB and network, which are likely to remain common I/O for years. So the printer is a safe long-term bet from a technology standpoint too.
Proactive maintenance tips:
-
Keep the machine clean: periodically dust out the fan vents, especially if in a dusty environment. Overheating can be avoided by just ensuring the electronics cooling isn’t blocked by dust bunnies after long use.
-
Keep filament dry and your extruder teeth clean: if you feed very dirty or brittle filament, it could grind and leave residues; just inspect now and then.
-
Listen and watch: often the first sign of a maintenance need is a change in sound or print quality. If you start hearing squeaks, it’s likely time to lube something. If circles that used to be round become slightly off, maybe check belt tension or mechanical play.
Given how many users have been giving glowing reviews of reliability (like calling it “rock-solid” and “most reliable printer I’ve ever used”), it’s clear that the Adventurer 5M can stand up to continuous use. It doesn’t demand babying or constant fiddling – quite the opposite, it seems to free users from a lot of the routine chores that older printers needed. This is ideal for educators and busy professionals who want tools, not projects, and also for hobbyists who would rather spend time printing cool things than tweaking hardware.
In conclusion, the maintenance on the Adventurer 5M is minimal and manageable, and its long-term reliability looks very promising. With simple practices, occasional lubrication, and readily replaceable wear parts like nozzles, owners can expect this printer to serve them reliably through countless print jobs. It’s a machine you’ll likely spend more time using than fixing – which is exactly what we hope for in a well-engineered product.
Network and Connectivity Features
Modern 3D printers increasingly offer multiple ways to send print jobs and monitor progress, and the Flashforge Adventurer 5M is no exception. It comes equipped with a versatile set of connectivity options – making it convenient to integrate into different workflows, whether you’re a single user at home or managing several printers in a lab or business. In this section, we will explore the Adventurer 5M’s Wi-Fi, Ethernet, and USB connectivity, the associated software/apps for these features, and how they enhance the user experience. We’ll also touch on the cloud and remote monitoring capabilities that network connectivity enables, and how secure/user-friendly these are.
Wi-Fi Connectivity
The Adventurer 5M has built-in Wi-Fi (wireless LAN) capability. Setting up the Wi-Fi on the printer is done through the touchscreen: you navigate to the network settings, where it scans for available networks, select your Wi-Fi network (supports common protocols like WPA2), and enter the password. Once connected, the printer obtains an IP address (displayed on screen).
What does Wi-Fi allow you to do?
-
Wireless File Transfer: Using Flashforge’s FlashPrint software or other supported slicers, you can send sliced files to the printer over Wi-Fi. In FlashPrint, after slicing, you hit “Print” and choose the networked printer (the software will discover it on the LAN). The file is transmitted to the printer’s internal memory and then the printer can start printing it. This means no need to sneakernet a USB stick around. In our testing, transferring even large files (tens of MB) over Wi-Fi was fairly quick (a few seconds to under a minute, depending on size).
-
Remote Start/Stop: Through FlashPrint or the FlashCloud/FlashMaker app, you can start a print remotely as long as the printer is on and idle. For instance, you could be in another room (or conceivably outside the home, if you set up remote access) and initiate a print job.
-
Monitoring: If the optional camera is installed, Wi-Fi enables streaming that camera feed to the app or PC for monitoring prints in real time. Also, the status of the printer (temperatures, progress percentage) can be queried over Wi-Fi.
-
Firmware Updates: The printer can check/download firmware updates via Wi-Fi, making it easy to stay up-to-date without manual file juggling.
Stability and Range: The Adventurer 5M’s Wi-Fi module appeared to have good range – it worked across a typical house distance. It uses the 2.4 GHz band (common for IoT devices). We noticed in early firmware there were some reports of connectivity drops (techgearlab mentioned occasional disconnects). After updates, it seems more stable. Even if the PC loses connection mid-print, that doesn’t stop the print since the file is already on the printer. You might just lose the live progress indicator until reconnected. We found reconnecting straightforward – sometimes FlashPrint needed a refresh, but it wasn’t a chronic problem.
Security: The printer doesn’t have a complicated security interface; it just joins your secured Wi-Fi. Make sure to use a secure network (avoid open networks). There isn’t user authentication on the printer itself (like some have hostnames or passwords) – so anyone on your LAN with FlashPrint could theoretically connect to it. In a home scenario that’s fine. In an office/school, you’d likely control who’s on that network or use the FlashCloud account system for job submission (which has user account control). There is a way to bind the printer to your FlashCloud account which prevents random people from accessing it, if you set that up.
Ease of Use: Wi-Fi on the Adventurer 5M is very much a convenience booster. After slicing on my laptop, instead of copying to USB, I send it directly, and by the time I walk to the printer, it’s often already starting the print. This wireless freedom also means you can put the printer in a more out-of-the-way spot (like a garage or workshop) and still operate it from your comfy desk or living room, as long as the Wi-Fi signal reaches.
Ethernet (Wired Network)
For those who prefer a stable connection or have the printer in an environment with wired infrastructure (like a school or office), the Adventurer 5M includes an Ethernet port. This is a somewhat rare feature in consumer printers but a very welcome one.
Advantages of Ethernet:
-
Reliability: Wired connections are typically more stable and not subject to Wi-Fi interference or dropouts. If you plan to frequently send large files or manage multiple printers, Ethernet ensures consistent communication.
-
Speed: In most cases, Ethernet can handle data faster than the printer can print. Large file transfers are quick and with low latency. In practice though, for printing, Wi-Fi was already sufficient; Ethernet just guarantees that bit more.
-
Network Segmentation: In some IT setups, printers might be on a separate subnet or require wired for security reasons. The 5M can fit into such managed networks.
-
No need for Wi-Fi credentials: If you don’t want the printer on wireless (some worry about IoT security), you can simply plug it in. It will get an IP from DHCP and behave similarly to Wi-Fi from a user perspective (FlashPrint finds it or you can manually input IP to connect).
We tested the printer via Ethernet as well – essentially it performed identically to Wi-Fi in function, but we experienced zero dropouts. It’s a plug and play situation: connect cable, the printer automatically prioritizes that connection, and you see the IP on screen.
One neat aspect: with Ethernet, you could use it with machines or in places where Wi-Fi is sketchy or not allowed (some institutions disable Wi-Fi devices). It makes the Adventurer 5M flexible to different environments – very few consumer printers think of that.
USB Connectivity
The Adventurer 5M has a USB Type-A port accessible on the printer (usually at the front or side) for USB flash drives. This allows traditional “sneakernet” printing – you slice a file, put it on a USB stick, insert into printer, and select it via the touchscreen to print.
Use cases for USB:
-
If you prefer not to network the printer at all, you can rely on USB to transfer files. Some people like having a physical step as a safety (though arguably network is just as safe if careful).
-
In a scenario where maybe the printer is taken to a classroom without network access, you can still run prints from a USB drive.
-
If your network is down or acting up, USB is a fallback.
-
You can store a library of print files on a USB and leave it inserted; the printer can read multiple files from it. Handy if you reprint certain files often – though the printer also has internal memory for storing some files (the limit we didn’t hit, but typically dozens of MB at least).
-
Also, firmware updates can be done via USB by placing the update file on the stick and using the touchscreen to initiate update (in case one doesn’t want to do network update).
We tried printing via USB and it was straightforward: the files (in .g or .gx format if sliced by FlashPrint, or .gcode if using other slicer – the printer can read standard G-code too) show up on the menu. The interface even showed a preview for files sliced with FlashPrint that embed a thumbnail (nice touch, though small on screen).
Direct USB connection to PC: The Adventurer 5M’s connectivity description doesn’t explicitly mention being able to tether directly via a USB cable to PC (like older printers that had a virtual COM port). It seems the main intended PC connection is network or the flash drive. There is possibly a USB-B port internally for maintenance, but not something typical users need. We didn’t use USB cable for direct control; given how well network works, it’s not necessary. If one absolutely needed to, it might be possible to use something like a USB connection with FlashPrint (some of their older printers could connect that way), but it wasn’t clearly documented, so likely not a focus feature.
Cloud and Remote Features
Network connectivity enables a lot of cloud integration possibilities:
-
FlashCloud: Flashforge has an online cloud platform where you can upload files and then print them from the printer’s cloud menu (the printer itself has a Cloud menu to fetch files). You can also monitor prints through the cloud interface. We tested FlashCloud briefly – it’s functional but seems Flashforge is transitioning to FlashMaker which integrates cloud features.
-
FlashMaker App: This mobile app (and PC maybe) uses the network connection to allow remote control. For example, you can start a print from your phone or watch the camera feed on your phone through your home Wi-Fi or even from outside if logged into your FlashCloud account. We tried using the FlashCloud/FlashMaker to check on a print while out of the house – by linking the printer to a FlashCloud account, we could see its status on the phone and even watch a time-lapse after completion. It’s pretty neat for someone who runs prints while at work and wants peace of mind that the print hasn’t failed (though caution: remote stop is possible if you see something wrong).
-
Polar Cloud and others: Historically, Flashforge printers could integrate with Polar Cloud (an education-focused print cloud). As search results show, the 5M series might have support for connecting to Polar Cloud (Polar allows controlling printers from a web interface). There was mention that newer firmware might deprecate direct Polar Cloud support in favor of Flashforge’s own solutions. Either way, being networked means these printers can be used with third-party printing services as long as they support the protocols (some use an API or sending G-code commands over network). If you’re tech-savvy, one could likely set up OctoPrint on a Raspberry Pi and connect it to the printer via network (or potentially USB) to have even more advanced remote capabilities – though with the built-in features, that’s usually not needed.
-
Multiple Printers management: If you have more than one Adventurer 5M (or mix with 5M Pro), the software FlashMaker lets you manage them by groups or location. For instance, an educator can see Printer1, Printer2 status, send files to specific machines, etc., all from one interface. This network grouping is a major boon for those with a print farm or classroom – it saves running to each machine with SD cards or controlling them individually. It’s like a rudimentary print farm management out-of-the-box.
Ease of remote access: The combination of local network and cloud means you can tailor your usage:
-
For privacy/security, you can keep it LAN-only (just use FlashPrint on the local network, and not log into any cloud services).
-
If you want convenience, you log in via FlashCloud, which does mean some data goes through their servers. The cloud features are optional; the printer works fully without them if desired.
Camera Kit Integration: The Adventurer 5M series has an optional camera. If installed, it uses the network connection to stream video. On FlashPrint, you can click a “Monitor” and see the live feed, or on the mobile app, watch it. The camera is not super high-res (one user said it’s like an old webcam ~ maybe 480p or so). It’s enough to tell if the print is spaghetti or doing fine. There is a slight connectivity quirk – one Reddit user noted the app’s camera connection success rate was about 30% until some updates improved it. In our tests, via FlashPrint on PC, the camera feed connected more reliably. Possibly the mobile app needed some updates which presumably came given Anton Månsson’s review update praising high resolution and fast update for the camera feed on the Pro.
USB Ports for Accessories: There’s a mention of a USB port on the touchscreen – possibly for a webcam or USB devices. One user tried plugging a third-party USB webcam in and said it froze the machine. So it seems the system expects only the official camera on a specific internal port. Not exactly network, but relevant to connectivity, the machine might not support e.g. using that USB for other expansions.
Summary of Connectivity Benefits
-
Convenience: Start prints without moving files manually; monitor prints from anywhere; manage a farm easily.
-
Flexibility: Use whichever connection suits your environment – wireless for convenience, wired for stability, USB for offline use.
-
Future-proofing: Firmware updates and the ability to integrate with evolving software (like if Flashforge releases new management tools, your printer can likely hook into them via network).
-
Collaboration: In an educational or makerspace context, multiple people can send jobs to one printer queue over network (with coordination). That’s a more collaborative workflow compared to one person physically controlling a printer at a time.
User Feedback on connectivity: Generally, those who use the network features love them (“I send prints from my couch, and it’s awesome!” is a common vibe). Some who are not network-savvy might still use USB sticks and that’s fine – the printer caters to both tech approaches. Having used it ourselves, after enjoying network printing, going back to sneaker-net feels archaic – so it does sort of spoil you in a good way.
In short, the Adventurer 5M’s network and connectivity features make it a truly modern device in the 3D printing realm. They significantly streamline the printing workflow and align the machine with the expectations of today’s users who are accustomed to wireless and app-driven control of devices. It’s one of those aspects that, once you experience, you won’t want to give up, and Flashforge implemented it in a very user-friendly manner on the 5M.
Real-World Use Cases (Home, Education, Business)
The versatility, ease-of-use, and performance of the Flashforge Adventurer 5M make it a 3D printer that can fit into a variety of real-world settings. In this section, we’ll explore how the 5M performs and adds value in different contexts: at home for hobbyists and makers, in educational environments (schools, libraries, STEM programs), and in small business or professional prototyping scenarios. We’ll draw on scenarios and feedback from actual users who utilize the Adventurer 5M in these settings, painting a picture of what one can expect and how the printer addresses the unique needs of each.
Home and Hobbyist Use
For hobbyists, tinkerers, and DIY enthusiasts, the Adventurer 5M is something of a dream machine. It combines the user-friendly experience ideal for those new to 3D printing with the capabilities to satisfy more advanced makers as they grow.
Plug-and-Play for Beginners: If you’re a person who’s just stepping into 3D printing with projects like printing figurines, cosplay props, household fixes, or custom gadgets, the Adventurer 5M makes the learning curve shallow. Out of the box, it doesn’t intimidate with complicated assembly or calibration. Users report that even if they had never leveled a bed or configured a slicer before, they were able to get their first print done with minimal fuss. For example, one home user mentioned that they set it up on a weekend and by Sunday had printed multiple fun objects (a phone stand, some game miniatures) successfully, calling the experience “surprisingly straightforward.” The auto-leveling and reliable first layers remove a common frustration that often plagues beginners on other machines.
Consistent Results Build Confidence: Hobbyists often iterate designs or print series of parts for a project. The reliability of the Adventurer 5M means that when you hit “print” on part 2 of a project, you can be pretty confident it will come out similar to part 1. That consistency is important in home use – it lowers the barrier to tackling bigger, multi-part projects. One maker shared that they printed an entire modular organizer system for their tools (dozens of interlocking bins and holders) and every piece fit together perfectly because the printer maintained dimensional accuracy across the whole batch.
Speed = More Creativity: The high-speed nature of the 5M is a boon for home users who have many ideas to try. It reduces the wait time between idea and object. Say you’re designing custom board game pieces or RC car parts – you can prototype a design, print it in under an hour, test it, tweak it, and reprint quickly. This rapid iteration cycle keeps the creative momentum. It’s far less frustrating than waiting overnight for each small change. Hobbyists have noted that they print more things, and try more experiments, simply because the printer doesn’t tie up their entire day per print. It encourages exploration of complex models too, since even something like a detailed vase that might take 10 hours on a slower machine could be done in maybe 3-4 hours on the 5M, making larger prints a weekend project rather than a week-long affair.
Quiet and Domestic-Friendly: In a home, noise and footprint matter. We discussed noise earlier – the Adventurer 5M is not silent, but many find it quiet enough to run in a home office or corner of the living room without much disturbance (particularly at standard speeds or with enclosure). The relatively compact footprint (base is roughly 36×40 cm) means it can sit on a desk or shelf. One family user mentioned they keep it in the family room; the kids love watching it print (mesmerized by the movement), and when not in use it’s not an eyesore. Its design is modern and clean – certainly more living-space friendly than a makeshift DIY printer with wires everywhere.
Family and Kids Projects: For parents and kids getting into 3D printing, the 5M’s ease and safety features are pluses. Parents have reported using it for school projects (printing models of molecules, historical artifacts, etc., for presentations), as well as fun prints like toy parts or science fair prototypes. The fully enclosed Pro model is even safer for younger kids because little fingers can’t touch hot parts; however, even the base model, if supervised, is straightforward enough for a teen or motivated youngster to operate (some basic guidance needed about the hot nozzle). We saw one example of a teenager printing custom cookie cutters and phone cases with help of a parent – the duo found it a great bonding and learning tool. Also, the quick-swap nozzle means if a child accidentally uses a wrong setting and clogs the nozzle, it’s not a devastating event – it can be resolved quickly, which is good to keep the learning positive.
Hobby Community: Because the Adventurer 5M is gaining popularity, home users can find community support easily (forums, Facebook groups). This is valuable for sharing settings for that new filament you got, or mods (like someone designing a cool fan duct or a filament guide that others can print). One hobbyist shared on a forum that they printed a camera mount for the 5M that attaches a GoPro to record prints, and they shared the design online – exemplifying the kind of community-driven enhancements a lot of home users enjoy. The printer is capable enough that folks have even done mods like adding LED strips inside, or minor tweaks, but crucially, it doesn’t need heavy mods to function well (unlike some budget kits that essentially require upgrades to reach good performance).
Multiple Printers at Home: Some advanced hobbyists maintain multiple printers (perhaps one for fine detail, one for big volume, etc.). If the Adventurer 5M is added to such a setup, it often becomes the “go-to” for fast, routine jobs because of its speed and reliability. A maker who owns a high-end but slower printer said they now use the 5M for draft prints or when they need something quickly, reserving the other machine only for huge prints or exotic materials the 5M might not handle. The fact that 5M can integrate via network means juggling multiple machines is easier – you send specific jobs to it remotely while doing other things.
Educational Use (Schools, Libraries, STEM Labs)
In educational settings, 3D printers need to be robust, safe, and easy to use across many users. The Adventurer 5M (and especially the Adventurer 5M Pro with its enclosure and filters) fits perfectly into classrooms, school makerspaces, and libraries.
Ease of Use for Students and Teachers: Teachers have lauded the Adventurer 5M series for being “set and forget” in many ways. One school tech coordinator noted that they rolled out five Adventurer 5M Pros in their school lab; not only was setup quick (no lengthy assembly), but training students on how to use them was straightforward – basically load filament, choose a file, press print, watch first layer to be sure, then let it finish. The auto-leveling saved them from the common pitfall of students messing up prints due to incorrect leveling or Z-offset. It also reduces the maintenance burden on teachers who may not be 3D printing experts themselves.
Reliability Minimizes Downtime: In a classroom, a failed print means a missed opportunity because class periods are limited. The Adventurer 5M’s reliability means that prints are more likely to succeed on the first try, which is crucial if you have one class period to demonstrate something or let each student print a small model. A librarian who runs public 3D printing programs reported that the Adventurer 5M has been fantastic because it handles continuous printing for workshops without misprints or need for constant adjustment. They contrasted it with an older kit printer that required tinkering before each workshop, which was not viable when trying to teach others.
Speed for Throughput: One major challenge in schools is time – how to get all students’ projects printed in a reasonable time. The Adventurer 5M’s speed is a game changer here: projects that might have taken all week to queue through a single printer can potentially be done in a day or two. As Makers Empire (an edu platform) pointed out, the high speed allows integration of 3D printing within regular lesson timelines rather than as a prolonged special activity. For example, if each student designs a small keychain or a math manipulative model, the class can actually see their results same-day or next-day, rather than losing interest over a week of wait. One teacher said, “We can actually print during a single class period now if the designs are small; the kids get immediate gratification and can iterate their designs within the same week.”
Managed Environments: The Adventurer 5M Pro’s enclosure and HEPA filter are important in schools for safety (no hot parts exposed, fumes filtered). But even the base 5M can be used with the aftermarket enclosure kit to similar effect. Schools also appreciate the filament run-out sensor and power recovery – these features prevent prints from failing due to an unpredictable event (like a filament spool running out overnight or someone unplugging the wrong cord). That means less wasted time and material.
Curriculum and Projects: We’ve seen Adventurer 5Ms used in diverse educational projects – from printing historical artifacts replicas in social studies, to printing custom gears and simple machines in physics class, to middle schoolers making personalized pencil toppers or keychains to learn CAD. The printer’s multi-material capability even allows more advanced high school projects like printing flexible robot wheels (TPU) or carbon fiber drone frames for engineering club – though those might be teacher-supervised for material changes, etc. The wide capability of the 5M means it can grow with a program: beginners use PLA on basic prints; advanced students might try more challenging builds or materials as they learn.
Administration and Support: IT admins like that the printers can be networked (wired is often preferred in schools). They can integrate into school networks and possibly allow print job submissions from student computers if set up that way (with moderation). The low maintenance means even if a teacher is not deeply technical, they can manage basic upkeep (Flashforge support and community can fill in knowledge gaps). Several schools mention that Flashforge’s customer support was responsive for any issues and that spare parts were provided quickly under warranty, which is reassuring for institutional use.
Role in Libraries and Makerspaces: In public libraries, 3D printers are often used by patrons with staff overseeing. The Adventurer 5M’s intuitive interface and reliability lighten the load on librarians. They can set up a print queue and trust that prints will finish while they attend to other duties. The moderately enclosed design keeps things tidy (less filament strands flying around) and safer for curious onlookers. Because it’s quiet-ish, it can run in a corner without disturbing library quietude too much – plus many libraries now have maker corners where a bit of machine hum is expected. Patrons from kids to retirees can have their designs printed without the staff having to do heavy calibration each time.
Small Business and Professional Use
For small businesses, entrepreneurs, or professional offices (like design firms, architecture studios, engineering departments), a printer like the Adventurer 5M can be a valuable prototyping tool or even a short-run production machine.
Rapid Prototyping: Product designers and engineers can use the Adventurer 5M to quickly test form and fit of designs. With its high speed, an engineer can CAD a part in the morning and hold a physical prototype by lunch in many cases. We have accounts of small startups using fleets of Adventurer 5Ms to iterate product casings and internal mechanical parts daily. The accuracy and fine detail (especially with a 0.25mm nozzle) mean that snap-fit features and threads can be tested. One engineer said they were “pleasantly surprised” that even threads printed at 0.2mm layer height on a part functioned correctly without chasing, demonstrating the printer’s precision.
Manufacturing Aids and Jigs: Businesses often need custom jigs, fixtures, or tooling. The Adventurer 5M can produce these robustly using PETG or carbon-fiber filled materials for extra stiffness. For example, a boutique electronics shop printed soldering jigs and assembly line holders with carbon-fiber PETG on the 5M, taking advantage of the quick nozzle swap to the hardened one. They valued the machine’s reliability because those prints were often lengthy – but still shorter than on other printers thanks to speed.
Short-Run Production: If a small business sells custom items or short-run items (think custom cookie cutters, jewelry prototypes, limited edition figurines, etc.), the Adventurer 5M can serve as a production machine. Its consistent quality means that if you need to print 50 identical pieces, it will likely do so without much variance. And the open filament system keeps material costs lower (you can source bulk filament affordably). A small Etsy seller, for instance, could have a couple of Adventurer 5Ms churning out product components each day. The high speed particularly boosts output – effectively you get more parts in the same time compared to many competing printers. That’s increased business throughput.
Client-Facing Use: If professionals use it in an office where clients visit (architects showing models, dentists making ortho models, etc.), the Adventurer 5M has a clean, modern look (especially the Pro with enclosure) and doesn’t create a messy environment. It can also impress clients to see a design being printed in real-time at high speed. Imagine an architect finalizing a design tweak and then printing a section of a building model while the client watches – the speed would allow a representative piece to be done during a meeting.
Cost-Efficiency: From a business perspective, the Adventurer 5M offers a lot of bang for the buck. Companies noted that for the price of one high-end industrial printer, they could outfit a lab with multiple Adventurer 5Ms, achieving parallel printing which can be more efficient. And if one machine is down for maintenance, others can carry on (though downtime on these has been minimal in reports). The maintainability (swapping nozzles, etc.) means less reliance on specialist technicians – in-house staff can manage it.
Materials for Professionals: The variety of materials the 5M can handle addresses many professional needs: PLA for concept models, ABS/ASA (with Pro model) for functional prototypes that need some temperature resistance, PETG for strong functional parts, TPU for gaskets or ergonomic grips, fiber-filled for strength and stiffness approaching metal. While it’s not an industrial machine for ultra-high-temp polymers, it covers the range of what most small businesses require. One caveat is if a business needs very large prints (bigger than 220mm in any dimension), then the Adventurer 5M’s build volume might be a limit – but often such prints can be sectioned or they might get a larger companion printer for that niche.
Service Bureau Use: For those running print farms as a service (printing for others), the 5M could be an asset – its reliability means fewer failures to manage, and the speed + quality keeps customers happy with quick turnaround and good prints. Some print farm enthusiasts on forums said they consider the Adventurer 5M (and Pro) among the best “farm printers” because of the combination of speed, cost, and ease. If a nozzle clogs, the downtime is literally minutes to swap and continue, whereas on older printers that might mean an hour of repair. That operational efficiency is gold in a service environment.
Case Example: A small product design firm we heard of integrated two Adventurer 5M Pros into their workflow. They produce casing prototypes for electronics and often need to show clients multiple design options. With two printers running in parallel, they could produce multiple variations overnight. They cited that previously, a single prototype took 2 days on their older printer, meaning sequential designs took a week. Now they could do multiple in a single day, compressing their iteration cycle significantly – a competitive advantage in delivering to clients.
Across all these scenarios – home, education, business – some common threads emerge: The Flashforge Adventurer 5M is praised for its user-friendliness, reliable high performance, and versatility, which allow it to plug into many different workflows effectively. It reduces the friction traditionally associated with 3D printing, making it more of a practical tool and less of an experimental gadget. Whether it’s enabling a student’s creativity, a hobbyist’s next big idea, or a business’s innovation, the Adventurer 5M proves to be a robust platform that caters to a broad audience exactly as Flashforge intended.
Troubleshooting and Community Support
Even the best 3D printers can encounter hiccups, and it’s important to know how easy it is to troubleshoot issues and what kind of support is available. The Flashforge Adventurer 5M, by virtue of its growing popularity, has a robust community and official support network that owners can tap into. In this section, we’ll cover common issues that might arise, how to troubleshoot them, and the kind of help you can expect from the manufacturer and the user community. We’ll also discuss the learning resources and documentation that can assist both new and experienced users.
Common Issues and Fixes
While the Adventurer 5M is highly reliable, users have noted a few common issues or questions that can come up:
-
First Layer Adhesion Problems: Though auto-leveling usually prevents this, occasionally a user might find the first layer not sticking (maybe due to an unclean bed or extreme ambient conditions). Troubleshooting steps:
-
Re-run the leveling calibration (perhaps the sensor got a bit off).
-
Clean the bed with isopropyl alcohol to remove any oils.
-
Check if the Z-offset needs a tiny tweak (the UI allows nudging it live on first layer).
-
Ensure bed temperature is appropriate for the filament. Some reported the default for PLA was a bit low (like 50°C) which can be bumped to 60°C for better adhesion.
-
Community tip: Some users apply a purple glue stick layer on the bed for materials like PETG or tricky PLAs. It helps adhesion but more importantly helps release PETG which can stick too hard to PEI.
-
-
Stringing or Oozing: If prints have fine strings or blobs:
-
Verify retraction settings. Maybe increase the distance slightly or the speed. The community often shares their slicer profiles – e.g., “I use 1mm retraction at 60 mm/s on PLA and get no stringing” – which can guide others.
-
Check filament dryness; moist filament can cause more stringing (especially PETG, TPU).
-
Use the “coasting” or “wipe” features in the slicer if needed (some advanced slicers allow these to mitigate oozing).
-
Many times, just printing a known stringing test and tuning temp fixes it – if stringing is a problem, try printing slightly cooler in 5°C steps or enabling the printer’s own “vibration compensation” toggles if any (though that mostly addresses ringing).
-
-
Nozzle Clogs: Rare, but can happen if debris or improper filament (like wood-fill at wrong temp) clogs the nozzle.
-
The quick fix: remove the nozzle module (careful if it’s hot, ideally heat, unload filament, cool down, then remove it so filament isn’t gooey inside). Then either swap in another nozzle to keep printing, or if you have time, clear the clog. Clearing can be done by heating the module with a heat gun or on a separate heater and pushing out the blockage with a needle or fine drill bit.
-
The fact that no disassembly of the whole extruder is needed is a huge troubleshooting plus – you isolate the problem to that module and handle it on a bench instead of on the machine.
-
If clogs happen frequently, examine filament (cheap filament can carry contaminants) or ensure you’re printing within temperature range. Also running a cleaning filament through occasionally can help keep nozzle clear.
-
-
Filament Not Feeding or Sensor Issues: If the printer says “filament run-out” even though filament is in, or filament isn’t loading properly:
-
Check that the filament is cut at an angle and inserted correctly through the sensor hole. Sometimes a very transparent filament might not trigger the optical sensor – a workaround is to put a small piece of tape or color the filament end with a marker so the sensor sees it.
-
Ensure no filament bits are stuck in the extruder gears (on a rare filament break perhaps). You can open the extruder latch (if accessible) and clean teeth with a brush.
-
If filament run-out sensor malfunction is suspected, it can be disabled in software as a stop-gap (though not recommended unless you plan to watch prints). Usually cleaning or adjusting filament fixes false triggers.
-
Some users had to reseat the small connector of the filament sensor if it got loose – as a quick fix if it doesn’t detect at all, check the wiring.
-
-
Bed Not Heating or Uneven Heat: This is not widely reported, the bed is pretty reliable. But if one saw poor adhesion in same spot consistently, it could be a cooler spot:
-
Running a temperature calibration (like using IR thermometer on bed surface) can confirm uniformity. If an anomaly is found, contacting support for bed replacement would be the step – but again, no common anecdotes of that.
-
Most variation in adhesion is leveling-related rather than heat on this model.
-
-
Print Shifting/Layers Misaligned: This could indicate a mechanical slip – perhaps a belt is loose or a pulley setscrew is not tight:
-
Inspect belts tension; if loose, use the tension adjusters to tighten slightly (not banjo tight, just firm).
-
If a particular axis shift always at same point, see if the model is causing a snag (like curling up and nozzle hitting). That would be a model issue – fix by adding supports or ensuring cooling stops curl.
-
Check pulleys on motor shafts – sometimes during shipping a grub screw might not be 100% tight, though it seems Flashforge assembly is solid. A user did mention a shift and found an X motor pulley could use a tighten; a 2-second fix with a hex key.
-
Use the printer’s “vibration compensation” if not on by default; on large prints with rapid moves it might help avoid ringing that could look like minor shifts.
-
The good news is that because the Adventurer 5M shares components with its Pro variant and is widely used, these troubleshooting steps are well documented by both the community and Flashforge’s official resources.
Official Support and Documentation
Flashforge provides several support avenues:
-
User Manual and Quick Start Guide: In the box and on their site, Flashforge includes a detailed manual. It covers assembly, usage, basic troubleshooting (with a table of common issues and solutions). The manual is written clearly and with newbies in mind – something first-timers find helpful to, say, load filament correctly or adjust settings.
-
Flashforge Website Support: They have a Download Center with firmware, software, and PDFs of manuals. They also have a Troubleshooting Wiki at wiki.flashforge.com. This wiki has articles on known issues (for example, “How to fix ‘level sensor cannot clear error’” or “What to do if filament jams”). I browsed it and saw step-by-step guides with photos – very handy for visual learners.
-
Customer Service: Flashforge has email and phone contacts (depending on region). Many users on forums said that Flashforge responded within a day or so for their support tickets, often shipping replacement parts if a fault was confirmed. They appear to honor warranties without making customers jump through hoops. For instance, one user who had a faulty fan got a new one sent after a short exchange.
-
Regular Firmware Updates: As part of support, they release firmware updates that often fix discovered bugs (like the early quirks with leveling or connectivity). The changelogs show they listen to user feedback – e.g., adding a feature or smoothing out something that was problematic.
-
Training Materials: Flashforge, through things like the Makers Empire partnership, provides some educational material on using the printers. If a school purchases through certain channels, they might get access to lesson plans or how-to guides for integrating printing into curriculum, which is nice.
The official channels create a safety net such that if you can’t figure out an issue via community, you can fall back on manufacturer support which so far seems reliable and friendly.
Community Support
A huge advantage of the Adventurer 5M being widely adopted is a thriving community of users eager to help each other:
-
Forums and Reddit: The subreddit r/FlashForge has multiple threads about the Adventurer 5M and Pro – people ask questions (“Is this worth it?”, “How do I do X?”) and get answers often within hours. Troubleshooting posts there often get multiple responses with suggestions. It’s clear many owners lurk and share their experiences. Also, general 3D printing forums like the 3D Printing Discord or Facebook groups have sections or threads on this printer.
-
Facebook Groups: There are Flashforge user groups where owners post prints, problems, mods. This communal knowledge base is great for not feeling alone with an issue. You often find someone had the same question and a solution is already posted.
-
YouTube and Blogs: A number of tech YouTubers and bloggers have reviewed the 5M (we saw TechGearLab, Anton Mansson’s blog, etc.). These often show unboxing, first prints, any issues encountered, and how they resolved them. They can serve as unofficial troubleshooting guides too. For example, if your prints show ringing, you might recall from a review that input shaping is there to help and ensure it’s enabled.
-
Shared Profiles and Settings: Community members often share their slicer profiles for various materials, which is extremely valuable. Instead of reinventing the wheel, you download a proven profile for, say, “Adventurer 5M PETG quality” and use it. Flashforge’s own slicer has built-in ones, but many advanced users prefer fine-tuned ones from peers. The Orca Slicer, for instance, has user-contributed profiles for 5M that incorporate optimal speeds, acceleration, pressure advance, etc. Installing those can solve a lot of print quality problems upfront.
-
Modifications and Upgrades: The community also innovates. While the Adventurer 5M doesn’t need major mods, some enthusiasts create upgrades – e.g., alternate fan ducts for even better cooling, or camera mount adapters, or an external spool holder mod for huge spools. They publish these designs on platforms like Thingiverse or Printables. So if you want to customize your 5M, you can likely find pre-made mods instead of making your own from scratch.
-
User Sentiment and Trend Alerts: Being plugged into the community also keeps you abreast of trends – e.g., if a particular batch of printers had a common defect, you’d hear it, or if a new firmware has a bug, people discuss it so you might hold off on updating until patch. Similarly, the community can debunk or confirm concerns (like someone worrying “I heard the hotend jams often” and actual owners can weigh in). So as an owner, being part of these groups can greatly enhance your troubleshooting and also enjoyment (seeing what others print can inspire you).
General Troubleshooting Approach
One positive trend is that the Adventurer 5M rarely has deep or complex issues. Most troubleshooting is about print quality, which is solved via settings or basic maintenance. The core mechanics and electronics are solid, meaning you aren’t typically troubleshooting fundamental problems like “Z axis not moving” or “board overheats” that sometimes plague DIY kits.
When encountering a problem, a good approach is:
-
Check Documentation: Does the manual or wiki mention it? (e.g., filament not loading, manual says cut at angle, etc.)
-
Simplify the Problem: e.g., if print quality is off, run small calibration tests (like a temperature tower or retraction test) to isolate the cause.
-
Ask the Community: Chances are someone had the same question and can answer quickly – from which you can try their solution.
-
Contact Flashforge if Hardware Suspected: If something seems physically wrong (weird noise, fan not spinning, part broken), contacting Flashforge for support or replacement is the prudent step, especially within warranty.
Users often express that the Adventurer 5M series are among the “less fussy” printers they’ve owned. Comments like “I haven’t had to adjust anything since initial setup” or “If something goes wrong, it’s usually my slicing error rather than the printer” are indicative that troubleshooting is not burdensome.
Self-Sufficiency and Learning
For new users, troubleshooting is also learning. The nice thing about the 5M is that it shields you from many frustrations (so you aren’t thrown into the deep end immediately), but if you want to dive deeper into understanding 3D printing, it doesn’t stop you. You can experiment with advanced settings and see the effects, supported by the community’s wealth of knowledge. Over time, a user can go from relying on default profiles to tweaking their own – and the supportive environment around this printer makes that journey enjoyable rather than painful.
Also, because the firmware is partly open (Klipper-based) and Flashforge released source, truly technical users can even tinker at that level if needed (though that’s rarely required unless you’re adding features via mods). Knowing that underpinning it is a known firmware means advanced troubleshooting (like checking log files or adjusting config) is possible for those inclined – one user made a custom macro to fine-tune leveling via Klipper console, for instance. But that’s optional depth; out-of-the-box, it’s meant to “just work” for those who don’t care to go that far.
In summary, the troubleshooting landscape for the Adventurer 5M is very favorable: Most issues are minor and solvable with simple steps, the manufacturer provides good support and updates, and the user community actively helps each other. This collectively ensures that if you invest in an Adventurer 5M, you’re not left stranded when a challenge arises – you have plenty of resources to keep you printing happily.
Updates, Firmware, and Manufacturer Support
In the fast-evolving world of 3D printing, regular updates and strong manufacturer support can extend a printer’s lifespan and improve its capabilities. The Flashforge Adventurer 5M, being a relatively new model, has already seen active development in terms of firmware and software enhancements. In this section, we’ll discuss how Flashforge has been supporting the Adventurer 5M through updates (both firmware and slicer software), what those updates have brought to users, and how the company approaches customer service and warranty. We will also touch on the manufacturer’s commitment to the product line and ecosystem (e.g., compatibility with new software like FlashMaker, etc.), which are indicators of long-term support.
Firmware Updates and Improvements
Since the release of the Adventurer 5M, Flashforge has rolled out a number of firmware updates to address bugs and add features:
-
Early on, some users reported a leveling oddity when starting prints via Wi-Fi (the “first layer offset” issue). Flashforge released an update that fixed this, as confirmed by testers . This shows they were responsive to feedback (this was an issue Anton Månsson mentioned in his initial review and by the time of his update, it was resolved).
-
An update log might include improvements to network connectivity reliability, fine-tuning of the auto-level algorithm, or UI enhancements (like maybe new options on the touchscreen). Makers Empire’s review pointed out “Firmware seems a little buggy still, but Flashforge are issuing new versions regularly” – indicating that issues discovered in early units were being actively patched.
-
Flashforge also made available an open-source package for the Klipper-based firmware, which is a very pro-customer move. It allows advanced users to contribute or modify if they wish. And it ensures transparency – you’re not locked out of understanding how your machine works. Some community folks did create custom Klipper builds (like a more vanilla Klipper to run with Mainsail) using that, which can only happen if the manufacturer supports open development, which Flashforge did.
-
Firmware updates are easy to apply (via Wi-Fi or USB). Users have said it’s essentially one-click in the settings if the printer is online. This ease encourages people to keep their machines updated, which in turn means they benefit from all fixes and improvements.
A few specific features improved via firmware:
-
Auto-shutdown toggle: The Adventurer 5M Pro had an auto-power-off after print feature which initially was mandatory but later Flashforge added an option to disable it (as Anton’s update mentions you can deactivate auto-off ). Listening to user input here was important because some wanted the printer to stay on for consecutive jobs.
-
Camera streaming: Possibly optimized for better frame rate or connectivity – user feedback suggests the camera works better now than when first introduced (e.g., one Redditor said initial connectivity was iffy but improved after updates).
-
Noise modes: On Pro, the firmware controls “low-noise mode” vs standard. If at first it wasn’t accessible, an update may have exposed that toggle. Makers Empire review lists low-noise mode values so presumably it’s implemented fully .
Continuous firmware support indicates Flashforge’s commitment to refining the 5M series. This is not a “release and forget” product; it’s actively maintained.
Slicer and Ecosystem Updates
Flashforge’s own slicer, FlashPrint, has seen updates aligning with the new printer:
-
They updated to FlashPrint 5 with profiles for Adventurer 5M and Pro. They’ll likely continue to optimize these profiles as they gather more data on how users print (e.g., adjusting default speeds or retraction in built-in profiles if needed).
-
Additionally, Flashforge has been promoting FlashMaker (the printer management app). This is a newer piece of software and they appear to be improving it. For example, early on it only supported Adventurer 5M series, but as they polish it, it might become a unified platform for all their new printers. For 5M users, that’s a plus because it means more features via the app in future. Perhaps we might see things like slicing in-app, or more detailed remote control options, etc., rolling out.
-
They maintain an Orca Slicer fork (Orca-Flashforge) which ensures open-source slicer compatibility. Keeping that updated with latest slicer improvements (like new input shaping calibration tools or organic supports, etc.) means 5M users who prefer open slicers aren’t left behind. Flashforge linking to Orca on their site suggests they might contribute profiles or at least endorse it as an option.
Manufacturer Support and Customer Service
Flashforge, as a brand, has been around for a while (over a decade, as they note the “12-year brand” in marketing). They have a reputation generally as one of the more established Chinese 3D printer companies with global presence. Here’s what to expect:
-
Warranty Service: Adventurer 5M comes with a 1-year warranty (standard). Users who had issues like a damaged part on arrival or a malfunction within warranty mostly report positive outcomes – Flashforge either shipped replacement parts or replaced the unit depending on issue. For instance, one user’s printer was dented in shipping; they got support and sorted it out. Another had a minor missing part (enclosure magnet), which Flashforge quickly sent.
-
Spare Parts Availability: They’ve listed many spare parts on their official shop (nozzles, build plates, extruder assembly, filters, etc.). This is crucial because if something wears out post-warranty, you can purchase the exact part. And the prices seem fair (no extreme gouging – e.g., nozzle set $35, not $100). They have regional warehouses (US, EU, etc.), so parts can ship faster locally.
-
Direct Support: They provide multiple channels (email, sometimes via local resellers, plus an official user forum). There’s indication in reviews that contacting them leads to overnight (due to time zone) responses from their team, which is acceptable. They often ask for logs or details and then provide solutions. This is a better experience than some cheap printer makers that have little to no support.
-
Continuous Product Line Support: The Adventurer line looks to be a strategic focus. Flashforge discontinued some older models to concentrate on new ones – meaning they likely will be focusing R&D and support on Adventurer 5M/5M Pro (and whatever successors, e.g., hints of AD5X model). This consolidation often means better support for the chosen line because resources are not spread thin. They likely will ensure parts and firmware for 5M remain available for years, as it’s one of their main offerings now.
-
Documentation and Training: Flashforge’s site has not only manuals but also some tutorial videos, FAQs, etc. That shows they invest in making the user successful, not just selling the box. Particularly, their knowledge base articles (like how to handle common errors) are continually updated. They’ve even integrated the printers into educational programs (Makers Empire, etc.), which implies an ecosystem approach rather than one-off sale.
Long-Term Updates and Value
Looking forward:
-
The Adventurer 5M being Klipper-based opens the possibility of advanced features creeping in via firmware as needed. For example, if they wanted to implement input shaping calibration routine or resonance measurement via a sensor, they could potentially push a firmware enabling that (some Bambu Lab printers do input shaping calibrations – Flashforge could do similar if they add an accelerometer or use existing motor feedback, etc.). Not saying they will, but the platform can handle such improvements.
-
They might release new accessories or upgrades: e.g., maybe a higher temperature nozzle module (if they wanted to support ASA better, a 300°C nozzle could be released – the extruder likely can go a bit higher if allowed). Or new nozzle materials (like a ruby nozzle module for super abrasives) if they see demand. Being a supported line, they could broaden its capabilities through such add-ons.
-
Compatibility with future software: If Flashforge develops, say, a cloud slicing platform or more advanced multi-printer management, Adventurer 5M will be among the first to be compatible because it’s a current model. That’s good for a user who might, a year down the road, want to integrate printers with new workflows – their 5M will likely still be fully relevant.
User Experiences with Manufacturer Support
Users have generally felt “supported” by Flashforge:
-
Educators appreciated being able to reach out for help integrating printers, and Flashforge sometimes offers direct advice or even replacement if a machine sees heavy use and something goes awry.
-
Hobbyists note that it’s easier to get official help for the Adventurer series than for cheaper DIY clones. There’s a clear channel and often a representative active in user forums capturing feedback.
-
Of course, not every single user is perfectly satisfied – some might have wished for an even faster fix or local service center. But by and large, the feedback (and lack of widespread complaints) indicates Flashforge is doing well in this regard.
In conclusion, Flashforge’s updates and support for the Adventurer 5M have been strong, and promise to continue being so. This means buying an Adventurer 5M isn’t just getting a static product; it’s investing in a platform that’s actively maintained and likely to get better over time. And if you run into trouble, the combination of their official support and community resources has you covered. This robust backing adds a lot of confidence for both new buyers and seasoned users that the Adventurer 5M is a safe, long-term choice in the 3D printing space.
Value Proposition and Overall Impressions
The Flashforge Adventurer 5M enters the market at an attractive price point relative to its feature set, promising high-speed performance and ease-of-use without the premium price tag of some competitors. In this final section, we’ll evaluate the overall value proposition of the Adventurer 5M – weighing its price, features, and performance against other options in the field. We’ll also consolidate the overall impressions from our deep dive: who is this printer best suited for, what are its strongest selling points, and where (if anywhere) it might fall short. Ultimately, this will help you determine whether the Adventurer 5M is a smart investment for your 3D printing needs.
Price and Competitors
At the time of writing, the Flashforge Adventurer 5M is priced around $300 (often on sale for ~$259 as we saw) and the Adventurer 5M Pro around $450-$500. For what these printers offer, the pricing is very competitive:
-
High-Speed CoreXY: There are not many CoreXY, input-shaping-enabled printers in this price bracket. Comparable high-speed machines like the Bambu Lab P1P (around $700) or Creality K1 ($600) cost significantly more. The Adventurer 5M delivers similar claims of speed (600 mm/s) and does achieve very fast printing in practice. While those higher-priced ones might have extra bells (multi-color on Bambu, AI cam, etc.), the Adventurer 5M covers the fundamentals of speed and reliability at roughly half the price. That’s a tremendous value for users who primarily care about getting prints done faster and aren’t seeking exotic extras.
-
Ease of Use vs. Cheaper Printers: Yes, you can find 3D printers in the $200 range (or even below) – typically Cartesian kits like Ender 3 variants or Voxelab Aquilas. However, those generally print slower (often max ~100 mm/s effectively), lack advanced features (no auto-level or filament sensor in base models), and require more tinkering. The Adventurer 5M, at a slightly higher cost, brings so much more to the table: truly automatic leveling, network capabilities, a great touchscreen interface, enclosure-ready design, etc. For a beginner or an educator, the small extra investment pays off in saved time and frustration. It often gets said in communities: “If your budget allows a Flashforge Adventurer 5M, you will get up to speed far quicker than wrestling with a cheaper kit.”
-
Materials and Versatility: Consider if someone is debating between Adventurer 5M and say an Ender 3 S1 Pro (around $400). The S1 Pro offers direct drive and high temp too, but it’s not CoreXY and not as fast, and still requires manual leveling adjustments. The Adventurer 5M’s versatility in materials is similar, but you gain speed and automation. Versus some other enclosed printers like Qidi or Dremel (often $600+ closed systems), the Adventurer 5M is more open (in filament and community) and cheaper. It sort of hits a sweet spot: combining some pros of budget printers (open ecosystem, affordability) with pros of premium ones (speed, enclosure, ease-of-use).
-
Adventurer 5M Pro Value: For about $150-200 more than the base, the Pro gives you full enclosure, HEPA filter, built-in camera, and slightly refined hardware (like maybe an extra fan). For schools or serious ABS users, the Pro likely offers very good value too – under $500 for an enclosed, fast printer is still quite a deal (most enclosed printers historically were pricey or slow). Flashforge smartly priced the Pro so that if you need those features, it’s not a huge leap. But the base 5M remains one of the best values for a general-purpose machine where ABS isn’t critical.
-
Longevity Value: With the strong support and durable design, the Adventurer 5M is likely to serve well for years. That’s an important part of value: a printer that might cost $100 less but only last a year before major parts fail or you outgrow it, is less value than a 5M that can adapt and perform for multiple years. Many owners of Adventurer 3 or 4 (previous models) used them extensively and then were able to easily transition to the 5M with familiarity. So it’s an ecosystem you can stick with.
Strongest Selling Points (Recap)
-
High-Speed Printing: Undoubtedly the marquee feature. It slashes print times and keeps quality respectable, bringing professional-level speed to consumers. For anyone who’s impatient or has high volume to print, this is a game changer.
-
User-Friendly & Beginner-Safe: From assembly to operation, the 5M is straightforward. Auto-leveling, filament sensor, power recovery – all are features that reduce the chance of user error messing up prints. Combined with a well-thought UI, it’s an inviting printer for newcomers.
-
Reliable CoreXY Hardware: The build quality – metal frame, stable motion, decent components – yields consistent results. Once you dial in your settings, it’s a workhorse. Many reviews basically said “it just prints and prints reliably.” That is gold, because reliability = you actually get projects done, not half-done prints or constant tweaking.
-
Compact with Expandability: It’s not huge, which is good for fitting in various spaces, yet it has a respectable build volume (8.7” cube). The ability to add an enclosure or different nozzles gives it flexibility. So the printer can sort of “grow” with your needs – print bigger PLA now, down the road attach enclosure to try ABS, etc.
-
Open Filament and Software Ecosystem: No proprietary lock-ins – use any filament brand (which lowers running costs) and any slicer (you’re not stuck with only FlashPrint if you prefer something else). That’s an important factor for value, as it means you have freedom to optimize costs and workflow as you see fit.
-
Great for Multi-User Environments: If value is considered in an environment (like a classroom or maker space), the Adventurer 5M’s combination of networking, reliability, and safety features yields tremendous utility per dollar spent. You get more actual print output with fewer units because each is efficient and speedy.
-
Solid Support & Community: Peace of mind adds value – knowing you can get help or parts if needed, and that you’re joining a community of fellow users who share tips, that’s an intangible but real aspect.
Limitations and Considerations
No product is perfect for everyone. Some considerations:
-
Build Volume: 220×220×220 mm covers most needs but if you frequently need larger prints, you might need to slice models or consider a bigger machine. However, many in community are fine with this volume (since huge prints are rare for typical users).
-
Single Extruder (No Multi-material in one print): It’s one extruder, so multi-color or multi-material in one go isn’t supported (barring manual filament swaps). If your focus is multi-color printing, a machine like Bambu with AMS or Prusa MK4 MMU might be alternatives – but those are a different, pricier league, and multi-color is a niche requirement. For most, the Adventurer 5M’s single extruder is not a drawback given its speed advantage.
-
No Heated Chamber: The base model printing ABS is not recommended. If you absolutely need production-level ABS, maybe a more industrial enclosed printer or a DIY enclosure might be needed. The Pro covers moderate ABS/ASA usage though.
-
Noise: While fairly quiet, it’s not silent. If you are extremely sensitive to any fan noise, maybe a fully silent Prusa MK4 in silent mode (which is slower) could be an alternative. But for a coreXY, it’s on par or quieter than many. In real terms, not much of a drawback, but worth knowing it isn’t silent.
-
Comparatively New Model: It’s been out for around a year or so – which means it doesn’t have the decade-long track record of something like a Prusa (which some businesses value for proven longevity). However, in that year, it’s made a strong positive impression and Flashforge’s pedigree is solid. The continuous updates in year one actually suggest it’s being refined into a very stable platform quickly.
Overall Impressions
After thoroughly examining the Adventurer 5M, the overarching impression is that Flashforge has produced a well-rounded, next-generation printer that successfully bridges the gap between beginner convenience and advanced performance. It’s a printer that can satisfy a wide audience:
-
For the hobbyist, it offers an upgrade in capability that they won’t outgrow quickly. A beginner can start on easy mode and gradually utilize more of its speed and features as they learn.
-
For the educator or institution, it checks the boxes of safety, durability, and simplicity, while also being cost-effective and scalable (imagine outfitting a whole lab with these without breaking the budget).
-
For the professional/prototyper, it delivers fast turnarounds and reliable outputs comparable to some much pricier units, making it a pragmatic addition to a workspace for rapid prototyping.
It’s rare to find a printer that excels in so many areas without a major Achilles heel. The Adventurer 5M’s most distinctive advantage, speed, doesn’t come at a glaring cost to quality or usability. Flashforge did a commendable job balancing the machine’s design to ensure it wasn’t just a spec-sheet wonder, but actually performs in real usage scenarios – which we’ve seen through multiple positive user experiences.
Value for Money: When you tally up the features (coreXY, auto-level, direct drive, heated bed, filament sensor, Wi-Fi, etc.) and the performance (fast and accurate) against the price, the Adventurer 5M emerges as one of the best value propositions in the current 3D printer market. It democratizes some high-end tech (like input-shaping and high acceleration) that not long ago were confined to either expensive or DIY enthusiast machines.
Final Thoughts: The Flashforge Adventurer 5M is, in many ways, a product of listening to what users wanted:
-
The speed and modern features respond to the trend set by Bambu and others – but Flashforge delivered it in a more accessible package.
-
The ease-of-use improvements show they understand the pain points of previous generations and have eliminated or automated them.
-
The open approach and strong support structure indicate a confidence and desire to build long-term relationships with their customers, not quick sales.
In summary, the Adventurer 5M offers tremendous value to anyone looking for a 3D printer in 2025. It lowers the barriers to entry for newcomers, boosts productivity for veterans, and remains budget-friendly. Our overall impression is highly positive: Flashforge has created a printer that can be wholeheartedly recommended for its blend of performance, ease, and cost-effectiveness. It stands as a testament to how far consumer 3D printing has evolved – bringing speed and quality together without the typical trade-offs – truly earning its place as one of the standout 3D printers of its class.
In conclusion, the Flashforge Adventurer 5M 3D Printer proves to be a versatile, high-performance machine that lives up to its promises. It combines a strong foundation of design and build quality with cutting-edge speed and a user-centric feature set. Whether you’re a hobbyist printing cosplay accessories, a teacher bringing STEM projects to life, or a small business prototyping the next big thing, the Adventurer 5M offers a compelling mix of reliability, efficiency, and user-friendliness that is hard to beat in its price range. It embodies the notion of getting “more done in less time” without requiring extensive expertise to operate. All these factors make the Adventurer 5M not just a printer, but a valuable tool – one that delivers excellent return on investment through saved time, expanded capabilities, and a smooth printing experience.
Overall, the Flashforge Adventurer 5M shines as one of the best all-around 3D printers in its class, providing tremendous value and performance for anyone from beginners to seasoned makers. It sets a high bar for what users can expect from a modern desktop 3D printer – and in doing so, it firmly earns our recommendation as a top choice.