The Anycubic Kobra 3 3D printer is a bold step forward in consumer 3D printing, bringing advanced features like ultra-fast printing and multicolor capabilities to a broad audience. Whether you’re a hobbyist eager to print vibrant models, a beginner looking for a user-friendly first machine, a professional needing rapid prototyping, or an educator wanting a reliable classroom tool, the Kobra 3 promises something for everyone. This review dives deep into every aspect of the Anycubic Kobra 3 – from unboxing and setup to long-term performance – to see if it lives up to the hype as an all-in-one high-speed multicolor 3D printer.
Anycubic has built a reputation for affordable yet feature-packed printers, and the Kobra 3 is their latest flagship filament printer. It’s equipped with innovations like multi-filament printing (up to 4 colors out of the box, expandable to 8), input shaping for faster prints (advertised up to 600 mm/s), and a fully automated calibration system. In this comprehensive review, we’ll explore how these features work in practice. We’ll walk through the technical setup process from unboxing to first print, examine the auto-calibration workflow and troubleshooting tips, evaluate the build quality and hardware specifications, and discuss the software experience including slicer settings and workflow tips with Cura, Anycubic’s own slicer, and more. You’ll also learn about the Kobra 3’s real-world performance in terms of speed, noise, and print quality with different materials (PLA, PETG, TPU, etc.), as well as maintenance routines and upgrade potential. Throughout, we’ll highlight real user pain points encountered so far and provide advanced tips to help you get the absolute most out of this printer.
If you’re considering the Anycubic Kobra 3, or just want to know how far 3D printing has come in 2025, keep reading. By the end of this extensive review, you’ll have a clear picture of what the Kobra 3 can do, how to use it effectively, and whether it’s the right 3D printer for your needs. Let’s begin with the journey from unboxing the printer to producing that exciting first print.
Unboxing and Setup: From Box to First Print
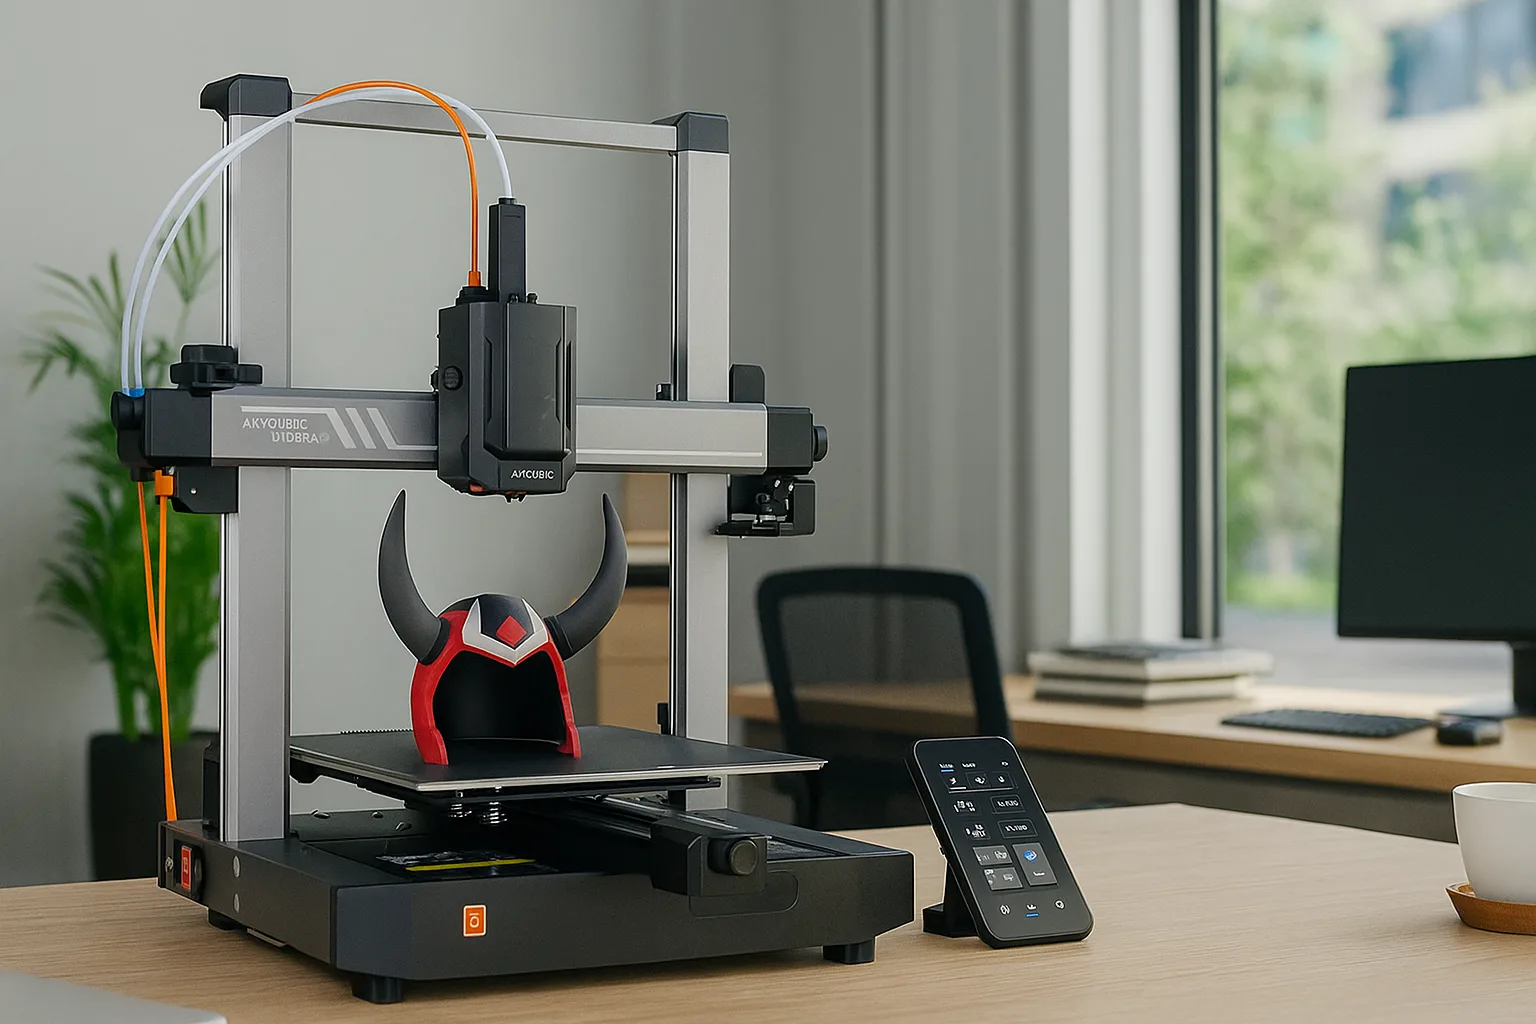
Unboxing the Kobra 3 is an exciting experience, as Anycubic has packaged the machine with care and a high degree of pre-assembly. Inside the box, you’ll find the main components neatly organized: the printer’s base (which houses the heated bed and electronics), the gantry frame with the X-axis, the print head assembly, a tilting touchscreen, a spool holder, the “ACE” multi-color module (if you have the Combo version), and various accessories. All screws and tools required for assembly are provided, typically sorted into clearly labeled bags. A quick-start guide or user manual is included, walking you through the setup step by step.
Assembly of the Anycubic Kobra 3 is refreshingly quick – a far cry from the old days of complicated kit builds. In fact, much of the printer comes pre-assembled from the factory. The vertical gantry is already attached to the base, so there’s no need to bolt the frame together in this case. The primary assembly steps involve mounting the print head, attaching a few modular components, and connecting cables:
-
Mounting the Print Head: The print head (extruder and hotend unit) slides onto the X-axis rail from the back. You secure it with a few screws (inserted from the front of the X-carriage). This is straightforward and the manual illustrates the exact screw locations. It’s often easiest to loosely thread all screws and then tighten them fully once the head is aligned. The Kobra 3’s print head is a unified module that includes the direct-drive extruder, fans, and a filament sensor, so installing it is just one step.
-
Connecting Cables: Next, plug in the main ribbon cable that runs to the print head. The Kobra 3 uses a sturdy orange flat cable (Type-C style connector) for the toolhead – you simply press it into the port on top of the print head until it clicks. A shorter 6-pin cable connects the X-axis motor on the side; insert it into the provided slot with the latch oriented correctly (the manual shows the orientation). The cables come with a plastic cable holder that you clip onto the gantry, keeping the ribbon and tubes neatly bundled and guiding them during motion. Take a moment to route the cables exactly as instructed – this will prevent any snagging or stress during printing.
-
Installing the Touchscreen: The 4.3-inch touchscreen mounts onto the front of the base. It tilts upwards for easy viewing. You attach it using a couple of screws from Bag #3, then connect the flat ribbon cable to the back of the screen. The connector is a simple push-in (ensure it’s fully seated). The screen’s adjustable angle (30° to 60° tilt) is a nice ergonomic touch, letting you view controls comfortably whether you’re sitting or standing.
-
Spool Holder (Single-Color Setup): If you plan to use the Kobra 3 in single-filament mode (or until you set up the multi-color unit), you’ll install the spool holder. The holder provided is a sturdy plastic arm that slots into a groove on the back of the printer’s base. Insert the cylindrical peg of the holder into the slot and twist – it locks in place securely. The holder sits behind the printer, centered, which feeds filament well for the direct-drive extruder. There’s also a short PTFE filament guide tube included: push one end into the filament inlet on top of the extruder and the other end into the hole on the spool holder or cable organizer. This little Bowden tube guides the filament smoothly from the spool to the moving extruder, reducing drag. (Note: If you’re going straight to multi-color printing with the “Combo” setup, you can skip installing the single spool holder and short tube. Instead, you’ll set up the external multi-filament unit as described below.)
-
Attaching the Purge Wiper: One distinctive accessory is the purge wiper assembly. This is a small plastic piece with a replaceable brush or wiper that helps clean the nozzle during filament changes. It slides into a channel on the rear of the X-axis (just behind the print head’s travel range). From the back of the printer, insert the wiper into the groove and push it towards the front until aligned, then secure it with the designated screw from Bag #4. The wiper sits at one end of the build plate – the printer will use it to wipe off any ooze when purging old filament during color swaps. Make sure it’s firmly in place and the brush faces the nozzle.
-
Setting up the ACE Pro Multi-Color Unit (Combo version): If you have the Kobra 3 Combo (which includes the Anycubic Color Engine Pro, often called the ACE or ACE Pro), there are a few additional steps to integrate it. The ACE Pro is the external filament feeder/dryer box that holds up to 4 spools (and supports up to 8 colors with two units or an upgraded version). Position the ACE Pro box to the left side of the printer, about 10–15 cm away, as instructed (this ensures the filament tubes reach without sharp bends). There will be a 4-pin signal cable and four Bowden filament tubes coming from the ACE. First, plug the 4-pin cable into the port on the left side of the printer’s base (behind a rubber cover) – this cable carries power and communication between the printer and the filament unit. Then plug the other end of that cable into the ACE Pro. Next, take the four long filament tubes and insert them into the “filament hub” on top of the Kobra 3’s print head. They push into the four inlet holes until snug (remove any blue collet locks if present, then reinsert them after pushing the tubes in). Do the same on the ACE Pro side: each tube goes into one of the four output ports on the ACE box. The order of the tubes usually doesn’t matter (the system will detect which filament is loaded where via sensor), but it’s wise to keep them straight to avoid tangling. Finally, secure the tubes alongside the main ribbon cable in the cable holder and organizers so that everything moves together cleanly. The result should look tidy: four tubes and the orange cable running in a bundle from the ACE to the extruder, with no kinks and enough slack for the print head to travel freely across the bed.
With the hardware assembled and cables connected, do a quick once-over check before powering on. Verify that the printer is on a stable surface and no packing materials or zip ties remain on the motion components. Gently move the axes by hand (with power off) to feel for any obstructions: the X-carriage and bed should slide smoothly. Check the tension of the belts – Anycubic pre-tensions them, but they should feel taut like a firm rubber band. The Kobra 3 conveniently has belt tension adjusters if needed (usually on the X end and Y front), but avoid over-tightening. Also glance at the wheels on the gantry (if your unit uses V-wheels on v-slot rails): if there’s excessive play or wobble, you can adjust the eccentric nuts to snug them up, though from the factory these are normally well-calibrated. Lastly, make sure the voltage selector on the power supply (if present) is set correctly for your local mains voltage (110V/220V), although many modern units auto-switch.
Now it’s time for the power-on and initial setup. Plug the printer into a grounded outlet and switch it on. The Kobra 3’s power supply is 400W, capable of heating the bed and hotend quickly, and you’ll see the machine come alive with a splash screen on the touch display. The 4.3″ touchscreen will guide you through an initial setup wizard when first powered (especially if the ACE unit is connected). Follow the prompts on the screen:
-
Network Connection (Optional): The Kobra 3 can connect to Wi-Fi for cloud features and firmware updates. During the first boot, you may be prompted to set up Wi-Fi. It’s not strictly necessary for printing, but connecting your printer to your network allows the use of Anycubic’s mobile app and cloud print service. You can skip or configure this now. (You can always bind the printer to the app later by scanning a QR code in the settings menu).
-
Loading Filament: If you have the ACE Pro multi-filament unit connected, the screen will likely prompt you to load filaments into the device. Open the lid of the ACE, place up to four spools inside (each sits on rotating rollers for low friction), and feed each filament into the corresponding tube input a few centimeters until an internal sensor detects it. The ACE will automatically grab and pre-load the filament partway through the Bowden tubes. On the screen, for each filament loaded, select its type and color. If you’re using Anycubic’s own filaments with RFID tags, the printer can auto-identify the material and even color name, which is a neat feature – but for third-party filaments, you’ll just manually choose (e.g., PLA, red). If you’re not using the ACE (single-spool mode), you can load a filament by selecting a “Load Filament” option. The extruder will heat up the nozzle to the preset temperature and prompt you to insert filament into the extruder intake. Feed the filament until the gears catch it – the direct drive will then pull it through. Within a few seconds, you should see filament extruding from the nozzle. (The Kobra 3’s extruder has a handy run-out sensor and an automatic feeder, so it will typically grab and feed filament after you insert it a short distance).
-
Initial Calibration Routines: One of the great things about the Kobra 3 is that it performs critical calibrations automatically on first startup. The printer will likely go through an auto bed leveling process and possibly a vibration compensation calibration before the first print. For leveling, the Kobra 3 uses Anycubic’s LeviQ 3.0 auto-leveling system, which requires no manual leveling at all. It will raise the bed and use the nozzle (or a probe) to tap at multiple points across the bed to mesh out any unevenness. (Before this, the printer might move the nozzle to the purge wiper and clean it to ensure accurate probing – you’ll hear a quick brush sound as it scrapes any excess plastic off the nozzle). Then the nozzle or an inductive sensor will touch down on the bed in a grid pattern (typically 25 points or more). This process only takes a minute or two. After leveling, the machine also runs a quick Z-offset adjustment to find the perfect initial nozzle height. You might notice the nozzle doing a gentle tap at the center of the bed to set a “zero” point.
Additionally, the Kobra 3 runs a resonance calibration (input shaping) routine automatically. During this “vibration compensation” calibration, the printer will move the toolhead back and forth in X and Y axes rapidly and measure the vibrations via a built-in accelerometer on the print head. It’s essentially tuning the input shaping parameters to match your specific machine and setup, which helps eliminate ringing/ghosting in prints at high speeds. You don’t need to do anything except avoid bumping the printer while it’s calibrating. In a similar vein, the printer may also perform a quick PID tuning for the hotend temperature to ensure stable heating. All of this automatic tuning is done to maximize print quality and speed without burdening the user with manual calibration – an impressive feature that makes the first print experience much smoother, especially for beginners.
-
Test Print Selection: With the bed leveled and filaments loaded, you’re just about ready to print. Anycubic typically includes a few pre-sliced test files in the printer’s internal memory or on the provided USB flash drive. On the touchscreen, navigate to the print menu and you should find sample models (often a calibration cube, a small multicolor demo like a fidget spinner or toy, etc.). It’s a good idea to start with one of these files as your first print, since they’ve been prepared by Anycubic to show off the printer’s capabilities and should work without any adjustments. For example, a common first print for the Kobra 3 Combo is a four-color fidget spinner or emblem that demonstrates color changes.
Select the model and hit “Print”. The printer will heat the bed and nozzle to the required temperatures (displaying progress on the screen). Once at temperature, it will begin printing. Watch as the Kobra 3 lays down its first layer – this is where you can confirm if the Z-offset is correctly set. The first layer should come out smooth and properly adhered: lines of filament pressed slightly into the bed, not so squished that they smear, and not so high that they don’t stick. If you see that the lines are too thin/flattened or the nozzle is actually scraping the bed, the Z-offset might be too low; conversely, gaps between lines or poor adhesion mean offset is too high. On earlier firmware versions of the Kobra 3, adjusting the Z-offset “live” was oddly not possible via the screen (a quirk that Anycubic addressed later). If your first layer isn’t perfect, don’t panic – we’ll discuss in the next section how to fine-tune that. Many users find the factory leveling gets it close, but a slight adjustment might be needed for perfection.
After a few initial minutes, the printer should be steadily producing the test print. If it’s a multicolor print and you have the ACE unit connected, you’ll witness the automatic filament changes: when it’s time to switch colors, the Kobra 3 will retract and cut the current filament, purge out any residual filament at the purge brush (creating a little spaghetti “poop” strand that falls off), then load the next filament from the ACE and resume printing in the new color. It’s quite a show for the first time, and it’s done entirely on its own. A single-color print, of course, will just continuously print.
Within the hour (depending on the model), you’ll have your first completed 3D print from the Kobra 3. Remove it from the bed once cooled (the flexible PEI spring steel sheet makes print removal easy – just flex it and the model usually pops off). It’s a good moment to appreciate that you went from unboxing to a finished print with minimal hassle. The automatic setup features of the Kobra 3 clearly aim to lower the barrier to entry.
In summary, the unboxing and assembly process of the Anycubic Kobra 3 is streamlined and beginner-friendly. Most users can go from sealed box to printing in under 30 minutes. The combination of pre-assembled components, a clear manual, and automated calibration routines means you won’t spend your first day struggling with bed leveling or firmware configuration. Next, we’ll delve deeper into those calibration systems and what to do if things aren’t perfect on the first try – because a little understanding of the Kobra 3’s leveling and calibration will help you troubleshoot and achieve optimal results consistently.
Auto-Leveling and Calibration Workflow
One of the standout features of the Anycubic Kobra 3 is its fully automated calibration workflow. For newcomers, this means you don’t need to perform the tedious manual bed leveling that older printers required, and even experienced users will appreciate the time saved and consistency gained. In this section, we’ll explain how the Kobra 3’s calibration systems work, what they do automatically, and how you can troubleshoot or fine-tune if necessary.
LeviQ 3.0 Automatic Bed Leveling
At the heart of the Kobra 3’s setup is LeviQ 3.0, Anycubic’s latest automatic bed leveling system. This system uses a combination of sensors to map the build platform and set the correct nozzle height. Unlike typical printers that might use a separate probe or require manual adjustment of screws, the Kobra 3 does it all with a press of a button.
Here’s what happens during an auto-level (when you select “Auto Level” from the Tools > Control menu, or during first setup):
-
The printer will likely home all axes first (moving the nozzle to a corner and the bed to a reference point).
-
If a purge brush is installed, the Kobra 3 will heat the nozzle slightly and wipe it on the brush to ensure no blobs of plastic could interfere with sensing.
-
The nozzle (or a tiny strain-gauge sensor in the print head) then taps the bed at multiple grid points. The Kobra 3 uses a 16-point or 25-point grid (and possibly even more points internally) across the 250×250 mm bed. Each tap measures the Z position where the nozzle contacts the bed.
-
From these points, the printer builds a “mesh” of the bed’s surface. Even if the bed or gantry has minor unevenness or tilt, the firmware will adjust the nozzle up and down during printing to follow this measured mesh, resulting in a level first layer everywhere. Essentially, LeviQ 3.0 compensates for any bumps or dips automatically.
-
LeviQ 3.0 also handles the Z-axis offset (the tiny gap between nozzle and bed at printing). Older auto-level systems would find relative leveling but still required the user to set the final offset (often by sliding paper under the nozzle). Kobra 3 attempts to set this itself by probing a specific point or using a sensor.
In practice, the auto-level is very accurate, but if you find your first layer wasn’t perfect, you may want to adjust the Z offset slightly. By late 2024, Anycubic introduced a firmware update that allowed adjusting the Z-offset on the printer’s interface – check if your “Move” or “Control” menu has a Z-offset or “Z-axis compensation” setting. If so, you can nudge it up or down by small increments (like 0.05 mm) to dial in that first layer. If the option isn’t present, an easy workaround is to use the slicer: you can set a global Z-offset there. For example, if you noticed the nozzle was a bit too close (squishing filament too much), you could set an offset of +0.1 mm in the slicer before printing the next job. Conversely, if too far (poor adhesion), set -0.1 mm. Usually only a tiny tweak is needed – once you hit the sweet spot, you can leave it as is.
It’s worth noting that the Kobra 3 uses a “free Z-axis compensation” mechanism. With dual Z lead screws and possibly a sensor for gantry tilt, the printer can also compensate if the X gantry is not perfectly parallel to the bed. All of this means the machine is very forgiving – you don’t have to manually adjust eccentric nuts or level screws to get prints going. Still, basic good practice helps: the bed should be clean and the nozzle free of debris when leveling, and the printer should sit on a flat surface. If the auto-level ever seems off (for instance, if you transport the printer or after many prints), you can always re-run the auto-level process via the menu. It only takes a couple of minutes and can save you from a failed print due to leveling drift.
One-Click Vibration Compensation (Input Shaping)
Beyond leveling, the Kobra 3’s calibration arsenal includes vibration compensation, which is essentially input shaping. Input shaping is a modern feature borrowed from high-end and DIY printers (and popularized via Klipper firmware) that actively counteracts the vibrations of the printer when moving at high speeds. Unchecked vibrations lead to print defects like ringing (those ripples or ghosted echoes near sharp corners). The Kobra 3 has an onboard accelerometer sensor that detects how the printer vibrates during quick movements. During the calibration routine, it moves the print head in patterns and records the resonance frequencies. The firmware then applies mathematical “shaping” to motion commands – slightly altering acceleration timings – to cancel out those resonances.
What does this mean for you? It means the printer can print faster without sacrificing much quality. Anycubic touts a maximum of 600 mm/s travel/print speed for the Kobra 3 (with realistic printing speeds for quality typically in the 150–300 mm/s range). Thanks to input shaping, when the Kobra 3 zips around at these speeds, you won’t see severe ringing artifacts on your prints. Edges remain crisp and corners don’t echo significantly, which is impressive on a machine at this price point.
The “One-click” calibration usually runs automatically on first setup, but you can also initiate it yourself whenever needed. The manual recommends doing a vibration calibration after about 300 hours of printing, or anytime you move the printer to a new location. If you notice ringing starting to creep in over time, re-calibrating could help. To run it, go to Tools > Control > Vibration Compensation and start the process. The printer will vibrate and shake for a short time – avoid touching it or the table until it’s done. After that, you’re set for another long stretch of high-speed printing with minimal ringing. Regular calibration keeps the motion tuned; think of it as a tune-up for the “sports car” speed mode of your printer.
Extruder Flow Calibration and PID Tuning
Another calibration step the Kobra 3 performs is flow rate calibration – essentially tuning the extrusion system. Anycubic advertised “accurate flow calibration” as part of the one-click process. This likely includes adjusting the Pressure Advance (PA) or a similar parameter. Pressure Advance (in Marlin firmware or equivalent) helps counteract the delay in filament flow during acceleration and deceleration. By calibrating this, the printer can reduce issues like blobbing at corners or inconsistencies in extrusion when speeds change. The Kobra 3 might do a quick internal test to set an optimal PA value so that when printing at high accel, corners remain sharp without over-extrusion. Users don’t have to manually calibrate esteps or flow rate usually – the machine handles it. However, if you ever suspect slight over or under extrusion, you can still calibrate E-steps manually by marking and extruding filament lengths, but that’s rarely needed here.
PID tuning for the hotend and bed is done to ensure stable temperatures. The printer fires the heaters and measures, adjusting the PID control loop so that when you set, say, 210°C, it stays near that without oscillation. This gives more consistent extrusion and prevents issues like slight variations in print due to temp fluctuations.
Troubleshooting Calibration Issues
Despite all the automation, it’s possible you might run into calibration-related quirks. Here are some common issues and how to address them:
-
First Layer Still Not Perfect: If you see the first layer is uneven after auto-leveling, the first suspect is Z-offset. As discussed, adjust it slightly. Some users also found that the initial firmware lacked an easy Z-adjust interface, but Anycubic has since updated this. If your firmware is older, consider updating to the latest version (we’ll cover the firmware update process later). Also, ensure the bed surface is clean – residue can affect the first layer. Wipe the PEI sheet with isopropyl alcohol once cooled to remove any oils; a clean bed gives more consistent leveling readings and adhesion.
-
LeviQ Leveling Fails or is Inaccurate: On rare occasions, if there’s debris on the nozzle or a bit of filament stuck, the sensor might get a bad reading. The result could be that one side of the bed prints too high or low. If you suspect this, cancel the print. Heat the nozzle and clean it (manually remove any blob; you might even let it extrude a bit and wipe the tip with the wire brush when cooled to about 150°C so plastic isn’t gooey). Then re-run auto-level. The Kobra 3’s leveling should be reliable after that. Similarly, check that the bed itself is firmly mounted (the Kobra 3’s bed is usually fixed with no adjustable screws; if it’s removable, make sure it’s clipped or magnetically seated flat).
-
Filament Not Loading or Sensor Issues: If during filament loading the extruder doesn’t seem to grab the filament, make sure you cut a clean end (45-degree angle helps) and insert it far enough. The built-in filament runout sensor in the print head will detect filament presence. If it’s not detecting, possibly the filament is too thin or the sensor cable is loose – check the small cable on the extruder if accessible. Typically this isn’t a problem, but it’s worth noting if you skip the proper procedure, the printer might think filament isn’t loaded and refuse to start a print. Always use the on-screen “Extrude/Load” function rather than forcing filament in, so the printer knows what’s going on.
-
Resonance Calibration for Y-axis: Some users noted that occasionally one axis might still show a bit of ringing if something is slightly off (for example, if the printer’s belts loosen over time, the resonance profile changes). If you start seeing minor ringing on Y axis but not X (or vice versa), it doesn’t hurt to re-run the vibration calibration. Also, double-check mechanical things: the Kobra 3 has both V-slot wheels and linear rods on axes for stability. If a wheel is loose or a rod’s bearing dry, that can introduce wobble. Lubrication (covered in Maintenance) and tightening can fix that, which in turn improves the calibration’s effectiveness.
-
Nozzle Height Adjust in Mid-Print: Suppose you realize halfway through the first layer that the nozzle offset is wrong. On printers with baby-stepping you’d adjust live. On the Kobra 3, if the firmware now supports it, tap the filament icon or settings icon during printing – there might be a “Z-offset” or “Flush Vol.” (flush volume relates to purge, discussed later) that you can adjust. If not, it’s safest to stop the print, tweak offset via slicer or firmware and restart, rather than let a bad first layer continue.
Overall, the Anycubic Kobra 3’s calibration workflow is among the most advanced in its class. It eliminates a lot of trial and error and helps users succeed on the first print. Once you’ve got leveling and calibration down (mostly automated, with minor fine-tuning), you can focus on slicing and printing without worrying that the hardware isn’t dialed in. In the next section, we’ll look at the software side: how to prepare your models for the Kobra 3, including the slicing software options and tips for managing multicolor prints.
Software and Slicing Workflow
A printer as feature-rich as the Kobra 3 needs capable software to unlock its full potential. Anycubic provides their own solution – Anycubic Slicer Next – tailored for the Kobra 3’s multicolor and high-speed capabilities. However, you’re not limited to just one slicer. This section explores the software compatibility, slicing settings, and workflow tips for using the Kobra 3. We’ll cover the experience with Anycubic’s slicer, as well as options like Cura, PrusaSlicer/OrcaSlicer, and how to get the best results from each. Additionally, we’ll discuss how to utilize the printer’s connectivity (Wi-Fi, cloud) and what the workflow looks like from slicing a model to initiating a print.
Anycubic Slicer Next (Orca-Based) – The Official Slicer
Anycubic Slicer Next is the recommended software that comes with the Kobra 3. It is a customized, rebranded version of PrusaSlicer/OrcaSlicer, which means it inherits a powerful slicing engine but with a user interface and profiles tuned by Anycubic. If you’ve used PrusaSlicer or SuperSlicer before, you’ll find the layout somewhat familiar – though menus might be rearranged and skinned differently.
Installation and Setup: The slicer is provided on the included USB drive (for Windows and Mac) and can also be downloaded from Anycubic’s website. Installing is straightforward. When you first launch it, you can choose the printer profile for Kobra 3 or Kobra 3 Combo. The slicer will know the printer’s build volume (250×250×260) and the fact that it has one nozzle with up to 4 filament inputs. Make sure to select the correct machine profile (e.g., “Kobra 3 with ACE” if you plan to do multi-color, or just “Kobra 3 single” if not).
Interface: The Anycubic Slicer’s interface presents the typical 3D viewport where you can load models (STL, OBJ, etc.). You’ll see a representation of the build plate and perhaps icons showing the filament slots if multicolor mode is enabled. There are preset print settings profiles (for example: “Standard Quality 0.2mm”, “High Speed Draft”, “Fine 0.1mm”, etc.) and material profiles (PLA, PETG, TPU, etc., possibly tuned for Anycubic’s own filaments). For newcomers, using the default profiles is wise – they incorporate the speeds, accelerations, and retraction settings that Anycubic determined for the Kobra 3.
Multicolor Slicing: If you want to print a model in multiple colors, the slicer provides a few ways to do that:
-
If you have a 3D model that is already separated into multiple parts (STLs) by color, you can import them together and assign each part to a different extruder (Extruder 1, 2, 3, 4 correspond to the different filament inputs). The slicer will then know which part gets which filament.
-
If you have a single-part model that you want to colorize, Anycubic Slicer (being based on PrusaSlicer) has a painting tool and a color change tool. You can paint regions of the model in the slicer to assign them to different extruders, or insert color change commands at certain layer heights. For example, you could make a logo two-colored by painting the raised text one color and the base another.
-
The slicer’s preview will show color transitions and indicate where purge is happening.
One thing to understand is how the Kobra 3 handles multicolor in G-code. It likely uses a single extruder tool (since physically there’s one nozzle) and uses tool change commands (T0, T1, etc.) to switch between filaments. The slicer needs to generate the necessary purge commands when switching. By default, Anycubic Slicer had a conservative approach: it purges a fixed volume of filament for each color change by extruding it out and using a “purge tower” or purge line. Early versions of the slicer automatically added a purge tower (a block in the corner that collects the waste) and still performed a “flush” at the side (the filament poop that gets flicked off at the wiper). This ensured completely clean color transitions but resulted in quite a lot of wasted filament.
Purge and Waste Settings: Initially, Anycubic Slicer did not expose settings to reduce the purge amount or eliminate the extra purge tower, which was a pain point for many users because it led to 50-70% of filament being wasted on multi-color prints. However, Anycubic has been improving the software. As of now, there are a few ways to deal with purge:
-
In the latest Anycubic Slicer, check if there’s a setting for “Purge Volume” or similar. If they’ve updated it, you may find an option to adjust how much filament is purged between colors. If it’s not obvious in the UI, this might be something handled by firmware at print time.
-
On-Printer Adjustment: Interestingly, the Kobra 3’s firmware includes a feature where during a print you can tap the screen (filament icon) and adjust a “Flush Volume” parameter on the fly. This number (default 1.0) scales the purge amount. Some users found that setting flush volume to, say, 0.4 reduced the purge waste dramatically while still getting clean color swaps. Essentially, you can fine-tune how much filament the printer spits out when changing colors – less means less waste but if set too low, you might see previous color lingering. It’s great that this is adjustable without re-slicing the file.
-
Removing the purge tower: The Anycubic slicer now allows disabling the purge tower if you prefer to rely on the side purge only. This can save filament but be cautious – you need enough purge somewhere to ensure colors don’t contaminate. Many have had success just using the side purge (the “filament poop” on the wiper) with a reasonable flush volume and no tower, especially for simpler two-color prints. For four colors with frequent swaps, a small purge tower or object can still be useful to maintain quality.
General Slicing Tips: For everyday slicing (single color prints), Anycubic Slicer works like any modern slicer:
-
Choose your layer height (0.2 mm is a good general use). The Kobra 3 can go down to 0.1 mm for fine detail or up to 0.3 mm for fast drafts thanks to its precise motion and high-flow nozzle.
-
Infill and shell settings can be adjusted normally. The printer can handle common infill patterns easily. You might stick to 2-3 perimeters (walls) and 15-20% infill for strong parts, or adjust per your needs.
-
Speeds: The default profiles likely have moderate speeds (maybe 100–150 mm/s perimeters, higher for infill). If you want to experiment with the touted high speeds, you can create a custom profile. For example, you could try upping infill to 250 mm/s and perimeters to 200 mm/s, with high acceleration (10,000 mm/s²) if you’re printing something that doesn’t require fine detail. The input shaping will help keep quality decent. Keep an eye on extrusion – at very high speeds you might be pushing the hotend’s melt rate limits, which could cause under-extrusion. The Kobra 3’s hotend is high-flow, but every nozzle has limits. In practice, many users find a sweet spot where prints are much faster than old printers but still look great (maybe 150-200 mm/s with 5k acceleration for large objects, and slower for small intricate ones).
-
For TPU or flexible filaments, the slicer’s TPU profile will significantly slow things down. This is intentional – flexibles need low speed (e.g., 30 mm/s or less) and often lower accelerations to ensure consistent extrusion. The direct drive of the Kobra 3 helps a lot here (no long Bowden tube to cause lag), but you still can’t print TPU nearly as fast as PLA. We’ll talk more on material-specific settings later.
Support for Other Slicers: Anycubic’s slicer is quite capable, but you may already have a preferred slicer or you want more control (especially to reduce purge waste or use community profiles). Fortunately, the Kobra 3 can work with PrusaSlicer/OrcaSlicer, Cura, and others, with some considerations:
-
OrcaSlicer (Community Edition): OrcaSlicer is actually what Anycubic Slicer Next is based on. The community has profiles for the Kobra 3. In fact, after user feedback, Anycubic released a beta profile for OrcaSlicer and partly open-sourced the necessary configurations. Using OrcaSlicer (from SoftFever) might give you more frequent updates and control. You can import an Anycubic-provided config or a community-made profile to get started. OrcaSlicer will let you adjust purge volumes, choose to use a purge object, and it also can handle the Kobra 3’s multicolor similar to how it handles Bambu Lab or Prusa MMU systems. Keep in mind that the Kobra 3’s firmware might not accept direct network prints from third-party slicers (more on connectivity soon), so you might have to save the G-code and transfer via USB or cloud.
-
Ultimaker Cura: Cura can be used for single-color prints on the Kobra 3 quite easily. You’d define a custom printer profile with the bed size, single extruder, etc. For multi-color, Cura isn’t as straightforward since it doesn’t natively support multi-input-single-nozzle systems (like PrusaSlicer does). However, you could simulate it by creating multiple extruder definitions (all with same nozzle) and then assigning models to extruders. It’s a bit hacky and not officially supported by profiles yet. Most advanced Kobra 3 users lean towards OrcaSlicer or stick with the Anycubic slicer for multi-color, where this is more seamless.
-
Simplify3D or others: These could theoretically work for single-material prints if you configure them, but they may not fully support features like input shaping commands or the flush at the wiper without custom scripting. Unless you have a strong reason, it’s easier to use the slicers that the community supports (Prusa/Orca or Cura).
Workflow: From Slicing to Printing
Once you slice your model and have the G-code ready, how do you get it to the Kobra 3 and start the print? There are a few methods:
-
USB Flash Drive (Sneaker Net): The tried-and-true way is to save the G-code file to the provided USB stick (or any FAT32 formatted thumb drive) and insert it into the printer’s USB port. Then, on the touchscreen, navigate to that drive and select the file to print. This method is very reliable and doesn’t depend on network connections. The Kobra 3’s screen and firmware will handle the rest once you hit print.
-
Wi-Fi and Anycubic Cloud: The Kobra 3 has Wi-Fi connectivity and ties into the Anycubic Cloud system (also accessible via the Anycubic mobile app). By binding your printer to the app (scanning the QR code as guided in the manual), you can upload print jobs over the internet. The workflow is: slice your file (in Anycubic Slicer, you can choose an option to upload to cloud or you manually upload the G-code via the app or web interface), then on the app you can start the print remotely. The app also allows you to monitor progress, pause or stop the print, and get notifications. If you have the optional camera installed on the Kobra 3, you can even watch a live video feed of your print on the app. For those who like to start prints while away or simply don’t want to shuffle SD cards, this is convenient. Keep in mind the printer must be connected to a stable Wi-Fi network and you rely on Anycubic’s cloud servers – some privacy-conscious makers prefer local control only. However, the convenience can be a big plus, especially for educators or professionals who might trigger prints from their desk.
-
LAN (Local Network) Mode: According to Anycubic’s info, the Kobra 3 supports a “LAN mode” as well. This suggests you might be able to send files directly over the local network (perhaps via the slicer if PC and printer are on the same network). At the time of release, this wasn’t fully implemented, and many users instead used the cloud method. Check the latest firmware notes – if a LAN mode exists, the slicer or app might have a “LAN print” option which sends the file directly over Wi-Fi to the printer without going through the cloud. This would be ideal for those wanting network printing without internet dependency. The official wiki had a guide, so by now it may be functional.
-
OctoPrint / USB Connection: Traditionalists might wonder if they can connect the Kobra 3 directly to a PC via USB for printing (e.g., using OctoPrint or Pronterface). The Kobra 3 runs on a custom “Kobra OS” and because it’s geared for network/cloud, direct USB-PC printing might not be straightforward. It’s not openly advertised, and indeed some community members noted the printer doesn’t present a standard serial interface easily. If you want the flexibility of OctoPrint or similar, one workaround is to use OctoPrint on a Raspberry Pi and have it send files to the printer’s cloud as if it were a user – a bit convoluted. Another approach is using the Pi with a USB drive plugin – essentially still dropping files to USB. For most users, the provided methods are sufficient, so a direct tether isn’t common.
Tip: If you use third-party slicers like Orca and they don’t directly integrate with the cloud, you can always slice to a file and then manually upload that file through the Anycubic app (there’s an option to upload G-code from your phone, for instance, if the G-code is accessible). Alternatively, just stick it on the flash drive – often the simplest path.
Slicer Settings and Workflow Tips
To maximize your success with the Kobra 3, consider these additional tips when slicing and setting up prints:
-
Use the Right Material Profile: The Kobra 3 supports PLA, PETG, and TPU officially (and ABS/ASA with the ACE Pro, albeit without an enclosure). Each material profile in the slicer will adjust print temperatures and cooling. For example, PLA profile will use around 200-210°C hotend and full cooling fan, PETG might use 230°C and reduced fan (to prevent brittleness), TPU maybe ~230°C and lower fan and speed. Stick to these presets as they’ve been tested on this specific machine. If using third-party filament, you might tweak temps slightly if needed (some PLA brands like 215°C, etc.), but generally start with defaults.
-
Rafts and Brims: Thanks to the excellent PEI bed and auto-leveling, you usually don’t need rafts or brims for adhesion – parts stick well on the Kobra 3’s heated PEI sheet. However, if you print very large parts that nearly fill the bed, a brim can help anchor edges against warping (especially for PETG or when attempting ABS). Use these aids only as needed, since they do add post-processing (removal and cleanup).
-
Supports: For overhangs, the slicer can generate support structures. The Kobra 3 prints supports nicely, and they should detach cleanly if settings are tuned. The stock profiles likely already set a good support interface separation. You might choose line supports for easy removal. Also consider using support blockers or painting supports only where needed in complex models – this reduces print time and material usage.
-
Multicolor Purge Object: If you prefer not to waste purge filament as trash, one clever trick (which advanced slicers allow) is to designate a “purge object”. This is essentially a sacrificial model printed alongside the main model that uses up the purge material in a somewhat structured way. For example, you could put a small cube or vase in a corner that gets all the color transitions, resulting in a weird rainbow object but less pure waste. PrusaSlicer/Orca let you set an object as a purge volume. In Anycubic Slicer’s early version, this wasn’t available, but if you switch to Orca or when Anycubic integrates it, it’s a fun option. Just remember that the purge object still uses filament – it’s not saving filament, just giving you something to do with it. The real key is adjusting flush volume to minimize needed purge in the first place, which is now possible.
-
Saving Profiles and Iterating: As you fine-tune settings you like (for example, a profile for “Fast Draft PLA” where you push speed, or a profile for “Quality PETG” where you slow down and increase wall count), save those in your slicer for future use. The Kobra 3 community is active, and many share their profiles on forums. You can find profiles that favor quality or speed or low purge, and import them to save time.
-
Firmware Compatibility: Ensure your slicer’s profiles match the firmware capabilities. For instance, if using OrcaSlicer, make sure it’s configured that the Kobra 3 uses a purge/wipe at coordinates of the brush. The official profile will have a custom tool change G-code script that does something like move nozzle to wiper, purge X mm of filament, cut filament (the Kobra 3 actually has an internal filament cutter – so it may command a cut), then switch filament. Using the manufacturer’s provided start/end code blocks in custom slicers is important to maintain features like auto resume and sensor triggers. Always test on a small multi-color print when using a new slicer or profile to avoid surprises.
-
Updates: Both the printer firmware and Anycubic’s slicer are evolving. Check Anycubic’s website or community announcements periodically for updates. A slicer update might introduce purge controls or other improvements. Firmware updates might improve network printing or add UI options. We’ll talk more about firmware updates in the support section, but just be aware that keeping software up-to-date can enhance your experience and fix earlier shortcomings.
In summary, the workflow with the Kobra 3 can be as simple or advanced as you prefer. Beginners can stick to Anycubic Slicer Next with default settings, slice a model in a few clicks, save to USB, and hit print – and they’ll likely get great results. Power users can dive into OrcaSlicer profiles, tweaking flush volumes and acceleration settings to push the machine’s limits or optimize efficiency. The printer’s connectivity options add flexibility in how you send jobs and monitor them.
With software and slicing in hand, next we’ll evaluate the Kobra 3’s hardware design and build quality – after all, the software can only do so much if the machine’s components aren’t up to par. Spoiler: Anycubic put a lot of thought into this printer’s construction, aiming for reliability and performance over the long term.
Hardware Design and Build Quality
The Anycubic Kobra 3 sports a modern, robust design that reflects the latest trends in 3D printer engineering. In this section, we’ll take a close look at the build quality, hardware specifications, and component choices that Anycubic made. From the frame and motion system to the extruder, hotend, and electronics, we’ll see how these contribute to the printer’s performance and reliability. We’ll also discuss how the hardware holds up over extended use and what users have observed after putting many hours on their Kobra 3.
Frame and Mechanics
The Kobra 3’s frame is mostly metal, giving it a sturdy structure. The base is a solid metal chassis that contains the Y-axis mechanism and the electronics. The vertical gantry is a heavy-duty aluminum extrusion that bolts to the base (in fact, as noted earlier, it comes pre-attached). Overall dimensions of the assembled printer are about 45.3 x 50.5 x 48.3 cm, and it weighs roughly 9.2 kg – a relatively compact footprint for a printer that offers a 250×250×260 mm build volume. It will fit comfortably on a desk or workbench, though keep in mind if you use the ACE unit, that adds an extra box (~36 x 28 x 23 cm, 4.6 kg) sitting to the side.
The motion system of the Kobra 3 is interesting: Anycubic uses a hybrid of V-slot wheel and linear rail technology. Specifically, the X-axis and Y-axis each have embedded metal rods (spindles) alongside the standard V-slot profiles. The print head and bed likely ride on wheels that roll on these rods or extrusions, which makes movement very smooth and wear-resistant. It’s a design Anycubic also used in some prior models like the Kobra 2 series – by having a metal rail for the wheels to contact, you reduce the wear on aluminum V-slot and maintain precision longer. This approach is aimed at enabling the faster movement (high speeds) without the wheels getting sloppy over time. User feedback indicates the axes indeed run very smoothly, and the mechanics feel more solid than typical budget printers. After months of printing, there’s minimal play in the axes if properly maintained (wheels can be tightened via eccentric nuts if needed).
Crucially, the Kobra 3 has dual Z-axis lead screws, one on each side of the gantry. Dual Z motors working in sync ensure that the X-axis gantry raises and lowers evenly. This prevents sag or tilt of the X-beam, which is especially important when there’s a heavy direct-drive extruder moving back and forth. The dual Z screws are coupled likely by the firmware leveling routine as well (the “smart Z compensation”), meaning even if they get slightly out of sync, the auto-level can compensate. Dual Z also contributes to stability for tall prints – you won’t get the wobble lines that single unsupported Z rods might produce. The Z-axis moves on lead screws and possibly uses brass nuts with anti-backlash, plus smooth rods or linear bearings to guide it. Movement in Z is precise (with a Z resolution of 0.0025 mm per step as per spec) – more than enough to get those fine layer heights accurately.
Belts on X and Y are GT2 timing belts with tensioners included. The X-axis belt tensioner is accessible on one end of the gantry; the Y-axis tensioner is at the front of the base. This makes it easy to re-tension belts if they stretch over time – just turn the knob to take up slack. Proper belt tension is important for dimensional accuracy and to avoid layer shifting at high accelerations, so it’s good to have convenient adjusters.
Any moving machine is only as good as its bearings and motors. The Kobra 3 uses quality stepper motors with likely 1.8° step angle (standard) and quiet stepper drivers on the mainboard (we suspect TMC2209 or similar). Users have commented that the motion is very quiet – you mostly hear fans rather than motor noise, which confirms the presence of silent stepper drivers. During printing, especially slow moves, you won’t hear the loud stepper whine that older printers had. Instead, the Kobra 3’s sound profile is dominated by the hum of its cooling fans and the whoosh of rapid travel moves.
Direct-Drive Extruder and Multi-Filament System
The extruder on the Anycubic Kobra 3 is a direct-drive type, mounted on the moving X-carriage. This choice is essential for reliable flexible filament printing and precise retractions needed for multicolor swaps. A direct-drive extruder means the motor and drive gears are right next to the hotend, pushing filament directly into the melt zone, as opposed to a Bowden setup where filament is pushed through a long tube. The direct-drive design greatly improves printing of TPU and other soft materials (less distance for filament to compress and buckle), and it gives very accurate control over filament flow (which is beneficial for fast acceleration and deceleration scenarios – minimal lag in extrusion).
The Kobra 3’s extruder uses hardened steel drive gears (dual gear or single gear+idler, unclear, but at least the main gear is hardened steel). Hardened steel is durable and can grip filament without wearing out even after hundreds of hours. Some early reports mentioned an “all-metal extruder with a hardened gear” – so it should last a long time and handle abrasive filaments better than a cheap brass gear might (though keep in mind abrasive filaments like carbon fiber filled aren’t officially supported without the ACE Pro upgrade, but physically the extruder/hotend could handle them given the 300°C capability and hardened gear – you’d just need a hardened nozzle too).
A standout aspect of the Kobra 3’s toolhead is the 4-in-1-out multi-filament setup. The print head has four filament guide tubes entering it (if using multi-color). Inside, the mechanism can manage up to four filaments. It works like this: when a color change is needed, the active filament is retracted and actually cut off inside the print head by a small cutter mechanism. Yes, the Kobra 3 has a tiny filament cutter integrated! This cuts the filament near the melt zone so that when the next filament is fed in, there isn’t a long string of previous color to pull out – effectively it leaves a clean transition. The new filament is then pushed in and purges out the remnants of the old color. This approach is similar to what high-end systems do (for example, Bambu Lab’s AMS also cuts filament before ejecting). The presence of a cutter is a major advantage for speeding up color changes and reducing color contamination, though it also means one more part to maintain (the cutter blade could dull after a lot of use, but it’s replaceable as noted in the parts list).
The extruder also houses a filament runout sensor (filament sensor board) right before the gears. If any filament (in single mode) breaks or if one of the spools runs out mid-print, the sensor will detect the lack of filament and pause the print automatically. You’ll get an alert to load new filament. For multi-color printing, the ACE unit itself monitors filament presence and will also alert if a spool depletes. The sensor is a simple but crucial feature to save prints from being ruined by an unexpected end of filament.
All of this is built into a relatively compact print head module. The print head also features a large part-cooling fan and a separate hotend heatsink fan. The part cooling on the Kobra 3 is handled by a powerful 5015 radial fan (hidden behind a translucent cover on the front of the toolhead). This fan splits into two ducts directing air on either side of the nozzle. Good part cooling is key for high-speed printing and for printing overhangs and bridges cleanly, especially in PLA. Users have noted that the Kobra 3’s cooling is very effective – bridging performance is strong and small details solidify nicely, avoiding the “mushy” look that printers with weak fans suffer from. The trade-off is that this fan can be loud when at 100% power, but it’s a necessary piece for quality. It’s typically only at full blast for PLA; for materials like PETG, the fan runs lower.
Hotend and Nozzle
The Kobra 3 is equipped with a high-temperature, high-flow hotend. It’s advertised to reach up to 300°C, which means it’s all-metal (no PTFE liner in the critical zone that would deteriorate above ~250°C). This opens the door to printing not just PLA and PETG, but also materials like ABS, ASA, and possibly polycarbonate or nylon (though as mentioned, those latter require an enclosure and the ACE Pro supports drying them – more on that soon). The hotend’s heater block and heatbreak have been engineered to handle rapid extrusion; Anycubic specifically calls it a “high flow” nozzle assembly. This suggests a larger melt chamber or a high wattage heater cartridge that can keep up when pushing filament fast (important for 0.4 mm nozzles printing at high speed – you need to melt filament quickly to avoid under-extrusion at 200+ mm/s).
Perhaps one of the most convenient aspects is the quick-release nozzle/hotend. The Kobra 3’s toolhead design allows you to remove the entire hotend module without tools. It might be a latch or clip system, similar to how E3D’s Revo or Bambu’s toolheads work. The Tom’s Hardware review mentioned it’s a one-piece nozzle inspired by the E3D Revo – likely meaning the nozzle and heatbreak are a single combined unit that you swap as one piece. This is great for maintenance: if you have a bad clog or want to switch nozzle sizes, you can just pop out the whole hotend and pop in a new one in minutes, rather than disassembling hot parts. Early on, Anycubic hadn’t started selling spares of these, but by now they offer free replacements for those affected by the initial leakage issue, and presumably will stock them. It’s wise for heavy users to have a spare hotend module on hand – then if anything goes wrong mid-project, you can swap and continue printing, fixing the clogged one later.
Speaking of the leakage issue: When the Kobra 3 first launched, a number of users encountered a problem where filament would leak from between the nozzle and heatbreak (basically the hotend “throat” wasn’t sealing perfectly, possibly due to a bad adhesive or assembly). This caused melted filament to ooze out the top of the heater block, creating a mess and eventually print failures. Anycubic investigated and found a batch issue with the throat adhesive, and they responded by offering free replacement hotend modules to all affected customers and extending the hotend warranty from 3 to 6 months. The new hotends fixed the issue with better sealing. By now, if you purchase a Kobra 3, it should either come with the updated hotend or you can easily request the new one if you see any sign of leaking. In day-to-day use, once the hotend is the improved version, leaks should not occur – it should behave like any normal well-sealed hotend (which means you can swap nozzles, etc., but in this case swapping nozzle means swapping the whole unit if it’s integrated).
The nozzle that comes with the Kobra 3 is a standard size 0.4 mm brass nozzle (though integrated in that quick-release format). 0.4 mm is ideal for balancing detail and speed. Because it’s capable of high temps, one could swap to a hardened steel nozzle to print abrasive materials (if one is made in the quick-release form). We haven’t seen mention of user-swappable different sizes yet, but logically Anycubic would or will offer 0.6 mm or 0.8 mm modules for people who want faster prints at the cost of some detail. For now, most will use the included nozzle. It gives fine detail – layer heights of 0.1 mm come out very smooth – and can produce very small features accurately.
Cooling for the hotend is handled by a dedicated fan and heatsink on the extruder. The heatsink fan runs constantly to keep the upper part of the hotend cool (prevent jams known as heat creep). It’s relatively quiet and enclosed. Just ensure that area doesn’t get clogged with dust over time.
Bed and Build Platform
The build plate of the Kobra 3 is a heated PEI-coated spring steel sheet – a favorite in the 3D printing community for its excellent balance of adhesion and ease of part removal. The sheet attaches to a magnetic base on the bed, so you can simply flex it to pop off prints once they’re done and cooled. The PEI surface (polyetherimide) grips materials like PLA and PETG very well when hot, and then releases them when it cools down. It also tends to leave a nice smooth finish on the bottom of prints (slightly matte or smooth depending on the PEI texture). Anycubic’s PEI sheet is likely double-sided (one side smooth PEI, possibly the other side textured? Some printers come with textured PEI which leaves a fine texture on the bottom of prints, great for hiding imperfections). Even if it’s one texture, replacement sheets are not hard to find. The size 250×250 means you could get aftermarket sheets if needed, but Anycubic should supply spares too.
The heated bed can reach up to 110°C, according to specs. This is enough for printing materials like ABS (though again, ABS needs an enclosure to really succeed). It certainly handles PLA (often you’ll use 60°C bed) and PETG (maybe 70-80°C bed) easily. The bed is driven by a 400W power supply, so it heats reasonably fast – maybe a couple of minutes to reach 60°C. The Kobra 3 (base model) probably uses a DC heated bed. Interestingly, the larger Kobra 3 Max has an AC bed for super fast heating, but the regular Kobra 3’s bed is smaller and fine on DC.
The bed is mounted on a Y-axis carriage that likely uses a similar rod+wheel system. The plate moves back and forth in Y direction (this is a classic Cartesian “bedslinger” design, not CoreXY, so the bed moving contributes to motion mass, but since it’s not huge and the printer is tuned, it still works at high speed). Because of input shaping, the common ringing on Y due to bed movement is mitigated.
There are no leveling knobs under the bed – it’s a fully auto-leveled system, so the bed is fixed in place with screws and probably spring washers. This means you won’t have to tinker under the bed at all, and the machine expects you to rely on LeviQ leveling.
One thing to be mindful of: bed adhesion and maintenance. PEI is great, but it does require occasional cleaning. If you see prints not sticking as well after many prints, the culprit might be oils on the surface. A wipe with isopropanol solves that. For PETG, some people put a thin layer of glue stick on PEI to prevent it from bonding too aggressively (PETG can sometimes stick too well to smooth PEI and cause chunks to come off). So far, Kobra 3 users haven’t reported serious issues – the PEI sheet quality is good and robust for thousands of cycles.
Electronics and Interface
Under the hood, the Kobra 3 uses a custom 32-bit mainboard. It runs what Anycubic calls “Kobra OS”, which likely is a tailored firmware (possibly based on Marlin for motion control, with Linux for the UI/Cloud? There is speculation that it has a more complex controller because of the Wi-Fi and camera support – perhaps a two-CPU setup). Regardless of the architecture, from a user perspective the electronics provide all the needed features:
-
Quiet stepper drivers (as mentioned).
-
Ports for all the add-ons (the toolhead has many components: filament sensor, cutter, accelerometer, fans, etc., all connected via that single ribbon cable – meaning the cable carries quite a bit of signals and power).
-
A port for the camera (the wiki mentions camera installation – likely a small USB camera that can plug into the board for the app’s real-time monitoring).
-
The Wi-Fi module is built-in, and there’s also an SD or internal storage where prints can be stored (the printer has some internal flash for those pre-loaded models and potentially to save uploaded files).
-
Safety features like thermal runaway protection should be present (never take that for granted, but Anycubic’s past printers did have it; given the hotend can reach 300°C, it’s crucial to have robust thermal control).
The 4.3” touchscreen is a colorful LCD with a responsive touch interface. Users report that it’s easy to navigate, with logical menus for printing, tools, and settings. The adjustable angle makes it comfortable to use without crouching. The UI shows useful info during printing, like temperatures, progress, chosen filament colors, etc. One early omission was the inability to tweak Z height during a print, which as we noted has likely been fixed by firmware updates (or at least partially addressed via flush volume adjustment and offset in the slicer). We expect that if you get a new machine or update it, the interface will include things like a baby-step or Z-offset knob. The UI also allows manual control of movements, loading/unloading filament, starting calibration routines, and so on. It’s overall beginner-friendly – big icons and simple labels.
In terms of build quality, the community consensus is that Anycubic did a commendable job. The assembly feels solid, there are no glaring weak plastic parts in critical areas, and the printer has an aesthetic polish (silver and black with the Anycubic logo, a departure from the older black+blue scheme – some say it looks like a “clone” of other modern printers, but in a good way: clean and professional). The only visual oddity noted by a reviewer was an orange cable contrasting with the otherwise grayscale design, but that’s hardly an issue – in fact it helps identify the cable easily.
All wiring is nicely sleeved or ribboned, and there are strain reliefs where needed (for example, the bed’s heater cable should have a strain relief at the moving platform to avoid wear; likely present). The power supply is likely an internal unit in the base or a brick? Given the base weight, it’s probably an internal PSU (meanwell or similar quality unit), with a standard fused switch for safety.
Component Reliability Over Extended Use
So, how does the Kobra 3 hold up after printing dozens of projects and hundreds of hours? Here are real-world observations on component longevity and any issues:
-
Hotend and Extruder: Aside from the initial hotend leak issue (resolved by replacements), the extruder and hotend generally perform reliably. Some users who printed extensively (hundreds of hours in a month) reported that prints remained consistent and near perfect. The quick-release hotend’s advantage is that if you did have a clog, you can swap it out quickly. Clogs themselves are not very common unless using dirty filament or extreme retraction settings. The hardened gear in the extruder means it doesn’t grind itself down; however, it can grind filament if there’s a jam (any extruder can). If you ever hear clicking during extrusion (a sign of slip), you’d clear the nozzle and check tension. The extruder has an idler tension that might be adjustable – ensure it’s neither too loose (causing slipping) nor too tight (could deform filament). Out of the box it’s usually set fine.
-
Motion System: The belts and wheels seem to hold up well. Belt stretch over time is normal, but the tensioners make it trivial to tighten a bit. No reports of belt snapping or pulley issues – likely they use steel-core belts and decent pulleys. The dual Z screws keep working in sync; occasionally, a user might check that the X gantry is level by measuring from the frame to the gantry ends and can manually adjust one side if needed (like after shipping, maybe one side could turn slightly). But with motors engaged, they stay aligned.
-
Print Surface: The PEI sheet will last a long time if cared for. You might see visual wear (minor scratches or a bit of discoloration) after many print cycles, but as long as prints stick and release properly, it’s fine. If ever it gets damaged (for example, if a nozzle crash gouges it or PETG pulls a chunk), it can be replaced relatively cheaply. Always avoid digging at prints with metal tools – use the flex to pop them off. That way the PEI coating stays intact for thousands of prints.
-
Fans: Fans are one part that could wear out sooner due to constant operation. The main blower fan for part cooling, if running at full power for long durations, could develop bearing noise after a year or two. The hotend fan runs 100% all the time, which could also after a long time accumulate dust or wear. The good news is fans are standard components and easy to replace (the Kobra 3’s design likely allows swapping fans by unscrewing a few screws on the shroud). Having a spare 5015 radial fan and a 4010 (or 3010) hotend fan on hand isn’t a bad idea if you print daily. But many users won’t need to replace them for quite a while – quality seems decent.
-
Electronics & Sensors: The mainboard and screen have not shown systemic failures; they are designed with adequate cooling (there’s a motherboard cooling fan in the base). The filament runout sensor works reliably – just keep it free of filament dust build-up. The accelerometer and other sensors are solid-state and should last the life of the machine without issue. One thing to mention is that Anycubic is known to use custom firmware that might be somewhat locked down; that doesn’t affect reliability per se, but if you’re a tinkerer wanting to flash third-party firmware, it’s not straightforward (the board might not accept it easily). However, the stock firmware does everything needed, and stability-wise it’s stable. A few early firmware bugs (like missing Z adjust) were solved via updates, which indicates the controller is robust enough to handle fixes without hardware changes.
-
ACE Pro Unit: If you have the multi-filer ACE Pro, its hardware also matters. Users have overall been happy with it: the filament feeding mechanism and sensors inside hold up. It includes a filament dryer feature (it warms the chamber slightly to keep filament dry during printing, which is fantastic for materials like PETG, TPU, or nylon that love to absorb moisture). Over extended use, you might want to check the rollers and gears in the ACE if you notice any feeding inconsistency. Also, the PTFE tubes connecting it to the extruder can eventually wear (the tips get a bit loose or the collet grips wear). The spare parts list even had collet replacements. But those are minor – you’d likely only consider swapping tubes after a year or if you print abrasive filaments that erode them.
-
Structural Durability: The metal frame and rods will easily last for years. There’s not much to wear out there except maybe the V-wheels. The wheels are typically made of POM (Delrin) plastic – very durable. If a wheel gets a flat spot or groove after very long use, replacements are a couple of dollars and the process is simple (loosen belt, remove wheel bolt, swap wheel). But with the metal rail design, the wear on wheels is minimized, so it could be many years before any need to think about that.
-
User Maintenance: To ensure reliability, the user should perform simple maintenance (which we’ll detail in the maintenance section). Things like lubrication of Z screws and X/Y rods can significantly prolong the smooth operation of the machine. Neglecting it doesn’t cause immediate failure, but you might see more strain on motors or slight print quality loss over time if everything’s running dry. We have a dedicated section on recommended maintenance coming up.
Overall, the hardware of the Kobra 3 is robust and thoughtfully engineered. Anycubic clearly took lessons from previous models and competitors, delivering features like dual Z, auto leveling, direct drive, input shaping – all integrated well. The printer feels like a premium device in use, despite its relatively affordable price. Users who have run it hard generally praise its stability: prints on day 30 look as good as prints on day 1, barring the early hotend hiccup which was rectified.
In the next sections, we’ll shift focus to the user experience of using the printer in practice: how it performs in the real world (speed, noise, and results across different materials) and how to maintain and possibly upgrade it. These will truly show how the hardware and software combine into the Kobra 3’s day-to-day operation.
Real-World Performance: Speed, Noise, and Reliability
Paper specifications are one thing, but how does the Anycubic Kobra 3 actually perform when put to the test on various projects? In this section, we’ll discuss the real-world printing performance of the Kobra 3, including its effective speeds, print times, noise levels during operation, and overall reliability in continuous use. The Kobra 3 markets itself as a speed demon (with that eye-catching “600mm/s” figure), but we’ll parse what that means in practical terms. We’ll also cover how the machine handles different printing scenarios from simple single-color prints to complex multicolor jobs, and the consistency of output over time.
Speed and Throughput
The headline “up to 600 mm/s” speed refers to the maximum movement speed (likely in firmware for infill or travel moves under optimal conditions). In realistic printing, no FDM printer maintains 600 mm/s on perimeters with high quality – it’s an upper bound used for sparse infill or non-printing moves to reduce travel time. That said, the Kobra 3 is undeniably faster than typical budget printers out of the box. Thanks to its input shaping and high-flow hotend, you can push it to print at speeds where many printers would falter.
-
Typical Print Speeds: Users report that printing perimeters at 150–200 mm/s and infill at 200–300 mm/s is achievable with surprisingly good quality. For context, many older printers (like an Ender 3 or original Kobra) might do 50 mm/s perimeters before quality drastically drops due to ringing and extrusion lag. The Kobra 3, on a standard quality profile, might already be set to ~120 mm/s perimeters. And indeed, sample prints show minimal ringing at those speeds – sharp details hold up. If you attempt something like a “speed benchy” with tweaked settings (e.g., 0.25 mm layers, 2 walls, higher flow), the Kobra 3 can complete it notably faster than most printers. In one test, a Benchy that would take 1.5 hours on a standard printer could be done in under 30 minutes on the Kobra 3 when tuned for speed (though surface might be a bit rougher). It didn’t quite beat the fastest CoreXY machines in benchmarks, possibly due to conservative slicer settings or firmware limits, but it’s in the ballpark.
-
Acceleration and Jerk: The real enabler of speed is acceleration. The Kobra 3, post vibration calibration, can use very high acceleration values (maybe 5,000–10,000 mm/s²) without ringing. This means it can reach high speeds even on short infill lines. For small objects, acceleration matters more than top speed, and the Kobra 3 excels here. The default jerk (or “instantaneous speed change”) is set balanced to avoid ghosting. If you tinker, you might squeeze even more speed but typically the default is a safe bet.
-
Multi-Color Speed Considerations: When printing in multi-color mode, raw print speed is a bit less critical compared to the overhead of color changes. Each color swap incurs a pause to cut filament, purge, and load the new one. The ACE’s simultaneous filament preloading helps a bit, but you can’t avoid the fact that a four-color print with constant switching will slow down total print time. For example, a print that’s 10 hours in single color might take 12 or more hours in four colors due to all the swaps and purging. The multifilament printing is inherently slower not because the printer moves slower while extruding (it doesn’t), but because of the frequent interruptions to change colors. Some of that can be mitigated by designing prints cleverly – e.g., printing larger regions of one color at a time rather than tiny pixelated color changes. Also, reducing purge volume (if possible) shortens the purge time. So, while the Kobra 3 prints fast, if you load it up with lots of color changes, expect print jobs to take longer than a single-color version of the same model. This is normal and still far cheaper and easier than manual color changes, but worth noting.
-
Complex Geometry and Speed: For prints with lots of small features, tiny infill, or many short line segments, the Kobra 3’s ability to maintain speed shines. The input shaping keeps corners crisp so you don’t have to slow down as much for detail. There is a point, however, where extremely small details still require slower speeds for accuracy (no printer can do a 2mm wide tower at 200 mm/s perfectly, physics limits that). The slicer will automatically slow down for very short layers or tiny perimeters if needed (minimum layer time and such settings ensure quality on small parts).
-
Comparative Throughput: If you are someone printing large pieces or batches, Kobra 3’s speed gives you a higher throughput. Real users who upgraded from older models note that projects that used to take, say, 20 hours might now take 10-12 hours at similar quality. This means you can complete prints in a single day that previously spanned two. For makers running a small shop or just impatient hobbyists, that’s a significant benefit. When dialed in, the Kobra 3 can compete with some of the famously fast printers on the market, at least in speed if not matching every automation feature of those machines.
Print Quality and Consistency at Speed
Speed is great, but only if the print quality remains high. Impressively, the Kobra 3 produces excellent print quality even at elevated speeds, as long as it’s properly calibrated and using appropriate profiles. We’ll talk more specifically about print quality with different materials in the next section, but generally:
-
Surfaces are smooth and layers consistent. The combination of a sturdy frame and good extruder control yields very uniform extrusion lines. On a well-tuned Kobra 3, you might see almost no difference between a print at 60 mm/s and one at 120 mm/s in terms of surface finish – except the faster one might have very slightly more visible layering if you look for it, due to minor vibrations, but input shaping truly minimizes those.
-
Fine details come out nicely. Small text embossing, for example, is legible. The direct drive ensures retractions are precise, so stringing is minimal even with fast moves (assuming retraction distance and speed are set right in the slicer, typically around 0.5-1mm at 60mm/s for direct drives).
-
Dimensional accuracy is on point, thanks largely to the rigid mechanics. Test cubes, calibration parts show that the X/Y dimensions are accurate (any tiny variance can be calibrated out with flow or slight scale tweak, but most users found things fit as expected). Z accuracy (height) is also very good due to the dual Z and fine leadscrew steps.
The main quality sacrifices at high speed can be slight rounding of very sharp corners (input shaping trade-off) and possibly a bit of uneven extrusion on extremely rapid direction changes (where pressure advance might not 100% compensate). But these are small and mostly invisible on everyday prints.
Crucially, the Kobra 3 maintains consistency over long prints. Long prints reliability: Some users have done 20+ hour single-color prints or multi-day multi-color prints. The printer can handle it. The power loss recovery feature is there in case of an outage, but aside from that, if you have a stable environment, the Kobra chugs along. The Ace unit’s filament drying ensures filaments don’t get brittle mid-way. Filament run-out sensors pause if something runs dry. So, in effect, the machine is geared to successfully complete large jobs without babysitting. Of course, like any printer, you’d want to ensure no loose cables or anything that could catch – which in this design, all cables are managed.
Noise Levels
When running, the Anycubic Kobra 3 is moderately quiet, but not silent. It’s quieter than many older 3D printers because of the silent motor drivers and smooth motion. However, the various fans and the sound of rapid movements still produce audible noise. Here’s a breakdown of noise sources:
-
Stepper Motors: Thanks to silent drivers (likely TMC series in stealthChop mode for low loads), the motion of X, Y, Z motors is nearly inaudible. You won’t hear the typical stepper “squeal” or tone. During extremely fast moves, you might hear a faint hum or a dull “thump” when changing direction (that’s the accelerations at work, not an issue but just a sound of inertia being countered).
-
Fans: The loudest constant sound is the power supply fan and the mainboard fan (if it has one), plus the hotend fan. These create a continuous whir. It’s comparable to a desktop computer or maybe a bit louder when all are on. The part cooling fan, when it kicks on at 100% (especially with PLA prints after the first layer), adds a noticeable whoosh. It moves a lot of air, so you’ll hear air rushing and maybe a slight turbine sound. In a quiet room, the printer is definitely audible because of these fans.
-
Purge “Noise”: Unique to the multi-color operation, when the printer purges filament at the wiper, it often does so by extruding quickly and sometimes with a little clicking (the filament flicking out). It’s not loud per se, but you’ll occasionally hear a scrape when the nozzle hits the brush, or a rapid extrude sound. Also, filament being cut might make a subtle snip sound but it’s very soft.
-
Frame vibrations: At top speeds, if the printer is on a lightweight table, the table might resonate and amplify noise. On a solid bench, the Kobra 3 doesn’t vibrate excessively (thanks input shaping) so it doesn’t rattle itself much. You might feel a slight vibration when it’s doing high-speed infill, but the design dampens a lot of it.
-
Peak noise events: During very fast travel moves (like 500 mm/s travel), there is some noise from the air displacement and mechanics – a brief “zip” sound. If the printer does rapid back-and-forth (like in vibration calibration or small zigzags), there could be a mild rattling if something is loose. Generally, the machine is well-built so it doesn’t rattle or grind.
In practical terms, can you keep it in a room where you work? Yes, many people do. It’s about as noisy as a normal filament printer on fast mode. It’s probably not suitable to have in a bedroom where someone is sleeping – the fan noise would disturb light sleepers. In a home office or living area, it’s noticeable but not overly annoying; many describe it as “white noise” level. You could reduce noise further by putting the printer on a sound-dampening mat or feet (some print silicone or TPU anti-vibration feet to absorb sound). However, do not enclose the printer fully just for noise without considering airflow – the electronics need cooling and the part cooling needs to exhaust air.
Compared to resin printers or fully enclosed machines, it’s louder. Compared to older open-frame kits or something like a stock Ender 3 with loud steppers and fans, it’s quieter (no high-pitched stepper noise). The loudest fan is often the power supply’s – you could consider a fan swap mod if noise is a big concern (some have put quieter fans in PSUs, but caution: ensure same airflow or you risk overheating).
One more thing on noise: the ACE Pro drying function – it likely includes some heating element and maybe a fan inside the filament box to circulate warm air. That could produce a slight hum as well, but nothing major as reported. If anything, it might have a gentle fan noise like a small bathroom fan when drying.
Reliability and Uptime
Performance isn’t just about speed, but also how reliably the printer can produce successful prints over time. In this regard, after initial kinks were worked out, the Kobra 3 scores well:
-
Print Success Rate: Once properly calibrated, most users find that print failures become rare. The auto bed leveling means first layer issues (a common failure point) are dramatically reduced. There’s no constant need to tweak leveling knobs or re-check things – you hit print and it usually sticks and goes. The only times a print might fail are typical 3D printing challenges like an extreme model that warps (for example, big ABS parts might still warp without an enclosure), or user error in slicing, or mechanical issues like a clogged nozzle.
-
Multicolor Print Reliability: With multicolor prints, there were some early challenges (like the hotend leak causing clogs mid-print, or slicer purge not being optimal causing color contamination). But with the improved hotend and better purge control, these multi-color prints are now quite reliable. The system will pause if something is wrong (like filament not loading properly or a clog). It even has clog detection in the toolhead – a sensor in the filament buffer that can tell if filament isn’t moving when it should, pausing the print to let you clear it. That is a fantastic feature; it can save a print if, say, a piece of debris or a bad tangle stopped filament feeding. The printer literally says “hey, I think nothing is coming out, let’s check”.
-
Long-Term Wear: After dozens of prints, you might check for any loosening of screws (a quick once-over to ensure frame bolts, motor screws, etc. are still tight – they usually are, but vibrations over hundreds of hours can sometimes loosen hardware slightly). The Kobra 3 uses locknuts and threadlock where appropriate, so it doesn’t fall apart. Occasionally, tightening the extruder gear grub screw or the belts might be needed as normal maintenance.
-
Thermals: The printer’s thermal design (heatsinks, fan cooling, etc.) keeps it stable. Even if printing in a warm environment, the mainboard hasn’t shown overheating issues – the enclosure fans handle it. The hotend holds temperature well (PID tunes itself, so you don’t see big swings that could cause extrusion issues). The bed being magnetic and relatively thin might have a little gradient (edges a bit cooler than center), but the auto leveling accounts for any slight shape difference if temperature changes the bed flatness. For critical large prints, some people do a quick mesh level right at print temp to be super precise, but generally not needed.
-
Downtime waiting for parts: If something does break (like the initial hotend needed replacement), how quickly can you get parts? Anycubic has made parts available via their store and authorized sellers. For example, replacement hotend kits, nozzle modules, extruder parts, etc., can be purchased. During the recall, they shipped hotends in ~2 weeks to those who requested, which was a bit of downtime for those users. But now, if you have a spare on hand, you wouldn’t have to wait. So, for mission-critical use, it’s recommended to keep a spare nozzle module and maybe a spare PEI sheet (things that can halt printing if broken). Belts and wheels are generic and easy to get if ever needed. Overall, with some foresight, you can minimize any downtime.
-
Software reliability: The firmware on the Kobra 3 is stable – crashes or freezes are virtually unheard of. The touchscreen interface doesn’t glitch. The cloud connection works (just ensure good Wi-Fi). If the cloud or app fails for some reason, you always have the USB method to fall back on, so you’re never stuck not being able to print due to software.
-
Power Recovery: The power loss resume function is implemented, but use with caution as always. It will save a point and allow resume, which is great – but if printing multi-color, resuming flawlessly depends on remembering which filament was active, etc. The firmware likely handles that, but there’s more to go wrong (like if power cut mid-toolchange). That said, short outages usually resume fine. It’s still best to use a UPS if your power is flaky and you have a critical long print, to avoid even having to resume.
In sum, reliability is one of Kobra 3’s strengths after ironing out early manufacturing issues. Many owners run print after print with minimal intervention. For a device with this many features, that’s a notable achievement – more complexity can mean more points of failure, but Anycubic managed to integrate it such that the features complement each other rather than complicate things for the user.
Next, we’ll zoom in on how the Kobra 3 handles different materials and print quality across them. We’ve touched on PLA, PETG, TPU in passing; the coming section will provide more detail on achieving the best results with each and what quality to expect.
Print Quality Across Different Materials
The Anycubic Kobra 3 is versatile in the materials it can print. Out of the box, it’s officially tuned for PLA, PETG, and TPU, which cover the majority of hobbyist and professional use cases for an open-frame printer. With the ACE Pro (multi-material unit), the capability extends to materials like ABS and ASA (thanks to filament drying and the high-temp hotend), though printing those may require some additional considerations like a draft shield or enclosure. In this section, we’ll evaluate the print quality and any special tips for printing with PLA, PETG, TPU, and touch on other materials like ABS. We’ll also discuss how multicolor printing interacts with these materials – for instance, printing multi-color TPU is not feasible through the filament switcher, but single-color TPU is.
PLA – Polylactic Acid
PLA is the most commonly used filament and the Kobra 3 prints PLA exceptionally well. PLA is relatively easy – it doesn’t require a heated chamber, it’s rigid and doesn’t warp much, and it melts at a low temperature (ideal for high speed printing). Here’s what to expect and how to get the best PLA results:
-
Print Quality: PLA prints come out with fine detail and smooth surfaces. The strong part cooling fan on the Kobra 3 ensures that bridges and overhangs in PLA are crisp. Small features cool quickly, so you avoid sagging or stringy results. The layer lines on PLA prints with the Kobra 3 are very uniform; many users report that the prints have a “polished” look, especially at 0.2 mm layer height – you see consistent texture without odd Z artifacts. If you print at 0.1 mm for a miniature or something, the machine’s precision really shines: you can achieve almost layer-invisible results given a good model and settings.
-
Speed vs Quality: PLA can be pushed to high speeds on this machine without losing too much quality. If you print a decorative item where a perfect surface is crucial, you might dial back to moderate speeds (like 100 mm/s) to be extra safe. But for most functional prints or prototypes, printing PLA at 150-200 mm/s with input shaping still yields quality that rivals slower printers. Edges remain sharp. For example, a PLA Benchy on standard settings shows minimal ghosting even around the nameplate and arches – testaments to the input shaping doing its job.
-
First Layer: PLA loves the PEI sheet – it sticks easily at around 60°C bed temp. The first layer should go down smoothly. If you see any slight elephant’s foot (wider bottom) on PLA prints, that indicates the nozzle was a hair too close; simply adjust Z offset by +0.05 mm. Conversely, if the bottom is not fully filled in, go a bit closer. PLA is forgiving here.
-
Adhesion and Warping: PLA typically doesn’t warp, so even large flat prints hold down well on the heated bed. Use a brim only for very small contact area parts if needed. The auto-leveling helps large PLA prints maintain even adhesion across the plate – you won’t get one side too squished and another barely touching, as sometimes happened on manual-level printers.
-
Multicolor PLA: The Kobra 3’s multi-color prowess really shines with PLA. PLA is ideal for multi-color because it cools fast and holds shape (so the purge and wipe clean the nozzle nicely). The color transitions between PLA filaments are usually crisp as long as the purge volume is sufficient. The waste purge may produce little PLA strings; once dialed in, the transitions are clean with no unwanted blending. One thing to watch out for is ooze during toolchanges: if the idle nozzles (there’s only one nozzle but the idle filaments in the hotend) ooze a bit, that’s what purging clears. PLA’s viscosity is such that the default routines handle it fine. If you ever see a tiny bit of previous color in your print, you might need to increase flush volume slightly. But given the ability to adjust mid-print, you can correct that on the fly.
-
PLA Cooling and Layer Bonding: The powerful cooling ensures PLA prints have great detail, but too much cooling can sometimes make layer bonding weaker. The default profile balances this – typically 100% fan after first few layers. If you print something requiring extra strength, you can lower the fan to 50% to increase inter-layer adhesion, at the cost of a bit more stringing or less crisp overhangs. Generally, though, PLA parts from the Kobra 3 are strong enough for intended uses (PLA is brittle compared to other plastics, but prints from this machine won’t be any more brittle than normal PLA prints).
PLA Summary: Expect near-perfect results with PLA. It’s the material that will likely give you the least hassle and the highest print speeds. Beautiful multicolor models, precise miniatures, prototypes – all of these in PLA will benefit from the Kobra 3’s precision and speed.
PETG – Polyethylene Terephthalate Glycol
PETG is a popular material for functional prints because it’s tougher and more temperature-resistant than PLA, though it can be trickier to print due to stringing and needing just the right amount of cooling. The Kobra 3 handles PETG quite well, with a few considerations:
-
Print Quality: PETG prints on the Kobra 3 come out with strong layer adhesion and a slightly glossy finish (as is common with PETG). The printer’s stable temperature control and enclosed filament path (especially with the ACE’s drying) mean PETG extrudes consistently. You can achieve very smooth walls, but PETG tends to show more strings or wisps if not tuned. With the direct drive and good retraction settings, stringing is minimized but you might still see a hair or two between towers. The part cooling can be dialed down for PETG (it usually likes about 30-50% fan to avoid cooling too fast and becoming brittle). The default PETG profile in Anycubic Slicer likely accounts for this. Layers at 0.2 mm look good; PETG doesn’t love extremely fine layers as much, but 0.2 is a sweet spot for strength and detail.
-
Speed: PETG typically prints slower than PLA to get the best quality. However, the Kobra 3 can push PETG faster than many printers because of input shaping and good extrusion control. Still, you might not want to run PETG at the machine’s top speed, because PETG is stickier and can cause more nozzle build-up if flung around too fast. Users found that default PETG speeds (maybe around 80 mm/s perimeters) sometimes were a bit high for perfect results – slowing to ~60 mm/s gave slightly cleaner outcome for intricate PETG prints. Large PETG prints (like big enclosures or functional brackets) can be done at moderate speed and they will benefit from the large bed and even heat.
-
Adhesion and Warping: PETG sticks very well to PEI when hot – in fact sometimes too well. A trick is to use a glue stick layer on the bed when printing PETG. The glue acts as a release agent to ensure PETG doesn’t fuse to the PEI. Many PETG users lightly coat the print area with a washable glue stick (like Elmer’s) and then print; after the print, the piece pops off more easily and the glue washes off. The Kobra 3’s bed at ~75°C is usually sufficient for PETG adhesion without warping. Warping isn’t a big issue with PETG except in very cold rooms or small contact areas. The auto-level again ensures first layer is even. If you get elephant foot on PETG first layers, lower the bed temp slightly or reduce first layer squish – PETG flows a bit more when hot.
-
Stringing and Ooze: PETG is notorious for stringing. The direct drive plus tuning can reduce it. Retraction in the profile might be around 0.8 mm @ 40 mm/s. That should handle most strings. If you still see many fine hairs, you can increase retraction distance a tad or lower print temp slightly (but too low and PETG will underextrude or have bonding issues). Another measure is to utilize the slicer’s “coasting” or “wipe” settings which stop extrusion slightly early before travel moves. PrusaSlicer’s default PETG profile often uses a bit of wipe to clean the nozzle. Check if Anycubic’s profile includes that.
The Kobra 3’s input shaping doesn’t directly reduce stringing, but the stable extrusion (due to pressure advance calibration) helps avoid blobbing, which is part of the battle.
-
Multicolor PETG: Multi-color printing with PETG is possible, but it’s less common than PLA since PETG is more for functional parts usually one color. If you do try multi-color PETG, be aware PETG oozes more and might need a larger purge. Also, PETG filaments often have slightly different viscosity by color, so dialing flush volume might take some tweaking for really clean swaps. And critically, PETG should not be run through the ACE’s gears if it’s flexible or too soft when warm – but PETG is rigid, so that’s fine. The ACE’s dryer will keep PETG dry which is great (PETG can absorb moisture leading to popping). So multi-color PETG prints should come out fine quality-wise; just prepared for some purge waste and possibly minor stringing at color seams if not fully purged.
-
Strength: The Kobra 3’s excellent layer registration and consistent extrusion means PETG parts have great structural integrity. Layer adhesion is typically very strong (especially if fan is moderate). If you print something like a bracket or spare part in PETG, expect it to be very sturdy. Just make sure to allow PETG parts to cool before removing; pulling them off hot can distort them.
PETG Summary: The Kobra 3 can produce high-quality PETG prints with strong mechanical properties. It may require a bit more tuning for stringing and slightly slower speeds than PLA to get the absolute cleanest results, but overall it’s up to the task. Use the recommended settings, keep filament dry, and you’ll get functional parts that look good, with only minimal post-print cleanup (maybe a quick pass of a heat gun to remove fine wisps if you’re picky).
TPU – Thermoplastic Polyurethane (Flexible Filament)
TPU and other flexible filaments are often a challenge for Bowden printers, but a direct drive like the Kobra 3 makes them much easier to handle. TPU is useful for prints that need to be rubbery – gaskets, phone cases, drive belts, etc. The Kobra 3 supports TPU (Shore hardness around 95A typically) with some important adjustments:
-
Print Quality: TPU prints will be dimensionally accurate and consistent on the Kobra 3 as long as extrusion is controlled. The direct-drive extruder feeds the flexible filament without the usual buckling that would happen in a long Bowden tube. Layers in TPU bond well (TPU tends to have excellent layer adhesion), so parts come out very strong in tear resistance. The surfaces of TPU prints might not be as smooth/shiny as PLA; they often look a bit matte or have microstrings (like little hairs). With tuning, you can reduce stringing a lot. The output quality is heavily influenced by speed and cooling for TPU.
-
Speed: TPU likes slow print speeds. This is crucial. The default TPU profile will probably set something like 30 mm/s or even 20 mm/s for perimeters, and fairly low acceleration. If you try to print TPU fast, you’ll get underextrusion and mess because the filament will compress and spring causing uneven feed. On the Kobra 3, some advanced users have managed moderately higher speeds (maybe 40-50 mm/s) with a firmer TPU, but if you’re using a very soft TPU (85A or 95A), keep it slow for best results. In the earlier part of this review, we noted a user had to slow volumetric flow to about 7 mm³/s to get good layer adhesion on TPU – that equates to quite slow head movement with a 0.4mm nozzle (for instance, 20 mm/s at 0.28 layer height, or 40 mm/s at 0.14 layer height). So yes, slow and steady wins the race with flexibles.
-
Retraction and Stringing: TPU is prone to stringing because it oozes and also because retraction is less effective (the filament stretches rather than cleanly pulling out melt). The Kobra 3 profile likely uses a small retraction (maybe 1 mm or less) and lower speed to avoid ripping filament. You will likely see some stringing no matter what; the goal is to minimize it. Using the wipe setting can help – letting the printer wipe the nozzle at the end of loops can reduce strings. Additionally, cooling helps solidify the filament to stop oozing, but too much cooling can hurt layer bonding. It’s a balance. The user who printed a TPU gasket noted needing to slow down significantly to get good layer adhesion; also sometimes turning off part cooling fan entirely for first few layers (to ensure strong bonding) and then on low (like 30%) for the rest can work.
-
Bed Adhesion: TPU generally sticks well to PEI, sometimes too well. A bed temp of 50°C is often enough. If TPU is sticking too aggressively (can happen with some blends on PEI), use a tiny bit of glue stick to ensure easy release. But usually it’s fine. TPU doesn’t warp. One thing to watch: if printing very flexible TPU slowly, it can sometimes sag a bit on overhangs because it stays rubbery longer; cooling fixes that. For bridging, TPU is poor – it will droop a lot, so design with minimal bridging or use supports for horizontal spans.
-
Multicolor TPU? Realistically, TPU should not be run through the ACE multi-filament unit. The ACE’s internal feed gears can tangle a soft filament (as noted by testers – TPU can wrap around gear if not kept taut). Also, the filament path with multiple tubes is not really designed for flexibles. If you want to print something in two colors of TPU, you’d likely be better off printing separate parts and assembling, or manually changing filament mid-print (which can be done by pausing at height – though that risks stringy transitions). The Ace’s own documentation implies TPU can be dried in it but not fed. So consider the Kobra 3 effectively a single-filament printer when it comes to TPU. You can still utilize the direct drive, just feed the filament directly from the spool (some have even bypassed the extruder PTFE tube for very soft filaments by feeding right into the gear, but the short guide tube provided should be fine).
-
Quality of TPU Prints: With correct settings, you’ll get flexible parts that match your model’s design – accurate dimensions, decent surface finish. Small imperfections like fine stringing can be trimmed with snips or even singed away carefully with a lighter or heat-gun (just a quick pass, not to melt the part but to shrivel tiny hairs). You might notice the bottom layer of TPU prints has a very smooth shiny finish from the PEI sheet – looks great and provides friction if that’s a functional surface (like a phone case interior). The top layers sometimes turn out a bit less smooth because TPU doesn’t flatten out as nicely (it’s like trying to trowel rubber); you can improve top finish by printing an extra top solid layer and possibly a slower top layer speed.
TPU Summary: The Kobra 3 can definitely handle flexible filaments, which opens up a lot of project possibilities. The key is to slow down and be patient with TPU prints. Expect longer print times and do some test cubes to dial in retraction and speed for your specific TPU brand (since different TPUs can behave slightly differently). The payoff is you’ll get reliable flexible parts without the nightmares Bowden users often face. Just remember to treat it as a single-filament scenario – multi-color flexibles aren’t the forte here.
ABS, ASA, and Other Materials
The base Kobra 3 isn’t explicitly marketed for ABS or ASA, mostly because it’s an open-frame design and those materials benefit from an enclosure to keep warmth in and avoid warping and cracking. However, thanks to the 300°C hotend and heated bed, the printer can extrude ABS/ASA and similar high-temp filaments. Here’s what to consider:
-
ABS/ASA Printing: If you try to print ABS or ASA on the Kobra 3 open-frame, small parts can succeed (especially ASA, which is slightly less warp-prone). The bed can go to 100°C; use that full heat to help adhesion. Turn off or very low the part cooling fan (ABS prefers no fan after the first layer). You might need to use brims and maybe enclose the printer loosely (some build a DIY enclosure or even drape a large cardboard box or thermal blanket around – taking care not to cover electronics fully). The ACE Pro unit’s drying feature supports ABS, meaning it can keep the filament dry and warm up to feed better. But controlling ambient temp is on you.
-
Quality and Warping: Without an enclosure, ABS prints may warp or delaminate if they are large or have sharp corners. If you must print ABS, consider using the “draft shield” option in the slicer (a single-wall perimeter around the part that blocks drafts) or enclosure. ASA behaves similarly, though ASA is a bit more UV resistant and maybe slightly easier to print than classic ABS. Print quality if successful can be good – Kobra 3’s precision means ABS parts will be dimensionally accurate and smooth (ABS can yield very smooth prints, especially if acetone vapor smoothing is done post-print). But achieving that without warping is the challenge. For functional parts that are medium sized, you might have success especially if your room is warm and not breezy.
-
Nylon, PC, etc.: These are more advanced materials that need even higher temps and enclosures. The Kobra 3’s hotend can reach nylon/PC temperatures (250-280°C for most). The ACE Pro can dry nylon and PC (it lists PA, PC among materials it supports drying). However, printing nylon on an open frame will almost certainly require an enclosure and maybe a garolite bed or glue because nylon warps a lot and doesn’t love PEI as much (though with glue it can stick). Unless you add an enclosure and perhaps slow down and use brim, printing large nylon parts will be difficult. It’s not the core use-case for this printer, but technically possible for small parts or with modifications. Also, one must note: the Kobra 3’s Bowden tubes feeding from ACE are PTFE, which will degrade at very high temps, so printing materials that need 280-300°C could risk the PTFE lifespan if done a lot. For one-off prints it’s fine, but continuous printing at 290°C may eventually require replacing the PTFE tubes feeding the extruder (the heat doesn’t travel far up, but it’s something to keep in mind).
-
Material Compatibility Recap (from specs): The official spec earlier said: “Kobra 3 only supports PLA, PETG, TPU. ACE PRO supports PLA, PETG, ABS, ASA, PET, PA, PC, PP, HIPS.” This is interesting – it implies the base printer profiles are for those three, but if you have ACE Pro (and presumably the idea you might enclose the printer or at least benefiting from dried filament), you could try all those materials. PP and PC are very tricky indeed (PC absolutely needs enclosure, PP often needs special bed sheets like polypropylene build plate or tape to stick). HIPS prints like ABS (and is usually used as dissolvable support for ABS). If someone is doing multi-material with HIPS and ABS, they likely have a very advanced setup. In short, the Kobra 3 hardware is capable, but these exotic materials are far beyond what a casual user would attempt on an open machine. If you truly need to do them, consider building an enclosure or limiting to small parts.
-
One more: High-speed PLA (“Bambu Lab PLA” etc): Some high-speed PLA or PLA+ filaments exist that can handle faster flow without stringing. The Kobra 3’s cooling and motion control pairs nicely with such filaments – you could push them for even faster prints. Also, silk PLA and matte PLA etc. – they all print fine on Kobra 3 as they would on any good printer. No issues reported specifically; just follow typical guidelines (silk PLA might need slightly higher temp, matte PLA might need slower cooling to avoid layer lines, etc).
Print Quality Summary across Materials: The Kobra 3 produces excellent prints in the recommended materials (PLA, PETG, TPU) when appropriate settings are used. The quality is consistent and high, rivaling printers much more expensive – this is because the fundamentals (frame rigidity, precise movement, and good extrusion control) are there. Multi-color printing doesn’t degrade base quality; if anything, it adds the complexity of purge but otherwise the layers are as solid and detail as crisp as single-color.
In the next part, we’ll turn to the maintenance routine and spare parts/longevity aspects to ensure the printer continues to produce top-notch prints for years.
Maintenance, Spare Parts, and Longevity
Like any piece of machinery, the Anycubic Kobra 3 benefits from regular maintenance to keep it in peak condition. Fortunately, maintenance on this printer is straightforward, and Anycubic provides guidance on what to do and when. In this section, we’ll outline a typical maintenance routine, discuss the availability of spare parts (and which ones you might want to have on hand), and touch on the overall longevity you can expect from the Kobra 3 with proper care.
Routine Maintenance Tasks
Here are the main maintenance tasks for the Kobra 3 and how often to do them:
-
Bed Cleaning: Keep the print surface clean. After many prints, especially with PLA, you might get a thin film of residue or fingerprints that can impact adhesion. Cleaning the PEI spring steel sheet with >90% isopropyl alcohol on a lint-free cloth after every few prints is a good habit. For stubborn marks (like PETG residue or glue stick), you can wash the plate with warm soapy water, rinse, dry thoroughly, and reinstall. Avoid scratching the surface with metal tools.
-
Nozzle and Hotend Cleaning: Over time, a bit of filament can build up around the nozzle or on the hot block, particularly if any small leaks or oozes occur during printing. When the nozzle is warm (but not too hot to risk burning filament on), wipe off plastic blobs with a cloth or use tweezers. The Kobra 3’s silicone sock (if it has one on the heater block) keeps most drips off the block, but inspect it. Replace the silicone sock if it’s torn or coated in burnt plastic. Also, perform cold pulls periodically to clean the nozzle interior: heat nozzle to ~220°C, insert a bit of cleaning filament or nylon, then cool to ~90°C and pull it out, bringing debris with it. This helps prevent clogs. Given the quick-change hotend, some might skip this and just swap nozzles if performance degrades, but it’s good practice nonetheless.
-
Lubrication: As the official manual suggests, lubricate the Z-axis lead screws every few months (depending on usage). A light application of lithium grease or a synthetic grease recommended for lead screws works well. Clean off old grease first. For the X and Y metal rods (“double metal spindles”), apply a few drops of light machine oil or a PTFE-based lubricant along the rods, then move the axes to distribute. Do this about once a month if you print very frequently, or every few months for light use. Proper lubrication ensures smooth motion and reduces strain on motors. Avoid over-lubricating (no dripping oil onto the belts or electronics).
-
Belts and Tension: Occasionally check the belt tension by plucking them – they should feel taut like a firm rubber band, not loose. If you notice ringing or slop in motion, maybe a belt stretched a bit. Use the tension knobs to adjust. Don’t over-tighten, which could wear motor bearings; just remove slack. Also ensure the pulleys on the stepper shafts are secure (set screws tight) – if you hear any slipping or see layer shifts, a pulley might be loose.
-
Wheel/Linear Rail Check: If you notice any wobble or play in the X-carriage or heatbed, check the V-wheels. Use the eccentric nuts to gently tighten if needed so that wheels roll without slipping but also without being so tight they bind. Usually, this isn’t needed often unless you’ve put a lot of hours and the wheels slightly wore in. The integrated metal rod system should minimize wear, but it’s good to inspect. If dirt or dust accumulates on the rods or wheels, wipe them with a clean cloth. Try to keep the printer in a relatively dust-free environment, or cover it when not in use, to prevent debris buildup on rails and leadscrews.
-
Fans and Electronics Cleaning: Ensure the electronics cooling fan in the base is not clogged by dust. Every few months, blow out or vacuum gently any dust from the control board area (unplug the machine first). Same for the PSU intake if it has a vent. The part cooling fan and hotend fan can get bits of filament or dust – inspect and clean carefully (tweezers to remove any strings caught, etc.). Quiet operation and proper cooling depend on these fans, so keep them in shape.
-
Filament Path Maintenance: For the ACE Pro unit (if used), empty the dessicant packs occasionally and recharge or replace them to keep filament dry. Clean any filament debris out of the ACE’s feeder slots. In the extruder, once in a while check the gears for filament shavings – open the extruder idler (if accessible) and use a small brush or canned air to remove any grindings.
-
Firmware and Software Updates: It might not seem like maintenance, but keeping your firmware and slicer up to date is wise. Manufacturers often release updates that fix bugs or improve performance. For example, if a new firmware appears that adds a feature or prevents an error, installing it will maintain the printer’s reliability. The Kobra 3 can likely update via a file on USB or through the app (Anycubic might push firmware via cloud). Follow Anycubic’s instructions when updating. And always slice with a profile that matches the firmware capabilities.
-
Calibration Checks: After many prints or a big move of the machine, it doesn’t hurt to re-run auto bed leveling and perhaps vibration calibration to ensure nothing’s drifted. If prints still look fine, it’s not strictly needed, but a periodic check ensures the printer’s compensations are current. For example, if you moved the printer to a new table that’s not perfectly level, re-run auto-level to recalibrate Z plane. Or if you tighten belts significantly, re-run input shaping calibration since the resonant frequency might change slightly.
-
Replace Consumables When Needed: The Kobra 3 has a few parts that can be considered consumable: nozzles/hotend, the purge wiper brush, and maybe the PEI sheet over a long term. If the purge brush gets gunked up with hardened plastic and isn’t effective, replace it (Anycubic’s spare parts or even a DIY bit of silicone wiper or brush can work). If the PEI sheet gets a lot of scratches or loses its stickiness after heavy use, you can replace it (they’re relatively inexpensive). Nozzles: since the Kobra 3’s nozzle is integrated, you’d replace the whole quick-release hotend if it’s severely clogged or after many hours (some users do it annually if printing daily, others will go years). But you can also swap just the nozzle insert if possible (need to see if Anycubic sells the nozzle separately from heatbreak or as one piece – likely one piece). The good news is the quick release means replacing it is a 5-minute task, not a fiddly hot tightening job.
-
Hotend Leak Vigilance: Given the initial history, keep an eye out for any filament oozing around the hotend. If you see deposits of burnt plastic on the heater block or a smell of burnt plastic during printing, inspect for leaks. Hopefully, with the updated part, this won’t happen. But should a leak reappear (molten filament seeping out above the nozzle), stop printing and address it (which probably means replacing that hotend under warranty). Better to catch it early than let it ruin the machine or print. The extended 6-month warranty on the hotend covers that, and even beyond, Anycubic or third parties now have improved parts.
Spare Parts Availability
Anycubic generally supports their printers by selling spare components on their website or via resellers. For the Kobra 3, some key spare parts and upgrades include:
-
Hotend/Nozzle assemblies: As mentioned, critical to have a spare if you print a lot. Anycubic provided free replacements for the faulty ones, so many early users have a spare now. Check if the store sells the “Kobra 3 Quick-Release Hotend” as an item. Third-party options might emerge too (like perhaps a Revo conversion or other hotend mod – advanced, but maybe possible).
-
Extruder parts: If the extruder gear or the small cutter blade ever needs replacement, Anycubic’s wiki indicates guides, so they probably supply those components. A pack with the extruder gear, cutter, or filament sensor board might be available. These aren’t likely to fail quickly, but heavy use could dull the cutter (like after hundreds of tool changes, maybe).
-
Belts and Wheels: Standard GT2 belts in needed lengths, or the v-wheel rollers, can be sourced from Anycubic or generic. They are common 3D printer parts. Having an extra Y belt or X belt on hand is not a bad idea (belts usually last years, but if one frays or gets damaged, you don’t want downtime).
-
Fans: Fans can fail after long use. The sizes are known (hotend fan likely 4010 24V, part fan likely 5015 24V radial, PSU fan maybe 60mm or 80mm 24V, board fan possibly 40mm). Anycubic might sell an official fan set, but you can also buy quality aftermarket fans (just ensure same voltage and airflow specs). Replacing a fan is usually plug-and-play.
-
Build Surface: Extra PEI spring steel sheets can be bought. It’s wise to have a second sheet anyway: you can swap a freshly printed sheet out for a spare to start the next print immediately, letting the first one cool off somewhere else – a trick to improve printer uptime. Check if the sheet is proprietary size or if a generic 250×250 sheet fits (likely the latter). Make sure any replacement has proper magnetic compatibility and thickness.
-
Purge Wiper: A replacement purge brush or wiper blade – these might come in a maintenance kit from Anycubic. If not, creative users have fabricated their own using silicone spatula pieces or small wire brushes. It’s minor but good to maintain for cleaner color changes.
-
Electronics: It’s less common to need to replace a mainboard or touchscreen unless something goes wrong. But if you ever do, going through Anycubic support is the best bet, as they can provide the exact board (with firmware) or screen. Community-driven alternatives (like a custom Klipper board) are possible but outside the typical scope. Anycubic’s one-year warranty on the printer covers failures, so if the board died prematurely, you’d get support for that.
The Kobra 3 being a relatively new model means spare parts might initially only be via Anycubic directly, but given time, places like Amazon, local distributors, or 3D printer part shops often carry them. It’s always a good idea to check the official Anycubic website for a “Parts Store” section for your region.
Longevity Expectations
With proper maintenance, the Kobra 3 should provide years of reliable service. Let’s consider the main components and their lifespan:
-
Frame and Structure: Indefinite lifespan. The metal parts won’t degrade (aside from cosmetic wear). As long as you keep screws tight and free of rust (if in humid areas, a light coat of oil on exposed steel rods can prevent rust), the frame will outlast most other parts.
-
Motors: Stepper motors typically last a very long time (many thousands of hours) if not overloaded. The Kobra 3’s motors run within normal loads. It’s rare for a stepper to fail; usually the bearings or driver electronics would go first. It’s not something to worry about for years.
-
Electronics: Mainboards can last years as well. Quality boards under proper cooling don’t spontaneously fail. The touch panel likewise should work for countless presses.
-
Hotend/Nozzle: The nozzle will gradually wear, especially if printing abrasive materials (carbon fiber, glow-in-dark, etc.). With mostly PLA/PETG, a brass nozzle can print for hundreds of hours and only show slight wear. Hardened steel gear in extruder means that part at least is built to last. The heatbreak and heater, if not abused, can last extremely long too. Thermistor and heater cartridge might one day fail due to thermal cycling (maybe after several years of heavy use). Those are easily replaced parts.
-
Belts and Bearings: Belts may stretch or dry out eventually (talking multi-year horizon). When that happens, replacing them renews the axis precision. The linear bearings or wheel bearings might develop a little play after very prolonged use; again, an easy swap to refresh if needed.
-
Miscellaneous: Rubber feet, plastic covers, etc., could degrade physically, but that’s trivial to fix or ignore.
Basically, the Kobra 3 is built robustly enough that nothing stands out as a “this will break after X hours” kind of weak point (once the hotend issue was resolved). Users who have put, say, 500+ printing hours on it in the first couple of months reported it continued performing well aside from doing the hotend replacement and minor tweaks. It’s realistic to expect the printer to run many thousands of printing hours over its lifetime. That could easily mean 5 or more years of moderate use. With upgrades and occasional part replacements, it could last a decade.
It’s also supported by a community, which helps longevity. If something weird goes wrong outside warranty, chances are someone found a fix or a workaround (e.g., printing a replacement bracket, or adapting a generic part).
One area affecting longevity is how it’s handled. If you frequently move the printer or travel with it to workshops, etc., mechanical alignment could be disturbed more often – but then you just re-calibrate. Keep the printer in an environment that’s not too dusty, not overly hot or cold, and free from power surges, and it will thank you with long service.
In summary, the Kobra 3 is not a disposable gadget – it’s an investment that, cared for properly, will continue churning out quality prints well into the future. The combination of good build, available parts, and an active support network means you won’t be left stranded. And even as new printers emerge (technology moves fast), the Kobra 3’s feature set is advanced enough that it should remain relevant for a long time. You have multicolor, high speed, etc., so it won’t feel obsolete any time soon.
After covering maintenance and longevity, let’s move on to the human side of ownership: the community support and resources available, and the manufacturer’s ongoing support in terms of firmware and service.
Community Support and Resources
Owning a 3D printer is not just about the machine itself, but also about the community and support ecosystem around it. In the case of the Anycubic Kobra 3, you’ll find a growing community of users, plenty of online resources for help and inspiration, and a responsive manufacturer backing the product. This section outlines the forums, groups, and knowledge bases that Kobra 3 owners can tap into, as well as what to expect from Anycubic in terms of customer support and firmware updates.
Online Communities and Forums
From the moment the Kobra 3 was announced, 3D printing enthusiasts began discussing it on various platforms. Here are some key places to connect with fellow Kobra 3 users:
-
Reddit (r/Anycubic and r/AnycubicOfficial): Reddit has an active community of Anycubic printer owners. The subreddit r/Anycubic is an unofficial forum where people share their experiences, ask questions, and help each other troubleshoot. You’ll find threads specifically about the Kobra 3 – users posting print successes, issues, mods, etc. The r/AnycubicOfficial subreddit is (as the name suggests) an official or semi-official channel where Anycubic staff sometimes engage. This can be useful for announcements or getting some direct attention on a problem. Browsing these subreddits, you can see real user feedback and solutions. For example, early on people shared tips for improving multi-color purge efficiency, or posted images of their prints and the community chimed in with advice if something was off.
-
Facebook Groups: There are often Facebook groups for specific printer models or brands. A quick search for “Anycubic Kobra 3” on Facebook will show if there’s a dedicated group. Many general Anycubic or 3D printing groups also welcome Kobra 3 discussions. These groups are useful for quick help; they have a broad range of users from beginners to experts. People frequently post pictures of their prints asking for advice on settings, or share STL files for useful mods (like spool holders, braces, fan ducts, etc.). The tone in such groups is typically supportive – just remember to use the search function as your question might have been answered already.
-
Anycubic Official Forum/Support Center: Anycubic’s own website often has a support section or forum. They have an official Support Center where you can submit tickets for help, but they also host a knowledge base. The Anycubic Wiki is a treasure trove of information. For Kobra 3, the wiki lists assembly guides, troubleshooting tips, FAQs, replacement guides, etc. It’s essentially the official documentation hub. Reading through the FAQ section on the wiki can answer common questions (e.g., “How do I know if my nozzle is leaking?” or “What do I do if the filament runout sensor triggers incorrectly?”). When a new firmware or slicer version is released, the wiki often gets updated instructions too.
-
YouTube and Bloggers: Several tech reviewers and 3D printing hobbyists have reviewed the Kobra 3 on YouTube or their blogs. Channels like Tom’s Hardware (Denise’s review), TechRadar, and YouTubers focusing on multi-color printing might have content specifically showing the Kobra 3 in action, how to set it up, and comparisons. Watching these can be educational. Also, as time goes on, you’ll find YouTube tutorials for tasks like “How to calibrate flush volume on Kobra 3” or “Installing Klipper on Kobra 3” (there’s likely an adventurous group working on alternative firmware – only for advanced tinkerers!). These user-created resources greatly supplement official guides.
-
3D Model Repositories & Prints: Community support also includes things like Printables, Thingiverse, Yeggietc., where you can find custom parts for the Kobra 3. For instance, common mods such as a filament “poop bucket” (to catch purge waste), an alternate camera mount, tool holders, or enclosures for the ACE unit. Often, early adopters design and share accessories to improve the printing experience. A quick browse on Printables for “Kobra 3” shows items like PSU covers, filament guides, etc. This not only saves you time (you can just download and print an upgrade someone else designed), but it also demonstrates how active the community is.
-
Discord or Chat Groups: Some enthusiasts form Discord servers or Telegram chats around certain printers. While not as widely advertised, if you like real-time discussion, see if any exist for Anycubic owners. It can be a quick way to get answers or just geek out about printing topics.
Manufacturer Support and Firmware Updates
Anycubic, as an established manufacturer, provides multiple support channels:
-
Customer Support Tickets: If you encounter a problem that seems like a defect or you can’t solve through community advice, you can directly contact Anycubic via their support email or ticket system. They typically respond within a couple of business days. For example, during the hotend leak issue, many users reached out and Anycubic arranged the free replacement shipments fairly promptly. They may ask for purchase info, photos of the issue, etc., to process warranty claims. The Kobra 3 comes with a standard one-year warranty (and some parts like the hotend had extended six months as noted). Users have generally reported that Anycubic honors their warranties by sending parts or sometimes even a whole printer replacement if needed.
-
Firmware Updates: The Kobra 3’s firmware (and the Anycubic Slicer software) have already seen updates since launch. Anycubic announced that things like the Z-offset adjustment and OrcaSlicer profile would come via updates – and indeed, they delivered profiles and presumably firmware tweaks. Keep an eye on the official Anycubic site’s Downloads section or news blog for firmware files. Usually, updating involves putting a file on USB and selecting update in the menu, or through the slicer if it’s integrated. Always follow official instructions for firmware updates to avoid any issues. As of now, the Kobra 3 firmware is mostly closed-source (it’s a custom OS), but Anycubic did release partially the config or at least cooperating with users for improvements (like open-sourcing profiles). They’ve shown willingness to improve the product post-release, which is a good sign for longevity.
-
Future Upgrades: The Kobra 3 is already high-spec, but Anycubic is likely to continue the “Kobra” line. They even mention a Kobra 3 V2 or such in tags. It’s possible they will release an improved version in future (maybe addressing any remaining gripes or adding features). However, typically they won’t forget the existing owners – firmware updates might bring some of the improvements to your unit if hardware permits. For example, if Kobra 3 V2 had better filament management, maybe a firmware can improve current purge sequences for original owners too. This is speculative, but it aligns with how companies often proceed.
-
Accessories: Manufacturer support also includes making accessories available. For instance, if you bought the standard Kobra 3 but later want multi-color, can you buy the ACE Pro unit separately? Yes, Anycubic sells the Kobra 3 Combo which includes ACE, and they have offered ACE Pro as an add-on. They might sell it standalone as an upgrade kit. Similarly, if they come out with a new module (like a laser engraver head or something – not that it’s announced, but some printers have add-on modules), they would likely make it compatible or offer to existing users.
-
Documentation and Tutorials: Anycubic’s official YouTube channel or site might have tutorial videos (the manual PDF even referenced an installation video via QR code). Check those out if you prefer visual guides – they often cover initial setup, leveling, etc. Also, after major updates, Anycubic sometimes posts guides on how to use new features (like “How to use Anycubic Cloud” or “Binding your printer to app”).
-
Frequent Q&A: The manual and FAQ answer a lot, but if something puzzling comes up, the first step is often checking those resources. For example, a common question might be: “Can I print with only one filament loaded in multi-color mode?” (Answer: yes, you can use just one or two colors, just tell the slicer accordingly). Or “What does error code X mean on the screen?” (The wiki likely has an error code list, such as thermal runaway, sensor error, etc.). Having quick access to these answers (via manual or forum search) saves time.
Knowledge Sharing and Advanced Tips
The community isn’t just about troubleshooting; it’s about pushing boundaries and sharing advanced tips:
-
People share slicer profiles that they’ve fine-tuned for specific tasks (e.g., a profile for super fine 0.1mm miniatures, or one for rapid draft printing).
-
Some may share start/end G-code tweaks that optimize purge or bed handling. For instance, a user might create a custom start code that purges a line at the bed edge before printing starts (common in many printers to prime the nozzle). If Anycubic’s default start code doesn’t do that, someone will have posted how to add it.
-
Enthusiasts might also hack around limitations – e.g., enabling local network printing by some method, or integrating OctoPrint. Already on the OctoPrint forums there was a discussion on the Kobra 3, about it only working via cloud or USB stick and not having a normal serial port. Somebody might develop a plugin or a workaround (like transferring files to the internal storage via network, etc.). If you’re the type who likes to customize, the community likely will produce instructions on those advanced mods.
-
Modding Community: On top of that, modders are always active. If you want to upgrade the printer’s hardware (say swap to an all-metal Revo nozzle, or change the fans to quieter ones, or add LED lighting), chances are someone’s done it and shared the process. There might even be a dedicated thread “Kobra 3 Mods and Upgrades” on forums.
-
Print Showcases: The positive side of community is also seeing what others have printed. It can be inspiring to see multi-color figurines, or highly detailed models printed quickly. It helps set realistic expectations of what you can achieve and gives ideas for your own projects. Many people upload their sliced multi-color files or model setups – you might find ready-to-print multi-color G-codes for certain popular models (though caution using someone else’s G-code, ensure it’s for Kobra 3 exactly due to purge settings etc). Safer is they share the 3MF project file which you can slice yourself.
In essence, buying a Kobra 3 plugs you into a network of knowledge. Don’t hesitate to leverage it. If you hit a snag at 2 AM, a quick search on Reddit or a scroll through a Kobra Facebook group might reveal someone else had the same issue and got an answer. And when you gain experience, you can give back too – share your successes, your beautiful prints, your tips for newbies. 3D printing communities thrive on that collaborative spirit.
Finally, after exploring everything from hardware to community, we’ll wrap up with a conclusion that summarizes the Kobra 3 experience and its place in the 3D printing landscape.
Modding and Upgrade Potential
The Anycubic Kobra 3 is impressively well-equipped out of the box, but that doesn’t mean there isn’t room for personalization and enhancement. Many users enjoy modding and upgrading their 3D printers to better suit their needs or to push performance even further. In this section, we’ll discuss some of the potential modifications and upgrades that Kobra 3 owners might consider, from simple printed add-ons to hardware swaps. Remember, any modification is optional – the Kobra 3 doesn’t need these to function excellently – but they can be fun projects or targeted improvements for advanced users.
Printable Upgrades and Quality-of-Life Mods
One of the easiest ways to customize the Kobra 3 is by printing your own accessory parts. Thanks to the active community, a variety of printable upgrades are already available. Some popular ones include:
-
Filament Purge Bucket/Guide: As mentioned earlier, a “filament poop bucket” or guide can be placed under the purge wiper to catch the extruded filament and keep it from making a mess on your printer or floor. Users have designed small containers or chutes that clip onto the frame near the wiper to collect the purge strand. This keeps your workspace tidier and makes cleanup easier – just empty the bucket of purge bits occasionally.
-
Spool Holders and Adapters: The stock spool holder works fine for a single spool, but some people prefer top-mounted spool positions or different orientations for smoother feeding (especially if not using the ACE box). There are printable spool holder arms or adapters that let you mount a spool on top of the gantry or on a side bracket. Additionally, some print spool guides or bearings to reduce drag. If you primarily use the ACE, this is less relevant, but for single-spool use, customizing spool placement can sometimes help filament feed more consistently, particularly with flexible filaments or if you have a filament drybox.
-
Camera Mount: If you want to keep an eye on prints or create time-lapse videos, adding a camera is popular. You can mount something like a Raspberry Pi camera or even an old smartphone to watch the printer. Printed camera mounts (for instance, a bracket that attaches to the frame or the ACE box) let you get the perfect angle. Some are designed specifically to fit popular webcams or the Anycubic camera module.
-
Tool Holders and Drawers: Many printers have community-designed tool trays that attach to the frame, giving you a convenient spot to store Allen keys, nozzle cleaners, tweezers, etc. Considering the Kobra 3’s base is fairly large, some have created a drawer that slides into the base slot or a side-mounted tool caddy. These organizational mods make maintenance and operation a bit more convenient (no more misplacing that one Allen wrench you need!).
-
Fan Duct Upgrades: The Kobra 3’s cooling is already strong, but hobbyists often tinker with fan duct designs to optimize airflow or reduce noise. A custom part cooling duct might distribute air more evenly around the nozzle or concentrate it differently for certain print scenarios. There are designs like dual-duct (on both sides of the nozzle) or more aerodynamically shaped ducts. Proceed with caution on such mods – any change in cooling can alter print results, so verify that an upgrade is indeed beneficial via community feedback before reprinting it.
-
Enclosures or Draft Shields: While not a printed mod, building an enclosure around the printer is an upgrade for those who want to print ABS or just contain noise and fumes. There are plenty of DIY solutions using IKEA Lack tables or acrylic sheets to create a box around printers. The challenge is the ACE unit – if used, it sits outside, feeding filament in, so an enclosure would need an opening for the Bowden tubes. Some creative users have placed both the printer and the ACE inside a large enclosure, or made an overhead mount for the ACE. If you don’t print high-warp materials, you may not need an enclosure, but those interested can find community examples of how to set one up for Kobra 3.
Hardware Upgrades
For the more technically inclined, there are hardware upgrades that can be done:
-
Nozzle Swap (Different Sizes or Types): The Kobra 3 comes with a 0.4 mm brass nozzle (quick-release style). If you want to print faster at the expense of some detail, you could upgrade to a 0.6 mm or 0.8 mm nozzle. Anycubic might offer alternate nozzle modules in the future, or adapters to use standard nozzles. Additionally, one might want a hardened steel nozzle to print abrasive filaments (carbon-fiber, glow-in-dark) without wear. Since the nozzle is integrated into the module, this might require a whole hotend swap to a hardened version if available. Some enterprising users could design an adapter to use E3D nozzles, etc., but that’s speculative. If printing abrasives is in your plan, keep an eye on forums for any solutions.
-
Upgraded Hotend (All-Metal or High-Flow): The stock hotend already is all-metal and high-flow to a degree, so this is more in context of any future improvements. Possibly, a third-party might create a drop-in hotend that uses a different style (like a Phaetus Dragonfly or E3D Revo) with Kobra 3’s mounting. Unless you’re really pushing extremes (like super high-speed with large nozzles, or needing ultra high temps for polycarbonate), the stock hotend is sufficient. But the modding community loves hotend swaps, so it could happen. One reason could be to use an entirely different nozzle ecosystem (like easily swappable nozzles of different sizes).
-
Extruder Upgrades: The extruder is fairly specific due to the multi-filament design, so replacing that outright is not straightforward. However, if one were to forego multi-color and just optimize for single-material performance, an upgrade could be installing a known high-precision extruder like a Bondtech dual-drive or similar. That said, the Kobra 3’s existing extruder is already dual-drive (with hardened gear) by design and handles TPU etc. It’s unlikely you’d need to change it. It’s more likely someone might incorporate a different filament sensor or a filament runout sensor position if they mod the filament path.
-
Klipper Firmware: A significant “upgrade” some enthusiasts consider is switching the printer’s firmware to Klipper (an advanced firmware that runs on an external computer/Pi and can improve performance and provide more customization). There are already hints in the community (like GitHub discussions) of people working to get Klipper on Kobra 3. Klipper could potentially unlock even faster printing through more refined pressure advance and input shaping algorithms (though Kobra 3 already does these things, but Klipper might allow finer tuning). It’s a non-trivial mod requiring tech savvy, but for a tinkerer, running the Kobra 3 with Klipper + Mainsail/Fluidd (the web interface) might be an appealing project. Note: Doing so might void warranty if it involves messing with the mainboard, but often you can revert. This is definitely advanced and not for the typical user who just wants to print; the stock firmware is fine for most.
-
Lighting and Aesthetics: Some like to add LED strips to illuminate the print area. Tapping into the power supply (or using a separate plug) to add LED lighting inside the frame can be a nice quality-of-life upgrade, especially if you enclose the printer. Just ensure any added wiring is tidy and doesn’t interfere with moving parts. Many LED mods are as simple as an LED strip along the top gantry, which can be 3D-printed clipped or adhered.
-
Noise Reduction: If you find the fans too loud, a popular hardware mod is swapping fans for quieter ones (like Noctua fans). For example, replacing the PSU fan with a silent model, or the part cooling fan with a quieter variant (though quiet often means lower airflow – a balance needed). Some have even done water-cooling on printers for extreme silence – that’s very rare and experimental. For most, a carefully chosen fan swap (ensuring same voltage and enough airflow) can cut noise a bit. Vibration isolation feet can reduce the low-frequency noise that resonates through furniture – printing TPU feet or using sorbothane pads under the printer can help if vibration noise is an issue on your table.
-
Expansion (Adding Tools): The Kobra 3’s main board likely has some unused ports (like extra fan or light ports, or a spare filament sensor port). If so, one could add things like a chamber temperature sensor, or extra lighting control, or even another axis for a camera slider. These are creative expansions not mainstream. Another example: Some folks mount a secondary Z endstop or bed tilt sensor if they want to fine-tune leveling differently – though with LeviQ 3.0 that’s unnecessary.
It’s important to note that while modding is fun, each mod should be approached with understanding of potential downsides. Some mods can void warranty or reduce reliability if done poorly. Always read up on others’ experiences; fortunately, the community usually provides that in detail.
ACE Pro Upgrades
The ACE Pro filament feeder/dryer itself has a few mod opportunities:
-
People have printed spool adapters or better rollers for it, to accommodate various spool sizes more smoothly. Some spool reels might be narrower or wider than others, so adapters ensure they don’t wobble or grind.
-
There’s mention of overhead mounting: a user created a bracket to mount the ACE Pro above the printer, feeding filaments down like some other systems. This can reduce the footprint (space taken) and perhaps create gentler filament path curves. However, mounting 4 spools overhead requires secure bracing (it’s heavy when loaded). Still, mods in this direction exist for similar systems (like people modded Bambu’s AMS positioning).
-
Drying enhancements: ACE Pro already heats to dry filament, but some might mod it to hold desiccant boxes or to better seal the lid (for very humidity-sensitive filament like Nylon). A simple mod: printing latches or clips that ensure the lid stays tightly closed, or a port to drop in extra desiccant sachets.
Mod Wisely
The golden rule of modding: If it ain’t broke, don’t fix it. The Kobra 3 performs very well stock, so you don’t need to tear it apart looking for upgrades from day one. It’s advisable to use the printer extensively in its standard configuration first, to identify if there’s anything that truly limits you or any feature you personally want to alter. For example, you might find the print quality and speed perfectly meet your needs, so you focus only on convenience mods like a tool holder and camera mount. Or you might really want to print ABS regularly, so your focus becomes building an enclosure.
Also, tackle one mod at a time and test. That way if something goes wrong, you know the cause. A fully modded machine can be harder to troubleshoot because you’ve deviated from known settings.
Happily, the Kobra 3’s design is mod-friendly: many parts are accessible, and Anycubic’s documentation (with assembly guides, replacement guides) means you have a map of how things fit together, which modders can use to plan changes.
To sum up, the Kobra 3 offers a lot of upgrade headroom for those who love to tinker, but it’s also perfectly fine to run it stock and enjoy consistent results. That flexibility is part of the appeal – it can be a reliable appliance or a hobbyist’s playground.
Tips and Tricks for Optimal Results
Before we conclude, let’s compile some advanced tips and tricks that have come up throughout this review and from the experiences of early Kobra 3 users. These pointers will help you get the most out of your printer, avoid common pitfalls, and solve issues proactively:
-
Perfecting the First Layer: Even with auto-leveling, the first layer is crucial. Take advantage of the first-layer speed and height settings – printing the first layer a bit slower and thicker (e.g., 0.2 mm height when others are 0.15 mm, at 20-30 mm/s) can improve adhesion. Watch the first layer as it goes down. If you see any sign of uneven extrusion, cancel and adjust Z-offset slightly rather than continuing a print that might fail.
-
Adjusting Flush/Purge Volume: When doing multicolor prints, experiment with the flush volume parameter. Start with the default (1.0) and if you notice that after a color change there’s still a tint of the previous color showing up, increase flush a bit (like to 1.2 or so) for that job. Conversely, if you see the purge is overly generous (lots of wasted filament but transitions were already clean), you can dial it down to save material. You can adjust this mid-print on the Kobra 3’s interface during a color change pause, which is a powerful trick: find the lowest flush volume that still yields clean color switches.
-
Using OrcaSlicer for More Control: If you’re comfortable with slicing software, consider trying OrcaSlicer with the Kobra 3 profile. It offers more granular control over purge, and you can utilize features like setting infill to use purged filament (color mixing in infill where it won’t show). Some users have managed to essentially use waste filament within the print object to reduce total waste – an advanced slicing strategy that OrcaSlicer allows. Also, OrcaSlicer’s ironing, support painting, and variable layer height features might give you an edge for certain prints.
-
Regular Calibration Prints: Keep a set of calibration models handy (like a temperature tower, retraction test, and resonance test print). When you change filament brand or type, it’s worth running a quick temp tower to find the ideal nozzle temp for that filament on your machine – sometimes even PLA brands vary a bit. A small retraction test (like two pillars to test stringing) can confirm if you need to tweak retraction settings for that filament (TPU vs PLA especially). The Kobra 3’s input shaping means ringing is minimized, but if you see slight ringing, you could reduce print acceleration a touch or ensure the vibration calibration was recent.
-
Keep Filament Dry: This is especially a tip for PETG, TPU, and Nylon if you venture there. The ACE Pro’s drying function is great – use it. If you’re printing a long job, it’s okay to leave the spools in the ACE’s heated dry mode throughout; it will maintain them at a low warmth to ward off moisture. For spools not in use, store them in airtight bags with desiccant. Dry filament prints much better (less popping, stringing, and more consistent flow).
-
Avoiding Heat Creep in Long Prints: For very long prints in PLA (say over 15 hours), if your environment is warm, consider enabling the “cool down” procedure on filament changes or pauses. PLA staying hot in the nozzle long can sometimes cause a jam (heat creep). The Kobra 3’s extruder has a strong heatsink and fan, so it’s not common, but one safeguard is to have the printer move away and cool the nozzle slightly if paused for a long time (some firmware do this automatically when filament runs out or you pause). Just something to be aware of – signs of heat creep would be filament grinding after a long time because the filament softened too high in the heatbreak.
-
Use the App Notifications: If you connect the printer to the Anycubic app, turn on notifications. It can alert you when a print finishes or if the printer is paused for some reason (filament out, error, etc.). This is very handy if you’re running a print overnight or while away – you’ll know if something needs attention. Also, periodically check the remote camera (if you set one up). Catching a print failure early can save filament and time.
-
In case of Power Loss: If you didn’t invest in a UPS and power blinks, the Kobra 3’s resume might save you. But to improve the chances, avoid opening the printer or moving anything if the power goes out mid-print. When power returns, the printer should prompt to resume. Make sure the bed and nozzle fully reheat before it continues, to avoid layer adhesion issues at the restart point (the firmware handles this, but good to observe). Note that for multi-color prints, resuming might result in a slight blob at the restart if a little ooze happened at loss – you can trim that later or sand it. It’s still better than starting over.
-
Grease Lightly, Not Excessively: When lubricating rods and screws, a thin film is sufficient. Wipe off extra grease because it can attract dust. A clean machine runs better. Over-greasing can also fling grease onto prints or belts. So, when in doubt, a pea-sized amount applied then spread is plenty.
-
Be Mindful of Gantry Level: The dual Z keeps the gantry aligned, but if the printer ever gets knocked or you manually turn a leadscrew, it could go slightly out of sync. A quick manual check: measure from the top of the bottom frame to the bottom of the X gantry on both left and right sides; they should be equal. If not, realign by disabling steppers and gently turning one leadscrew to match. Then home Z and auto-level again. This ensures the two Z motors work evenly and you don’t get a subtle skew. It’s rare to need this unless something physically shifts the machine.
-
Print and Share Test Models: The Kobra 3 is cutting-edge with multi-color, so share your successes! Printing known test models like Benchy (in single and multi-color), a calibration cube, bridging tests, etc., not only helps you fine-tune but also contributes data to the community. For instance, if you manage an 11-minute Benchy (as Anycubic advertised), post about what settings achieved it and how the quality turned out. Community will appreciate it, and you’ll cement your own knowledge.
By incorporating these tips into your workflow, you’ll avoid many common problems and truly unlock the full potential of your Anycubic Kobra 3.
Now, let’s bring everything together with a final overview in the conclusion.
Conclusion
The Anycubic Kobra 3 is a standout 3D printer that successfully marries speed, multicolor creativity, and user-friendly operation in one package. Over the course of this review, we’ve seen that the Kobra 3 offers:
-
High-End Features at a Mid-Range Price: With input shaping for fast, precise printing and an optional 4-to-8 color filament system, the Kobra 3 brings capabilities that until recently were found only on much more expensive machines. It’s no longer necessary to choose between a high-speed printer and a multicolor printer – the Kobra 3 is both.
-
Excellent Print Quality and Versatility: Whether you’re printing a single-color PLA prototype, a flexible TPU gadget, or a vibrant multicolor figurine, the Kobra 3 delivers strong results. The automatic calibration systems (bed leveling, flow calibration, resonance compensation) work together to ensure each print starts off on the right foot and maintains quality throughout. Users of all skill levels can achieve finely detailed prints and strong functional parts with minimal tweaking.
-
Smooth Setup and Learning Curve: From unboxing to first print, the experience is streamlined. Anycubic’s improvements in assembly (pre-assembled frame, clear instructions) and the guidance provided by the touch interface make the Kobra 3 accessible to beginners. At the same time, it has depth and advanced settings for experienced makers to explore. The provided Anycubic Slicer Next software is straightforward for basic use, yet based on powerful PrusaSlicer roots for those who want to dive deeper.
-
Robust Hardware and Reliability: The build quality – sturdy frame, dual Z leadscrews, quality extruder components – gives the Kobra 3 a stable foundation. Aside from the initial hotend issue that was swiftly addressed by Anycubic, the machine has proven to be reliable in continuous use. It’s built to run hour after hour, project after project, without constant babysitting. Features like filament runout detection, power loss recovery, and clog sensing add further peace of mind for long prints.
-
Active Community and Support: Owning a Kobra 3 means joining a growing community of enthusiasts and benefitting from Anycubic’s customer support. Whether you need help troubleshooting, want to show off a multicolor masterpiece, or are looking for mods to try, there are abundant resources and fellow users ready to assist. Anycubic’s commitment to improving the printer via firmware updates and open communication (like providing replacement parts and open-sourcing profiles) indicates that support for the Kobra 3 will remain strong.
-
Room to Grow and Customize: For hobbyists who love to tinker, the Kobra 3 provides a great platform that can be modded and upgraded. But importantly, none of that is required to get great performance – it’s optional fun. Out-of-the-box, the printer is fully capable, so you can spend your time printing rather than tweaking, unless you enjoytweaking.
In everyday use, the Anycubic Kobra 3 proves to be an efficient workhorse and an artistic tool. Hobbyist makers will enjoy drastically reduced print times and the ability to print objects in full color without manual painting. Beginners will find that they can progress quickly from simple prints to more complex projects thanks to the printer’s forgiving features. Professionals and educators will appreciate the blend of speed and reliability – whether it’s pumping out prototypes or demonstrating cutting-edge 3D printing technology in a classroom, the Kobra 3 rises to the challenge.
Is the Anycubic Kobra 3 perfect? No machine is without some trade-offs. The multi-color system, while revolutionary at this price point, does introduce some complexity in slicing and generates purge waste (which diligent tuning can mitigate). Also, like any fast printer, when pushing at the highest speeds, you may need to fine-tune settings to maintain the best surface quality. And being an open-frame design, printing ABS or similarly demanding materials is not its strongest suit unless you make accommodations like an enclosure. However, these are minor caveats in an otherwise outstanding package.
Fundamentally, the Kobra 3 achieves what it set out to do: empower users with speed and color. It embodies the idea that 3D printing is advancing rapidly – prints that used to take days now can be done in hours, and objects that once came off the printer in one color can now emerge in a rainbow. It brings a new level of efficiency and creativity to desktop 3D printing.
For anyone considering this machine, it’s safe to say you’ll be getting a capable and exciting tool. The Anycubic Kobra 3 is equally at home printing a batch of functional parts for a project as it is bringing a multi-colored character to life. It takes the progress of the 3D printing world and puts it on your desk, ready to print bold and print fast.
In conclusion, Anycubic’s Kobra 3 is a triumph of innovation in the FDM 3D printer market. It successfully goes beyond basic “pros and cons” to deliver a holistic, next-generation printing experience. After spending time with the Kobra 3, it’s clear that this printer isn’t just keeping up with trends – it’s helping set them. Whether you’re a hobbyist dreaming up colorful creations, a teacher inspiring students with technology, or a professional seeking rapid prototyping, the Kobra 3 has something to offer you. It’s an investment in a future where your ideas can become reality faster and more vividly than ever before.